

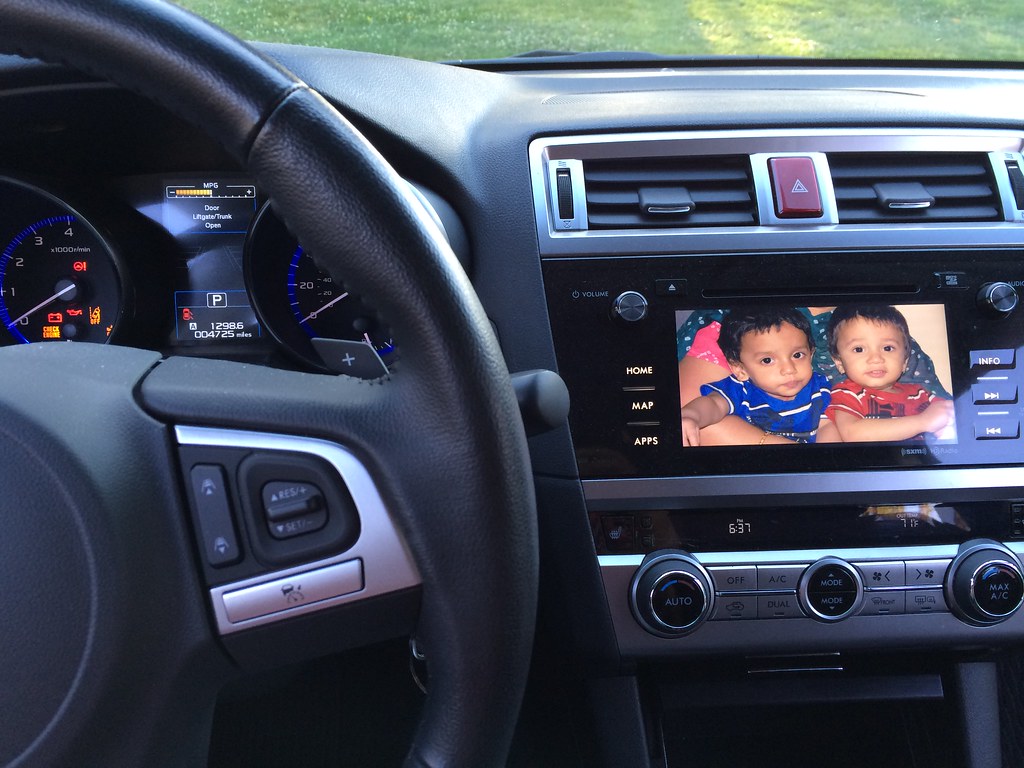
In the modern automotive landscape, your car’s digital screen is far more than just a radio display; it’s the nerve center of your driving experience. From navigation and climate control to infotainment and crucial vehicle diagnostics, these touchscreens are constantly interacted with, making them prime candidates for smudges, dust, and grime. Yet, despite their central role, cleaning these delicate surfaces is often a neglected task, leaving many drivers with cloudy, unresponsive, and visually distracting displays.
A spotless display isn’t just about aesthetics; it’s about safety, functionality, and protecting a significant technological investment. Smudges and glare can create momentary delays when you’re trying to adjust settings or get directions, pulling your focus away from the road—seconds that truly count. Furthermore, improper cleaning or the use of harsh chemicals can lead to permanent damage, stripping protective coatings and compromising touch sensitivity.
This comprehensive guide is designed to empower you with the precise knowledge and practical, step-by-step instructions needed to clean and protect your car’s digital screens like a seasoned professional. We’ll demystify the process, detailing the essential tools, techniques, and common pitfalls to avoid, ensuring your car’s command center remains crystal clear, responsive, and a pleasure to interact with for years to come. Let’s dive in and transform your neglected display into a gleaming highlight of your interior.

1. **Understand Why Cleaning Matters: Safety, Performance, and Investment**
Your car’s touchscreen has evolved into the command center for your entire drive, serving as the nerve center of modern driving. In many newer vehicles, models like the Tesla Model 3, Ford Mustang Mach-E, Rivian R1T, and Volkswagen ID.4 use their displays to manage critical functions such as climate control, navigation, driving modes, and even glovebox access. When smudges, streaks, or dust accumulate, they don’t just detract from your interior’s appearance; they significantly hinder your ability to access the very features you rely on daily.
Clarity and responsiveness are paramount, keeping your focus firmly on the road where it belongs. Smudges, glare, and fingerprints can introduce momentary delays when you’re tapping for directions or adjusting temperature settings, and in the dynamic environment of driving, those precious seconds truly count. A clean, responsive screen enables you to make quick adjustments without breaking your concentration, contributing to a smoother and undeniably safer journey for everyone in the vehicle.
Moreover, it’s about protecting your substantial tech investment. Touchscreens in today’s vehicles are sensitive, high-resolution components meticulously built to respond to the lightest touch. Even seemingly minor elements like small particles of dust or the application of the wrong cleaning solution can create micro-scratches or gradually wear down protective coatings over time. Regular, gentle cleaning performed with the correct products acts as a vital safeguard, protecting your investment and ensuring your dashboard maintains its pristine, like-new appearance for many years to come.
Read more about: Riding That Eight-Year-Old Motorcycle? Here’s What Fellow Bikers *Secretly* Think About You (and Why It Matters).

2. **Always Prepare: Turn Off Your Display and Dust the Interior First**
Effective screen cleaning begins long before the first wipe. A crucial preparatory step is to always ensure your car and its display are turned off, or, if available, put your main touchscreen display in screen cleaning mode. This not only makes smudges and dust more visible against a dark, blank surface, but also completely eliminates the chance of accidental taps or unintended changes to your settings while you’re cleaning.
Beyond just powering down, it’s a good idea to approach screen cleaning as part of a broader interior maintenance routine. The instruction specifies cleaning screens only “after you’ve dusted and vacuumed your interior.” This is a critical piece of advice, as you certainly don’t want dust flying around and settling back onto a freshly cleaned screen. Following a comprehensive dust and debris removal tutorial beforehand is the recommended approach.
The entire process should be broken down into three logical stages: debris removal, dedicated cleaning, and finally, buffing for that perfect finish. By dedicating time to initial dust and debris removal, you create an optimal environment for cleaning, minimizing the risk of re-contamination or accidental scratches. This structured approach ensures a more thorough and lasting clean.
3. **Essential Tools: Soft Brushes and Premium Microfiber Towels**
To clean your car’s touchscreen safely and effectively, arming yourself with the right tools is non-negotiable. You’ll need specific items such as a soft detailing brush, a plush microfiber towel, and either an interior detailer spray or an automotive glass cleaner. These products are explicitly designed to remove dirt and smudges without causing any damage to sensitive screens, unlike many household alternatives.
A soft detailing brush is your first line of defense against dust. It gently removes dust particles from the surface of your infotainment screen without causing scratches, which is essential for preserving the screen’s integrity. If you don’t have a dedicated detailing brush, it’s worth noting that “makeup brushes also work great” due to their super soft tips. These brushes are ideal for safely cleaning touchscreens and navigating tiny crevices where dust often accumulates.
For wiping and cleaning, plush microfiber cloths are the undisputed champions. They are “a go-to for wiping down your touchscreen display without leaving any lint behind or scratching the surface.” It is crucial to choose a high-quality towel with a tight weave and no rough edges, as coarse textures could potentially cause damage. The context highlights that “paper towels will leave lint—essentially tiny wood fibers—that could potentially scratch your screen,” emphasizing the importance of dedicated microfiber.
When it comes to microfiber towels, versatility is key. While standard 70/30 blend microfiber towels are excellent for the initial wipedown as they effectively “help ‘lift’ everything onto the towel,” you’ll want a specialized towel for the final stages. After applying the cleaner, a “very low-pile (glass-cleaning) microfiber towel” is recommended to achieve that coveted streak-free shine. This layered approach to towel selection ensures optimal results at every stage of the cleaning process.
Read more about: Beyond the Wash: 14 Pro Secrets to Making Your Car’s Interior Look Brand New Again

4. **Choosing the Right Cleaning Solution: Screen-Safe Sprays**
Selecting the appropriate cleaning solution is paramount for protecting your delicate car screens. The market offers various dedicated ‘car screen cleaning’ sprays, and most are decent, provided they are specifically “designed for touchscreens.” For beginners seeking a versatile and reliable option, the text recommends a product by Chemical Guys, praising it for its multi-purpose use on screens and plastics, its non-greasy formula, affordability, and easy retail availability.
When choosing a liquid cleaner, you essentially have two safe options: an interior detailer spray or an automotive glass cleaner. An interior detailer cleaning solution, when “specifically formulated to clean sensitive electronic screens,” can effectively remove fingerprints and smudges without harming the display’s functionality. Similarly, if you prefer a glass cleaner, it is critical to “opt for an automotive glass cleaner that is safe to use on electronic screens.” The key takeaway here is to always “ensure it is safe to use on tech screens before applying it to your car’s screen system.”
Under no circumstances should you resort to household cleaners, particularly those containing ammonia. The context clearly warns: “Avoid household glass cleaners containing ammonia, as they can damage the screen’s protective coating and cause streaks.” These harsh chemicals can “strip off anti-glare or anti-smudge coatings commonly used on car screens,” leading to permanent damage and reduced clarity. Always double-check product labels to confirm they are ammonia-free and safe for automotive electronics.
5. **The Correct Application Method: Spraying the Cloth, Not the Screen**
One of the most critical rules in car screen cleaning is how you apply your chosen cleaning solution. It is absolutely essential to “spray the solution on a microfiber towel FIRST, not directly on the screen.” This fundamental technique serves several vital purposes, safeguarding your sensitive electronics from potential damage that direct spraying can inflict.
Applying the cleaning solution directly onto the infotainment screen allows excess liquid to easily “creep into screen edges, buttons, and ports.” This moisture infiltration can quickly lead to serious electrical issues within the display or surrounding components, problems that are often far more expensive and complex to fix than the simple cost of a bottle of cleaner. Preventing this ingress is key to the long-term health of your car’s tech.
Furthermore, direct spraying, especially in warmer conditions, can cause issues with drying. “Especially when it’s hot, water droplets can easily dry on contact and be noticeable,” leaving unsightly spots and streaks that defeat the purpose of cleaning. By applying the product to a microfiber towel first, you ensure a controlled, even distribution of the cleaning agent across the entire surface of the cloth, leading to a more consistent and streak-free application on your screen.
This method also prevents overspray, which could inadvertently land on surrounding interior surfaces that may not be compatible with the cleaner, or worse, seep into delicate buttons or vents. By saturating the towel with just “4-5 sprays onto one side of a folded microfiber towel,” you achieve optimal dampness without risking any collateral damage. This meticulous approach to application underscores the delicate nature of modern car displays.
6. **Gentle Wiping Techniques for a Streak-Free Finish**
Once your microfiber cloth is properly dampened with the screen-safe cleaner, the next step is to gently wipe down the entire car touchscreen surface. The key word here is ‘gently’—avoid pressing too hard, allowing the cleaning solution and the soft fibers of your microfiber towel to do the work. Excessive pressure, even with a soft cloth, can “distort touch sensitivity and leave behind circular scratches” over time, so light, even strokes are essential.
For the most effective and streak-free cleaning, it is recommended to move your dampened microfiber cloth across the display in straight lines. The context suggests “gently buff over every inch of your car’s infotainment display in straight lines rather than a circular motion.” This method ensures even coverage and helps to lift away dirt and smudges uniformly, working from top to bottom so any dislodged debris falls away from already cleaned areas.
To maintain a consistently clean wiping surface and prevent redistributing dirt, strategic use of your microfiber cloth is advised. “Fold your dampened microfiber cloth into quarters, creating multiple clean sides to wipe with.” As you progress, “be sure to switch sides of the cloth as needed.” This practice ensures that you are always using a fresh, uncontaminated surface to lift grime, rather than simply moving it around. Continue wiping until all fingerprints, smudges, dust, and grime are thoroughly removed from the car touchscreen.
Read more about: Unmasking the Scratches: 13 Common Car Wash Mistakes That Leave Your Paint Marred with Swirl Marks
7. **The Critical Buff: Achieving Crystal Clarity**
After the initial cleaning pass, the final crucial step to ensure a truly pristine and streak-free finish is the buffing stage. This is where you remove any lingering moisture or cleaning solution residue that could otherwise dry unevenly and leave behind noticeable marks. To achieve this, you will “use the dry side of your quarter-folded microfiber cloth to buff out the touchscreen.”
The buffing process should be executed with the same gentle, light pressure as your initial cleaning. The goal is not to scrub, but to delicately absorb any remaining product, leaving the surface perfectly dry and clear. This extra step is what transforms a ‘clean’ screen into a ‘spotless’ one, enhancing its visual appeal and ensuring optimal performance.
Achieving a crystal-clear display is not just about aesthetics; it directly impacts your driving experience. A flawlessly buffed screen is easier to read, more responsive to touch, and significantly less distracting while on the road. This meticulous finishing touch safeguards both your visibility and the long-term performance of your infotainment system, making your display “look as crisp as your freshly detailed paint.”
8. **Avoid Common Culprits: Paper Towels and Harsh Household Cleaners**
Even with the best intentions, using the wrong products can quickly undo all your careful cleaning efforts and, worse, cause permanent damage to your sensitive car screens. Among the most common mistakes is resorting to paper towels. While they might seem like a convenient option, their coarse fibers act like fine sandpaper, leaving behind lint and micro-scratches that, over time, dull your screen’s finish and reduce its responsiveness.
Equally damaging are household glass cleaners, particularly those containing ammonia. The context clearly warns: “Avoid household glass cleaners containing ammonia, as they can damage the screen’s protective coating and cause streaks.” These harsh chemicals are notorious for stripping off anti-glare or anti-smudge coatings commonly applied to car screens, leading to cloudiness, streaking, and compromised visual clarity. Always check product labels to confirm they are ammonia-free and safe for automotive electronics.
Beyond just glass cleaners, many common household disinfecting wipes and strong detergents are also ill-suited for car screens. These products often contain chemicals that are far too aggressive for delicate surfaces, leading to sticky residues, clouding, or a reduction in touch responsiveness. “Many of these household wipes contain cleaners that can be harsh on plastics and trim over time,” underscoring the necessity for automotive-specific, screen-safe cleaning solutions.
Furthermore, using old T-shirts, shop rags, or any rough cloths not specifically designed for electronics can be detrimental. These materials often harbor unseen dust or grit within their fibers. Instead of cleaning, they can inadvertently grind these particles into the display, resulting in scratches and further diminishing the screen’s pristine appearance.
9. **The Dangers of Direct Spraying and Excessive Pressure**
One of the most critical rules in car screen cleaning, as highlighted in the context, is how you apply your chosen cleaning solution. It is absolutely essential to “spray the solution on a microfiber towel FIRST, not directly on the screen.” This isn’t just a suggestion; it’s a fundamental safeguard against potential electronic damage.
Applying cleaning solution directly onto the infotainment screen allows excess liquid to easily “creep into screen edges, buttons, and ports.” This moisture infiltration poses a significant risk of causing serious electrical issues within the display or its surrounding components. Such problems are often far more complex and costly to repair than the simple act of applying cleaner correctly.
Moreover, direct spraying, especially in warmer conditions, can lead to uneven drying. “Especially when it’s hot, water droplets can easily dry on contact and be noticeable,” leaving behind unsightly spots and streaks that detract from your cleaning efforts. By saturating the towel with just “4-5 sprays onto one side of a folded microfiber towel,” you ensure controlled, even distribution of the cleaning agent, leading to a more consistent and streak-free application.
Another surprisingly common mistake that can jeopardize your screen’s integrity is applying too much pressure during cleaning. The context advises, “Pressing down hard with even the softest cloth can distort touch sensitivity and leave behind circular scratches.” Even with a premium microfiber towel, excessive force can damage the sensitive layers of the screen over time, compromising its responsiveness and appearance. Gentle, even motions are all that’s required to lift dirt effectively without risking this kind of damage.
Read more about: The 13 Most Common Causes of Car Fires That Mechanics Want You to Know to Keep You Safe

10. **Microfiber Mastery: Selecting the Ideal Towel for Every Task**
While Section 1 introduced the necessity of microfiber towels, the world of microfiber is more nuanced than it might initially appear, and choosing the right type can significantly impact your cleaning results. Not all microfiber towels are created equal, and understanding their differences is key to achieving a truly streak-free finish without causing damage.
For the initial wipedown after applying your screen-safe cleaner, standard “70/30 blend microfiber towels” are excellent. These towels effectively “help ‘lift’ everything onto the towel,” making them ideal for picking up grease from fingerprints and accumulated dust. Their general-purpose nature makes them a reliable choice for the primary cleaning phase.
However, to achieve that coveted streak-free shine during the final buffing stage, a specialized towel is recommended. The context suggests using a “very low-pile (glass-cleaning) microfiber towel.” These towels are designed to absorb any lingering moisture or cleaning solution residue without leaving behind lint or streaks, perfecting the clarity of your display. Another effective option, mentioned in the context for screens, is a microfiber towel with a twisted loop weave.
Crucially, regardless of the specific type, always ensure you choose a high-quality microfiber towel. Look for a plush towel with a tight weave and no rough edges, as coarse textures could potentially cause damage. The context explicitly warns against “fluffy microfiber towel though, as this can leave lint on the screen,” further emphasizing the importance of selecting the correct type to avoid frustrating lint residue.
11. **Leveraging Compressed Air for Precision Dust Removal**
Before you even touch your screen with a brush or cloth, an optional yet highly effective preparatory step involves using compressed air. This is particularly useful for dislodging dust and debris from hard-to-reach areas around your screen and ensures a cleaner surface before any wiping begins.
“Use compressed air to remove dust around the screen” is the first step in the outlined process. This is especially beneficial “if your interior is very dusty” or if you have physical buttons or knobs near the display. Dust often collects in these tiny crevices, and compressed air can effectively blast it out, preventing it from being inadvertently dragged across the screen during subsequent cleaning steps.
You can utilize either a can of compressed air or an air compressor equipped with a blower attachment for this task. The purpose is to gently clear crumbs and dust from the edges and corners of the display, which helps prevent this debris from scratching the surface when you proceed with wiping. While not strictly necessary every time if you maintain a clean car, it’s an invaluable tool for a truly thorough pre-clean.

12. **On-the-Go Solutions: Smart Use of Screen Cleaning Wipes**
For those moments when you need a quick touch-up or don’t have your full detailing kit at hand, screen cleaning wipes offer a convenient solution. “Screen cleaning wipes have their place in car care, but think of them as nice-to-have on the go, but not the best solution.” They are perfect for refreshing your display in under a minute, whether you’re at a car wash or waiting in a parking lot.
However, not all wipes are created equal, and using the wrong type can cause significant damage. The context emphatically states, “And never use wipes like Lysol-brand cleaning wipes or baby wipes, to clean a touchscreen.” Many household wipes contain harsh cleaners that are unsuitable for sensitive automotive plastics and screens, potentially leading to clouding, residue, or stripping of protective coatings.
If you opt for wipes, it is crucial to “recommend ones designed for automotive screen cleaning specifically.” Products like Chemical Guys Total Interior Cleaner & Protectant Wipes are highlighted for their effectiveness in removing fingerprints, dust, and light grime quickly and safely. They allow you to refresh your screen without the need for bottles or microfiber towels in every instance.
To use these wipes effectively for a quick clean, begin by grabbing a fresh wipe and ensuring your display is powered off. Wipe gently across the surface using light, even strokes, allowing the wipe’s cleaning solution to do the work. For any stubborn spots, fold the wipe to expose a fresh section. Finish by using a clean, dry microfiber towel to lightly buff away any remaining moisture, ensuring a streak-free finish that makes your display “look as crisp as your freshly detailed paint.”
Read more about: The Essential Car Gadgets That Every Touring Musician Can’t Live Without: Your Ultimate Road Survival Guide
13. **The Purity of Distilled Water: Your Interim Cleaning Ally**
Sometimes, you might encounter minor smudges or fingerprints on your car’s touchscreen between your regular, more thorough interior cleaning sessions. In these instances, plain water can be a surprisingly effective and safe interim solution, but the type of water you use makes all the difference.
The context suggests that if you only need to remove unwanted fingerprints, “We recommend using water to remove them.” However, it is crucial to use “distilled water” rather than tap water. The reason for this is simple yet vital: “Tap water is made up of many minerals, which get left behind when the water dries. These minerals can damage surfaces like paint and car navigation screens.”
Distilled water, free from these minerals, “will not leave water spots on the surface,” ensuring a clean finish without additional residue. The method is straightforward: “Slightly damp or spray your microfiber cloth with water.” Then, “Use the dampened cloth to gently wipe away the fingerprints. Dry the display screen by flipping the cloth over and buffing the water away.” This gentle approach allows for quick touch-ups without introducing harsh chemicals or damaging minerals.
14. **Cultivating Long-Term Protection and Smart Maintenance Habits**
Maintaining a pristine and fully functional car touchscreen isn’t just about the occasional deep clean; it’s about embedding smart habits into your regular car care routine. Proactive and consistent cleaning, combined with avoiding common pitfalls, forms the cornerstone of long-term protection for this vital automotive component.
For optimal functionality and visual appeal for years to come, a regular maintenance schedule is highly recommended. “Every 2 to 4 weeks you should touch up your car’s interior. We suggest you include cleaning your car’s touch screen as part of your monthly or twice-a-month interior routine.” This ensures that dust, grime, and fingerprints don’t have a chance to build up, which could eventually lead to micro-scratches or reduced responsiveness.
Reiterating the “Common Mistakes That Scratch, Smudge, and Damage Screens” is a critical aspect of long-term protection. By consistently avoiding ammonia-based glass cleaners, rough paper products like paper towels, excess water, and abrasive cloths, you safeguard the delicate anti-glare and oleophobic coatings on your screen. These protective layers are essential for both clarity and touch sensitivity, and their preservation is paramount.
Beyond cleaning, there are additional measures you can take. While the article focuses on cleaning, the context also mentions using a “matte-finish screen protector to make the fingerprints less visible” as a way to prevent fingerprints. Similarly, using a “rubber-tipped stylus pen” can minimize direct finger contact, reducing the accumulation of oils and smudges on the screen over time. Small changes in interaction can lead to a cleaner display.
Finally, being mindful of static buildup, which can attract dust right after cleaning, is also beneficial. The context suggests that “An anti-static electronics cleaner or a slightly damp microfiber towel can help reduce static charge.” By adopting these comprehensive strategies – regular cleaning, using the right products and techniques, and incorporating protective habits – you ensure your car’s command center remains crystal clear, responsive, and a pleasure to interact with for every journey.
Read more about: Elizabeth Hurley at 60: Unlocking Her Age-Defying Wellness Secrets, From Mindful Habits to Radiant Confidence
In the dynamic world of modern vehicles, your car’s digital screen is undeniably the heart of your driving experience. From seamless navigation to personalized entertainment, its clarity and responsiveness are paramount. By embracing these simple, step-by-step instructions and practical insights, you’re not just cleaning a screen; you’re preserving an essential piece of technology, enhancing your driving safety, and ensuring that your car’s interior always looks its absolute best. So go ahead, give your screen the care it deserves, and enjoy the brilliantly clear view ahead!


