
")
Thanksgiving is just around the corner, and let’s be real, while the big bird usually takes center stage, the true MVPs of the holiday feast are always, always the side dishes! Imagine a holiday table without those comforting, creamy, savory, or even delightfully sweet companions that perfectly complement the main entrée. It’s practically unthinkable, right? They’re the unsung heroes that make the whole meal sing, adding layers of flavor and texture that keep everyone coming back for more.
Crafting that epic dinner menu means ensuring a fantastic variety, something to please every single person at your table. We’re talking everything from those absolute classic dinner rolls to lighter, refreshing salads and those deeply satisfying, hearty casseroles that feel like a warm hug. This thoughtful balance not only creates a well-rounded meal but also guarantees that there’s truly something for everyone to enjoy, whether they’re a traditionalist or looking for a fun new twist.
So, whether you’ve bravely volunteered to bring a show-stopping dish to the big family dinner, or you’re hosting Thanksgiving this year and feeling the delicious pressure, you’ve totally stumbled upon the right place. We’ve scoured the archives, dusted off the metaphorical family recipe box, and gathered some seriously amazing side dish recipes that are so good, they might just make Grandma raise an eyebrow in pleasant surprise. Get ready to share a recipe or two that will not only get Grandma’s coveted stamp of approval but will also have your siblings secretly wondering how you got so good at this!
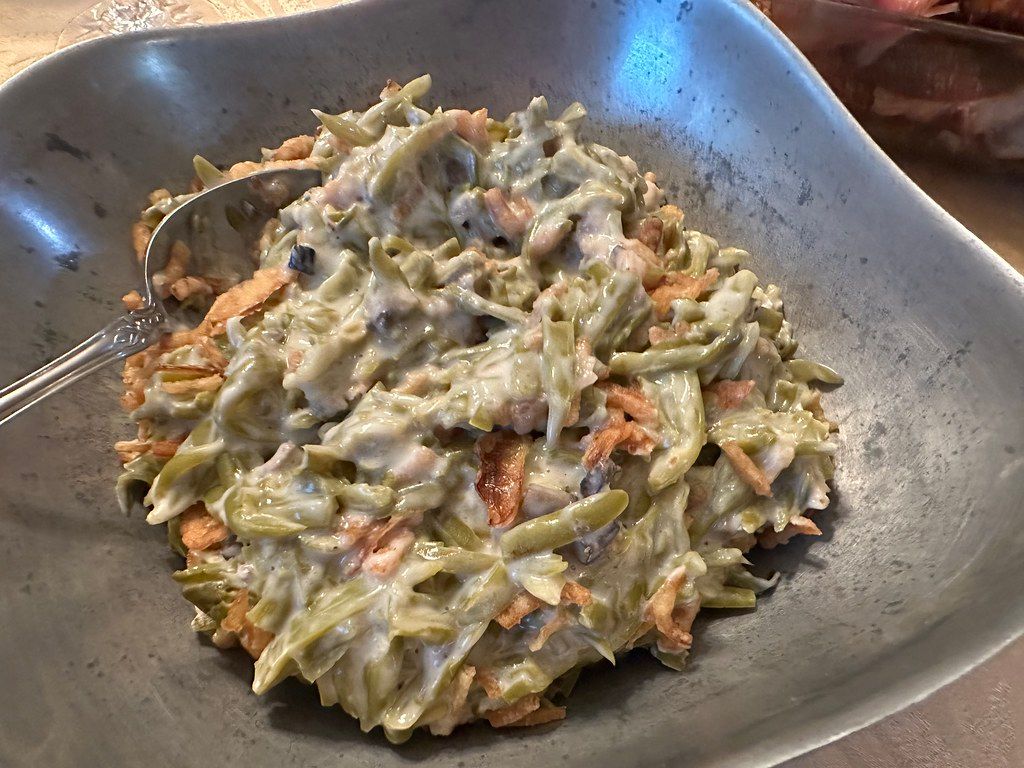
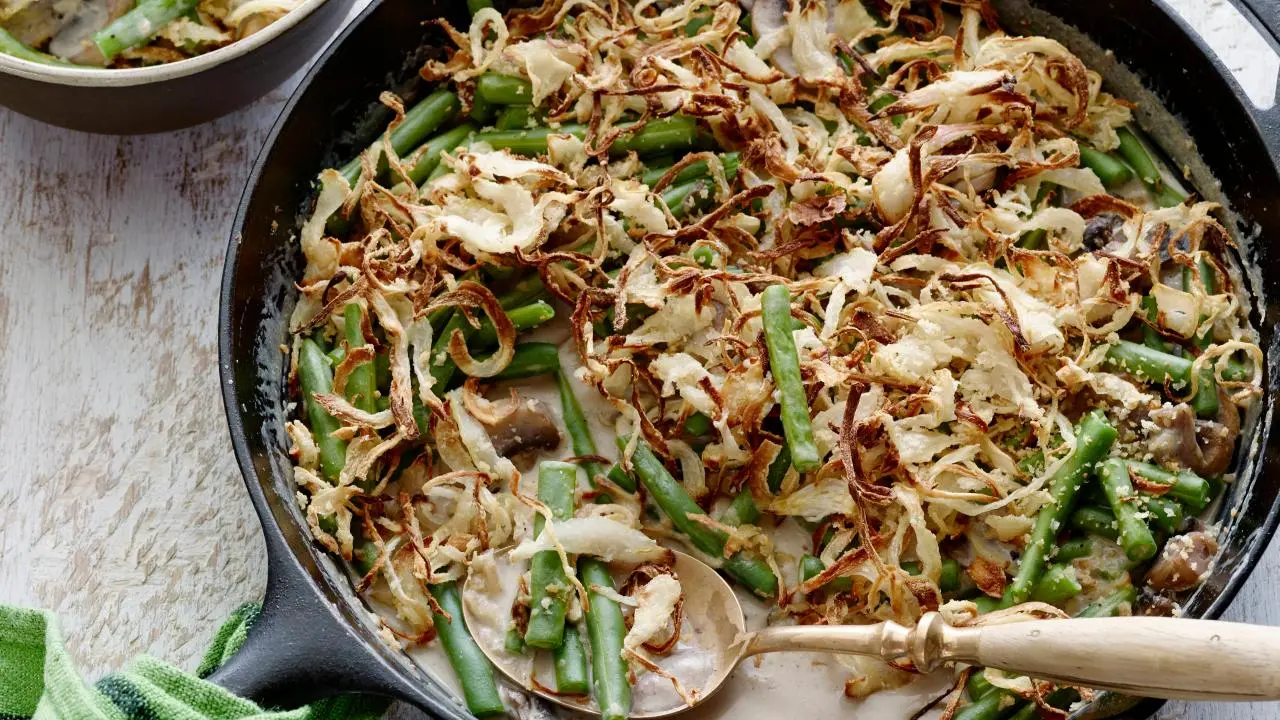
1. **Creamy Green Bean Casserole From Scratch**: Okay, let’s dive headfirst into a true, undisputed classic that practically screams Thanksgiving: the Green Bean Casserole! Now, this isn’t just any old green bean casserole; we are talking about the kind that’s made completely from scratch, elevating it from a simple side to a culinary masterpiece. For many of us, this dish has been a traditional, comforting fixture on the holiday table for generations, and there’s a very delicious reason why it holds such a special place in our hearts.
If, by some miraculous chance, this hasn’t been a staple in your household yet, then get ready, because once you give this homemade recipe a whirl, it is absolutely bound to become one. Picture this: tender, vibrant green beans, lovingly enveloped by the creamiest, most luscious sauce you can possibly imagine. This is a far cry from anything you’d find in a can; this is pure, unadulterated, wholesome goodness that takes comfort food to an entirely new, incredibly satisfying level.
And just when you thought it couldn’t get any more drool-worthy, this magnificent creation is generously topped with those perfectly golden, wonderfully crunchy fried onions. Seriously, every single bite is a symphony of textures and flavors – creamy, tender, and crispy all at once. The effort of making this from scratch, instead of reaching for a pre-made shortcut, is one hundred percent worth it, yielding a dish that will earn you endless compliments and satisfied sighs around the holiday table.
Best Ever Green Bean Casserole
Ingredients
Equipment
Method
- Preheat the oven to 475 degrees F.
- Combine the onions, flour, panko and salt in a large mixing bowl and toss to combine. Coat a sheet pan with nonstick cooking spray and evenly spread the onions on the pan. Place the pan on the middle rack of the oven and bake until golden brown, approximately 30 minutes. Toss the onions 2 to 3 times during cooking. Once done, remove from the oven and set aside until ready to use. Turn the oven down to 400 degrees F.
- While the onions are cooking, prepare the beans. Bring a gallon of water and 2 tablespoons of salt to a boil in an 8-quart saucepan. Add the beans and blanch for 5 minutes. Drain in a colander and immediately plunge the beans into a large bowl of ice water to stop the cooking. Drain and set aside.
- Melt the butter in a 12-inch cast iron skillet set over medium-high heat. Add the mushrooms, 1 teaspoon salt and pepper and cook, stirring occasionally, until the mushrooms begin to give up some of their liquid, approximately 4 to 5 minutes. Add the garlic and nutmeg and continue to cook for another 1 to 2 minutes. Sprinkle the flour over the mixture and stir to combine. Cook for 1 minute. Add the broth and simmer for 1 minute. Decrease the heat to medium-low and add the half-and-half. Cook until the mixture thickens, stirring occasionally, approximately 6 to 8 minutes.
- Remove from the heat and stir in 1/4 of the onions and all of the green beans. Top with the remaining onions. Place into the oven and bake until bubbly, approximately 15 minutes. Remove and serve immediately.
Notes
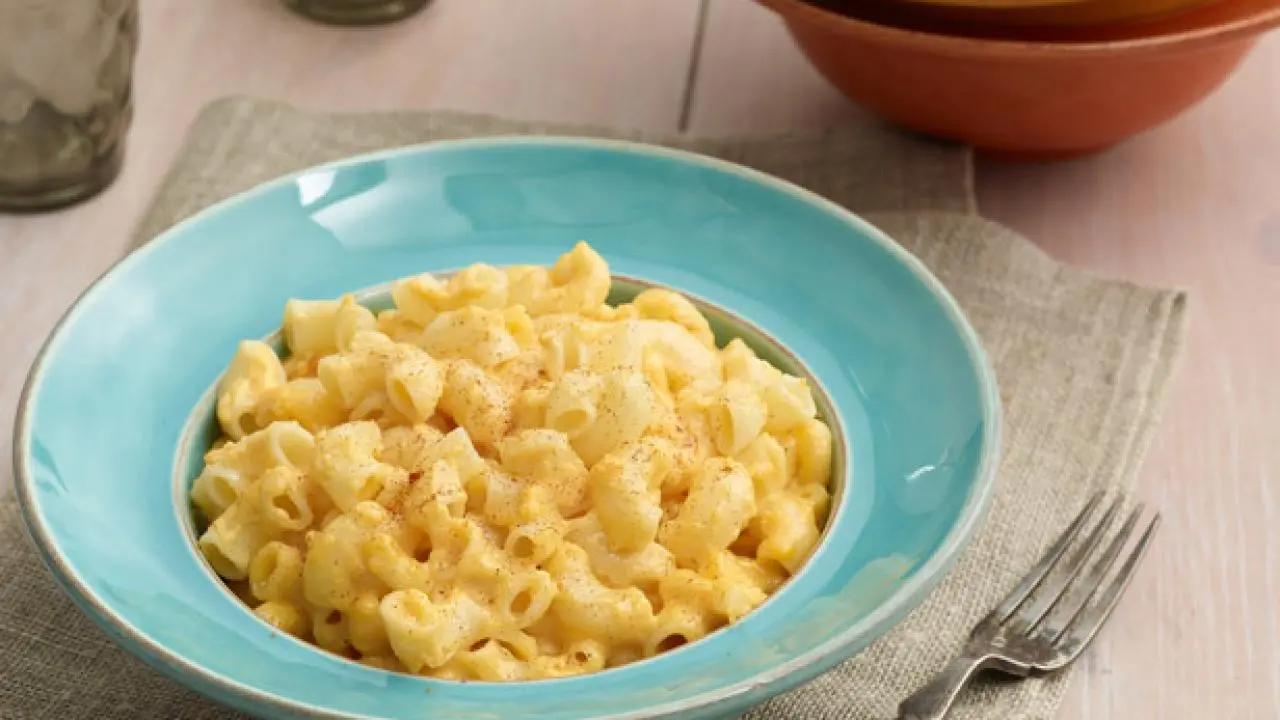
2. **Slow Cooker Macaroni And Cheese**: Next on our list, we’re talking about the ultimate, undisputed champion of comfort food: macaroni and cheese! Bring this slow cooker mac and cheese to your Thanksgiving dinner, and you won’t just get thanks; you might just get a standing ovation (and maybe a few requests for sleepovers, because it’s that good). This dish is practically a warm hug in a bowl, guaranteed to make everyone feel instantly at ease and completely satisfied.
The absolute best part about this recipe? It’s nearly foolproof, which means you can totally impress Grandma with your “from scratch” skills without breaking a single sweat or feeling overwhelmed in the kitchen. It starts exactly how a traditional macaroni and cheese recipe should: with a box of classic elbow macaroni pasta. But the real magic, the secret to its undeniable deliciousness, lies in the cheesy, creamy symphony that follows.
We’re talking about a dreamy blend of evaporated milk, rich half and half cream, sharp cheddar cheese, and smooth white American cheese, all melting together into an irresistible, velvety concoction. It’s unbelievably easy to throw together, yet tastes like you’ve been slaving away for hours. Get ready for this slow cooker marvel to become a brand new, highly anticipated holiday tradition that everyone will beg for year after year!
Slow Cooker Macaroni and Cheese
Ingredients
Equipment
Method
- In a large 4-quart slow cooker sprayed with cooking spray, mix the macaroni, evaporated milk, milk, butter, salt, pepper, eggs and all but 1/2 cup of the grated cheese. Sprinkle the reserved cheese over the top of the mixture and then sprinkle with paprika. Cover and cook on low heat for 3 hours and 15 minutes. Turn off the slow cooker, stir the mixture and serve hot.
Notes
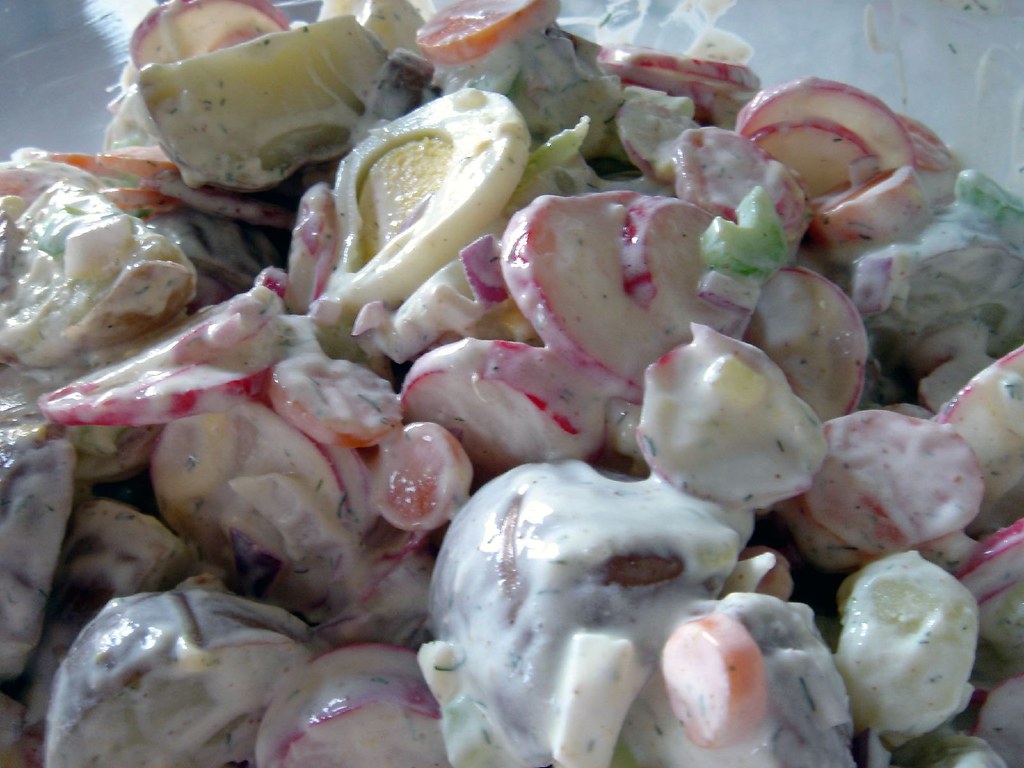
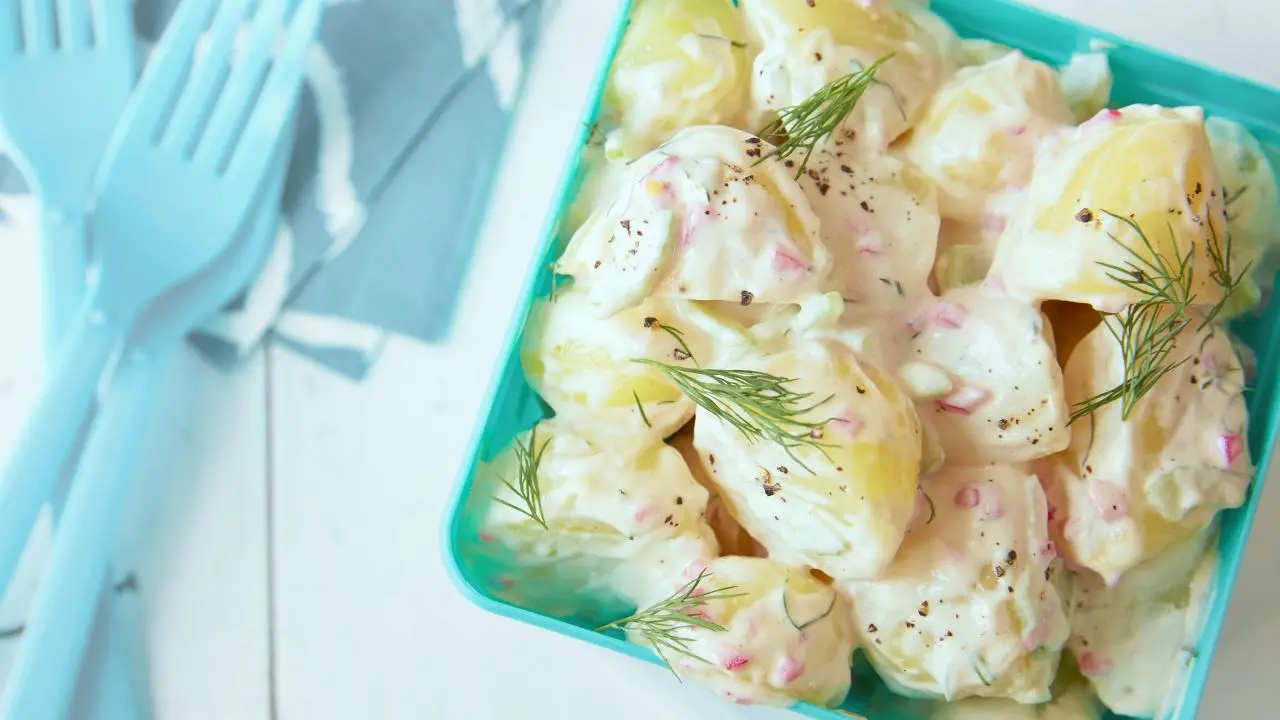
3. **Traditional Creamy Potato Salad**: Alright, let’s be real, who doesn’t absolutely adore a fantastic potato salad? It’s a guaranteed crowd-pleaser, perfect for any large gathering, and especially sensational when it tastes like it materialized directly from Grandma’s legendary, secret kitchen! This particular recipe is all about embracing those traditional, deeply comforting flavors that instantly make you feel like you’re home for the holidays, wrapped in a warm, delicious embrace.
Imagine serving up a generous bowl of this creamy potato salad, each bite bursting with the familiar, zesty kick of mustard and the warm, inviting spice of paprika. And for that quintessential, classic touch, the delightful addition of boiled egg brings in that rich, satisfying texture we all know and love. It’s like a beloved family story told through food, familiar and utterly heartwarming with every spoonful.
But this salad isn’t just about luxurious creaminess; it’s also got that perfect, satisfying crunch thanks to finely diced celery and perfectly chopped onion, adding a wonderful textural contrast. It’s straightforward, it’s undeniably classic, and it is going to be an enormous hit at your Thanksgiving feast. Prepare yourself for endless compliments and a steady stream of guests asking for the recipe, because this one’s a keeper!
Creamy Dijon-Dill Potato Salad
Ingredients
Equipment
Method
- Put the potatoes in a big pot with enough water to cover by 1-inch. Season with salt and bring the water to a boil. Cook just until the potatoes are tender when pierced with a fork, about 25 minutes.
- Drain the potatoes and return them to the uncovered pot off the heat. Let them sit until almost room temperature. (Cooling them in the warm pot will get rid of any excess water in the potatoes, and that's good.)
- Meanwhile, cut the white parts off the ends of the celery stalks. Cut the stalks in half lengthwise, then across into 1/4-inch slices. Stir the celery, 3/4 teaspoon salt, and the remaining ingredients together in a serving bowl large enough to hold all the potatoes.
- When they're cool, cut the potatoes into 1-inch pieces, add them to the bowl as you go. Stir gently until all the potatoes are coated with dressing. You can make the salad up to a couple of hours in advance. Keep covered at room temperature. Don't refrigerate or the potatoes will lose their rich, smooth texture.
Notes
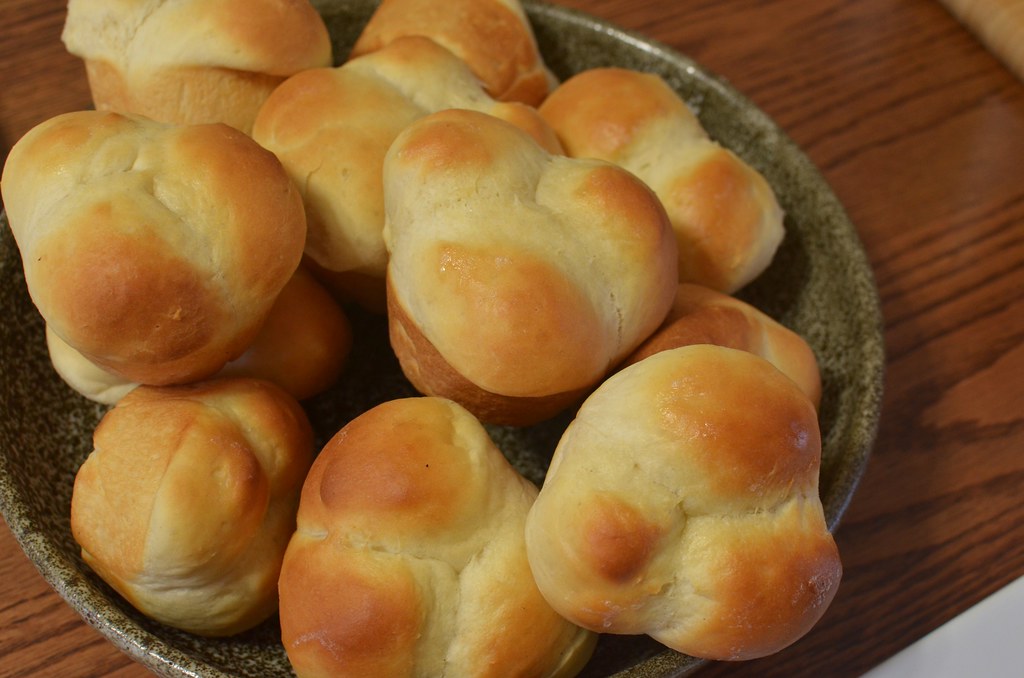
4. **1-Hour Soft And Buttery Dinner Rolls**: Let’s talk about the unsung heroes of any Thanksgiving feast: dinner rolls! Because, honestly, what’s a holiday meal without a basket brimming with warm, fluffy, irresistible bread? While some folks might gravitate towards the super easy garlic knots (which, let’s be honest, are totally awesome!), there are those moments when you just crave that truly authentic, traditional, homemade dinner roll experience.
And guess what? You can absolutely bake these incredibly soft and buttery rolls yourself, right in your own kitchen! Your Grandma will be utterly astonished, perhaps even slightly flabbergasted, by your impressive baking prowess. Yes, they might require about an hour of your time from start to finish, but trust us when we say the look of pure delight on her face when she realizes *you* made these from scratch is truly priceless and worth every single minute.
The beauty of this recipe is that you only need a handful of simple, readily available ingredients to whip up these golden beauties. Just follow the clear directions, and you’ll be pulling out perfectly risen, tender, and delightfully buttery dinner rolls that every single person at your table will devour with gusto. Get ready for a serious wave of bread basket admiration and maybe even a request for a baking lesson!

Homemade Dinner Rolls
Ingredients
Equipment
Method
- In a standing mixing bowl with dough hook, dissolve yeast in warm water. Let sit until lightly foamy, then stir in sugar and add egg, salt, warm milk, and 4 ounces of butter. Slowly add 5 cups flour, adding more as needed to make an elastic dough. Mix well, then roll out to floured surface and knead dough for about 5 minutes.
- Place dough in buttered bowl, cover with towel, and set in a warm place to rise until double in bulk, about 1 hour.
- Lightly oil the muffin pan. Punch down dough and form dough into 1-inch balls. Place 3 balls in each muffin tin. Fill muffin pan, cover with towel, and allow to rise an additional 1/2 hour.
- Preheat oven to 425 degrees F.
- Brush with remaining melted butter. Bake in preheated oven for 10 to 15 minutes, until golden brown.
Notes
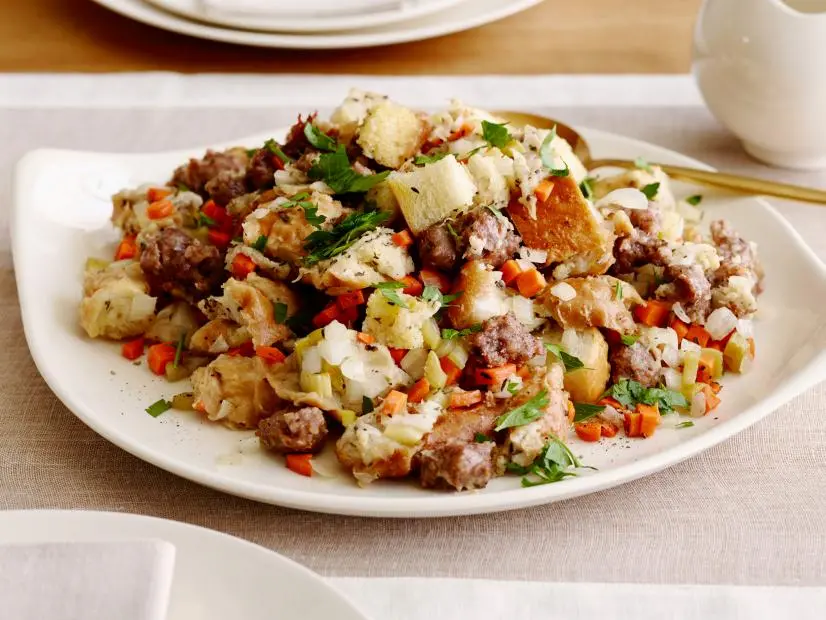
5. **Slow Cooker Stuffing**: When the topic of Thanksgiving inevitably comes up, there’s one dish that consistently dominates the conversation right after the turkey: stuffing! It’s one of those undeniable, traditional dishes that absolutely defines the holiday for so many of us, bringing back cherished memories with every savory bite. If stuffing is a non-negotiable staple on your Thanksgiving menu, then you seriously, truly need to give this particular recipe a try this year. It’s a game-changer!
This isn’t just any stuffing; it’s a beautifully crafted homemade recipe that meticulously brings all those savory, classic, and deeply comforting flavors to life. It wisely starts with wholesome, foundational ingredients like tender bread crumbs, finely chopped celery, and aromatic onion, all seasoned to absolute perfection. Every single forkful is like a little piece of holiday heaven, a delicious journey back to nostalgic family gatherings.
But here’s the absolute best part, the total genius move that makes this recipe a true winner: it’s made entirely in a slow cooker! That means incredibly easy preparation on your part and, even more importantly, it magically frees up precious oven space for your magnificent turkey and all those other vital side dishes. Less stress, more unbelievably delicious stuffing, and a beautifully orchestrated kitchen? Yes, please, sign us up immediately!
Slow-Cooker Sausage Stuffing
Ingredients
Equipment
Method
- Lightly grease the bottom and sides of a 6-quart slow cooker with butter.
- Toss the stale French bread, butter, onions, carrots, celery, thyme and 1 teaspoon each salt and pepper in the slow cooker. Pour the chicken broth over the bread mixture and toss to coat. Use your hands to tear teaspoon-size pieces of the Italian sausage and put them directly on top of the bread mixture. The sausage should cover most of the stuffing.
- Cover the slow cooker and cook on low until the sausage is cooked through and the vegetables are tender, about 4 hours. Remove the lid and gently stir the sausage into the stuffing. Season to taste with additional salt and pepper. Transfer to a shallow serving dish and garnish with the chopped parsley. Serve hot.
Notes
6. **Bang Bang Brussels Sprouts**: Okay, if you’re one of those people who *thinks* they don’t love Brussels sprouts, prepare to have your mind absolutely blown. Seriously, this recipe is a total game-changer that will have you rethinking everything you thought you knew about this humble green veggie! I mean, I’ll confess, I used to find them a bit on the bitter side myself, but this dish reveals the ultimate secret to unlocking their delicious potential: you just need to mask that bitterness with a symphony of other incredible, irresistible flavors. And this recipe? It does exactly that, flawlessly.
This “Bang Bang Brussels Sprouts” creation is pure magic on a plate, transforming a sometimes-maligned vegetable into an absolute star. It’s wonderfully creamy, perfectly spicy, and so ridiculously delicious that you’ll be tempted to literally lick your plate clean – and honestly, who could blame you? No judgment here, because every single bite is an explosion of savory goodness that somehow balances all those bold tastes into pure harmony. Plus, talk about inclusive! This recipe even offers an option to make it dairy-free and vegan-friendly, which is pretty awesome for accommodating all your wonderful Thanksgiving guests, no matter their dietary needs.
Honestly, prepare for Grandma to be totally flabbergasted when she tastes this. She’ll be utterly shocked and secretly impressed that she didn’t come up with this brilliant recipe herself! Get ready to convert even the pickiest eaters at your table, or those long-held Brussels sprouts skeptics, with this unexpected, flavorful hit that’s anything but boring. It’s the kind of dish that makes people ask, “Wait, *this* is Brussels sprouts?!” in the best possible way.
Roasted Brussels Sprouts
Ingredients
Equipment
Method
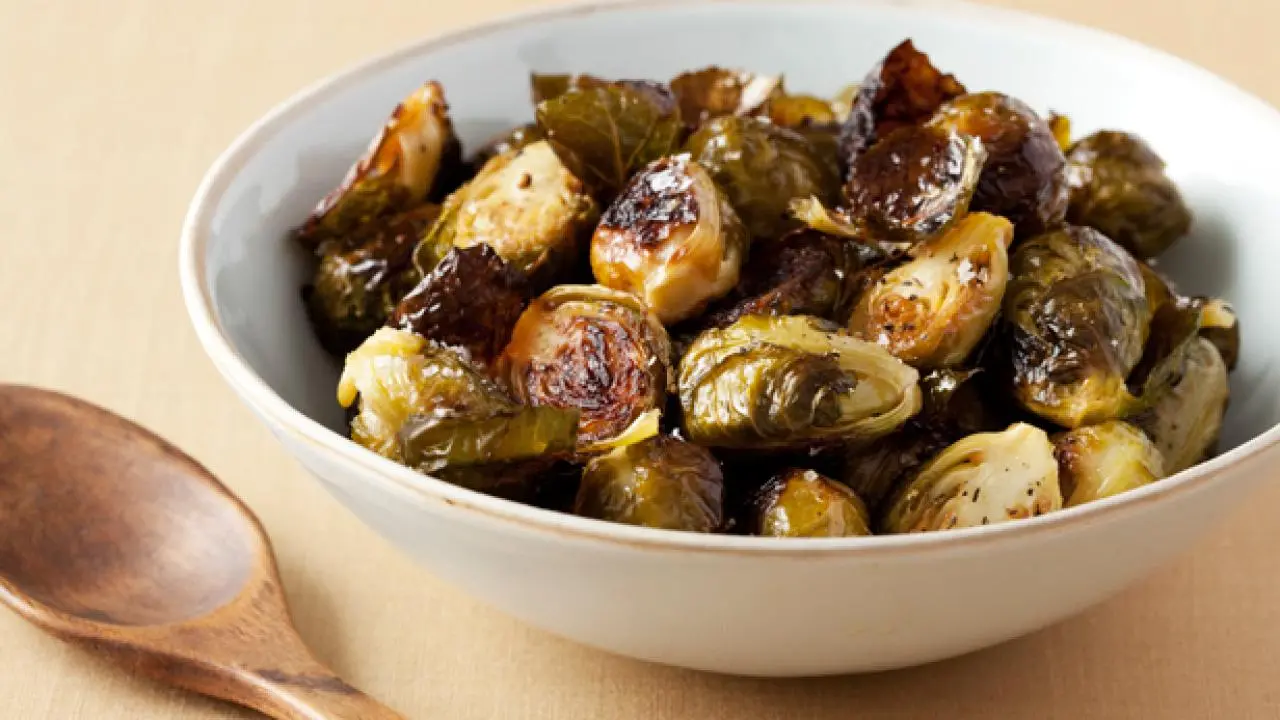
- Preheat oven to 400 degrees F.
- Cut off the brown ends of the Brussels sprouts and pull off any yellow outer leaves. Mix them in a bowl with the olive oil, salt and pepper. Pour them on a sheet pan and roast for 35 to 40 minutes, until crisp on the outside and tender on the inside. Shake the pan from time to time to brown the sprouts evenly. Sprinkle with more kosher salt ( I like these salty like French fries), and serve immediately.
Notes
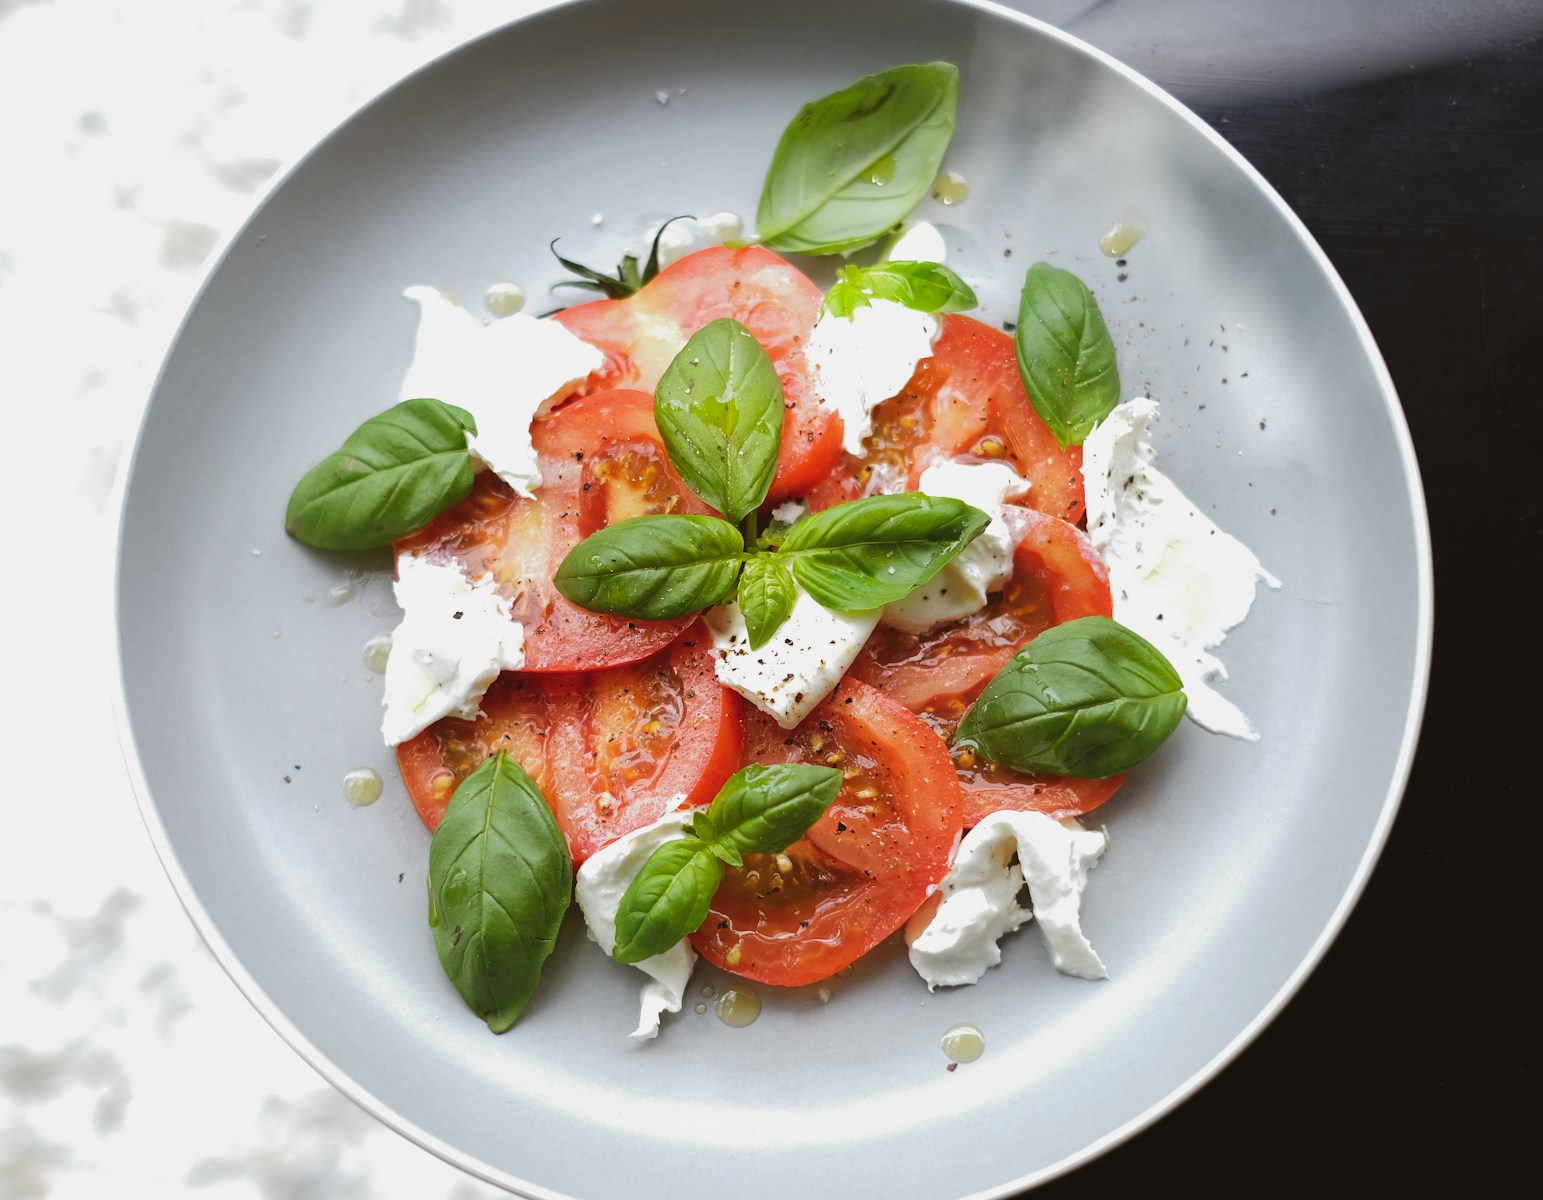
7. **Caprese Salad**: Time to lighten things up a bit, because even the most epic Thanksgiving feast, overflowing with all that delicious richness and comforting goodness, needs a refreshing palate cleanser! And guess what? Salads are your secret weapon for balancing the table and making your guests feel, dare we say, *grateful* for something crisp and fresh. Enter the Caprese Salad, your new, effortlessly elegant holiday hero that adds a burst of vibrant color and flavor to your spread.
This Caprese salad is unbelievably easy to throw together, which is exactly what we need when the kitchen is bustling with a million things and you’re trying to orchestrate the perfect holiday meal! It’s all about embracing simplicity and letting the quality of just three, super fresh ingredients shine: perfectly ripe, juicy tomatoes, luxuriously soft, fresh mozzarella cheese, and aromatic, bright green basil leaves. It’s a beautiful, vibrant trio that just *works* in perfect harmony, creating a classic flavor profile that’s universally loved.
Once you’ve assembled this colorful masterpiece, arranging those beautiful slices of tomato and mozzarella with fresh basil leaves, all you need is a generous drizzle of good quality olive oil and a sweet, tangy balsamic glaze to tie all the flavors together. A simple sprinkle of salt and pepper to taste, and boom! You’ve got a stunning, light, and incredibly delicious side that adds a sophisticated pop of Italian flair to your all-American holiday spread. It’s a breath of fresh air amidst the hearty classics!
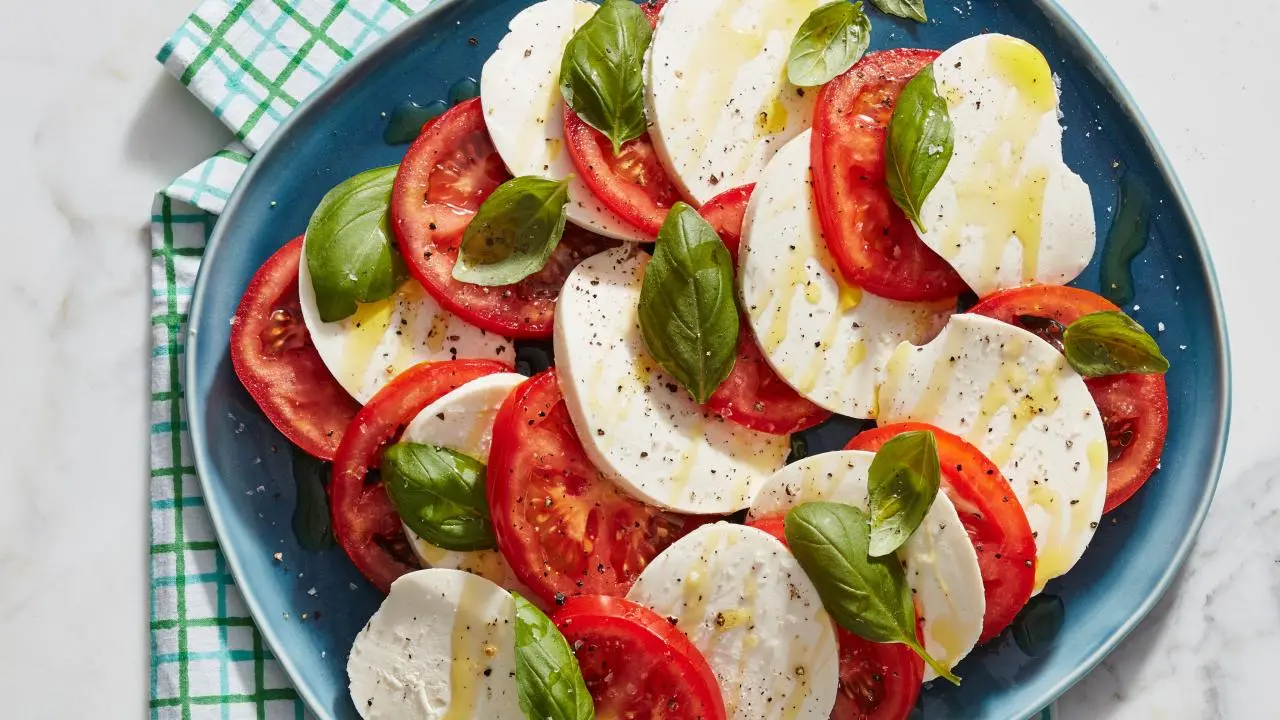
Caprese Salad
Ingredients
Equipment
Method
- Layer alternating slices of tomatoes and mozzarella, adding a basil leaf between each, on a large, shallow platter. Drizzle the salad with extra-virgin olive oil and season with salt and pepper, to taste.
Notes

8. **Asparagus Gruyere Tart**: Ready to pull off a culinary illusion that will have Grandma utterly convinced you spent *hours* toiling away in the kitchen perfecting a gourmet dish? Say hello to your new secret weapon: this absolutely stunning Asparagus Gruyere Tart! It looks so incredibly sophisticated and fancy, she’ll never, ever believe it only took you a mere 10 minutes of hands-on prep time to create. Shhh, it’s our little secret, and the wow factor is completely off the charts!
The absolute genius hack behind this tart’s simplicity? You get to totally skip the intimidating, often finicky homemade pastry step (no advanced baking skills required here!) and instead reach for trusty, ready-to-go store-bought puff pastry. It’s a total game-changer and a massive time-saver that miraculously delivers a perfectly flaky, wonderfully buttery base without any of the usual stress or mess. Seriously, we should all send a thank you card to whoever invented puff pastry – it’s a holiday miracle!
Once your puff pastry is laid out, ready for its close-up, you’ll lavishly top it with a generous layer of delicious, nutty Gruyere cheese, a zesty smear of honey dijon mustard for that perfect tang, a drizzle of rich balsamic vinegar, and beautifully tender asparagus spears. It’s elegant, it’s unbelievably easy, and it’s going to be the most Instagrammable, compliments-generating dish on your entire Thanksgiving table! Get ready for the oohs and aahs!

Asparagus and Cheese Tart
Ingredients
Equipment
Method
- Fill a large bowl with ice water. Bring about 1 inch of water to a boil in a large skillet. Add the asparagus; cook until bright green and crisp-tender, 2 to 5 minutes, depending on the thickness of the asparagus. Drain and transfer to the ice water to stop the cooking; drain and pat dry. Preheat the oven to 400 degrees F.
- Roll out the puff pastry into a 10-by-16-inch rectangle on a floured surface. Transfer to a parchment-lined baking sheet and prick all over with a fork. Bake until light golden brown, about 12 minutes. Let cool slightly on the baking sheet.
- Meanwhile, mix the fontina, comte, shallot, egg yolks, milk, nutmeg and a pinch each of salt and pepper in a bowl until combined. Spread the cheese mixture evenly over the puff pastry, leaving a 1-inch border on all sides. Toss the asparagus with the olive oil, 1/4 teaspoon salt, and pepper to taste. Arrange the asparagus on the tart and bake until the cheese mixture is slightly puffy, 15 to 20 minutes. Sprinkle with the lemon zest. Serve warm or at room temperature.


