

Sciatica is a condition that can bring excruciating discomfort, often radiating from the lower back through the buttocks, hip, and down the back of the leg, sometimes even reaching the foot. It’s more than just a fleeting ache; it’s a specific type of low back pain associated with the sciatic nerve. Understanding this condition is the first step toward effective relief and reclaiming an active, pain-free life.
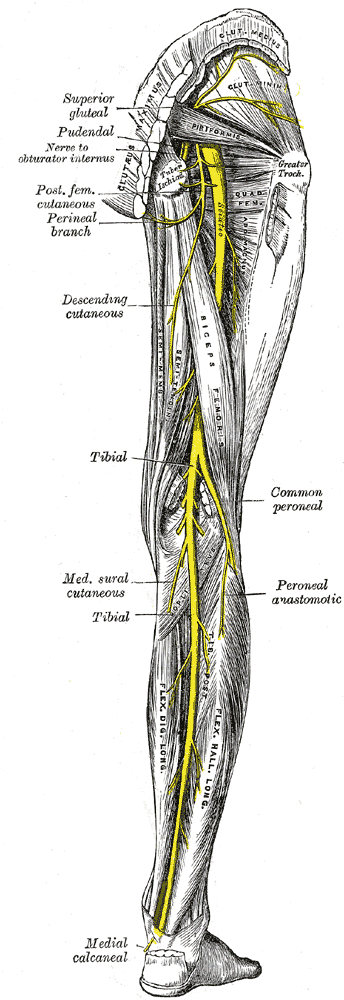
The sciatic nerve, originating in the lower back and extending down each leg, holds the distinction of being the body’s largest nerve, capable of reaching almost 2cm in diameter. When this vital nerve’s structural and functional integrity is compromised, it can lead to a host of symptoms, including tingling, numbness, weakness in the leg, and that characteristic burning or shooting pain. It’s a widespread issue, with a lifetime incidence estimated between 10% and 40%, particularly affecting individuals between 45 and 64 years of age.
While the pain can be sudden and intense, often persisting for days or weeks, the good news is that most cases of sciatica improve over time without surgical intervention, with approximately 80% to 90% of people recovering. A key component of this recovery and ongoing management often involves gentle, targeted exercises. These movements, approved by physical therapists, are designed to alleviate pressure on the sciatic nerve, strengthen supporting muscles, and improve overall mobility.
1. **Sciatic Nerve Glides (Floss)**This technique, often referred to as “nerve flossing,” is specifically designed to help relieve lower back pain by gently “massaging” the sciatic nerve when it becomes compressed by surrounding muscles. It aims to improve the mobility of the nerve along its course, which can decrease overall tension and compression. When the sciatic nerve is pinched or entrapped, a gentle gliding motion can help break up adhesions and restore normal movement, alleviating symptoms like burning sensations, numbness, and pain that radiates down the leg. However, it’s crucial to listen to your body; if this technique causes increased pain, it’s best to stop and explore other options.
There are various ways to perform sciatic nerve glides, including both seated and supine positions. A common seated variation begins with you sitting on a chair or table, both legs hanging off the edge, and your hands resting on your thighs. From this slouched position, you extend (straighten out) one knee while simultaneously looking up with your head. Following this, you then lower that leg while bending (flexing) your neck down. This coordinated movement creates a gentle flossing action on the nerve. After returning to the starting position, you should aim to repeat this sequence 10 times, three times a day, for the affected leg.
For a supine variation, you would lie down on your back. Raise the affected leg to a vertical position, holding the thigh for extra support. Gently bend your toes and the whole foot downwards, then return to the starting position. This movement should be repeated for 8-10 repetitions. Both seated and supine glides aim to improve nerve mobility, but if either makes pain worse or causes it to radiate to your foot, discontinue immediately.
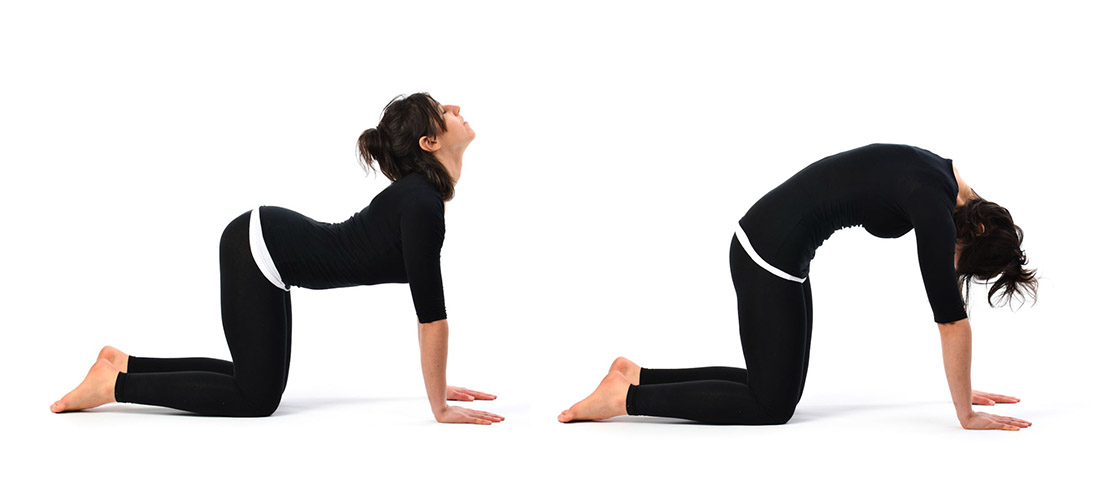
2. **Cat & Cow**The Cat & Cow exercise is a fantastic, gentle movement for enhancing spine mobility, which can be particularly beneficial for decompressing the low back. It involves a fluid transition between two poses, promoting flexibility in the spinal column and gently stretching the muscles that support it. Starting on all fours, with your hands directly under your shoulders and your knees directly below your hips, you begin the sequence.
As you exhale, gently arch your low back (Cow pose), letting your belly drop and lifting your gaze slightly, holding for 2 seconds. Then, as you inhale, you transition into the Cat pose by rounding your back towards the ceiling, tucking your chin to your chest, holding for another 2 seconds. This controlled range of motion helps to loosen tight back muscles, improve blood flow, and can provide significant relief from stiffness and discomfort. The goal is to perform 10 repetitions, moving slowly and deliberately.
The beauty of the Cat & Cow exercise lies in its accessibility and adaptability. It uses your body weight and natural spinal movement to promote healing and reduce pain. Regular practice can not only address acute sciatica symptoms but also contribute to better overall spinal health, flexibility, and core awareness, serving as a preventative measure against future flare-ups.
Read more about: Totally Tubular! 12 Earth-Shattering Events That Made The ’90s The Unforgettable Decade We Still Obsess Over!
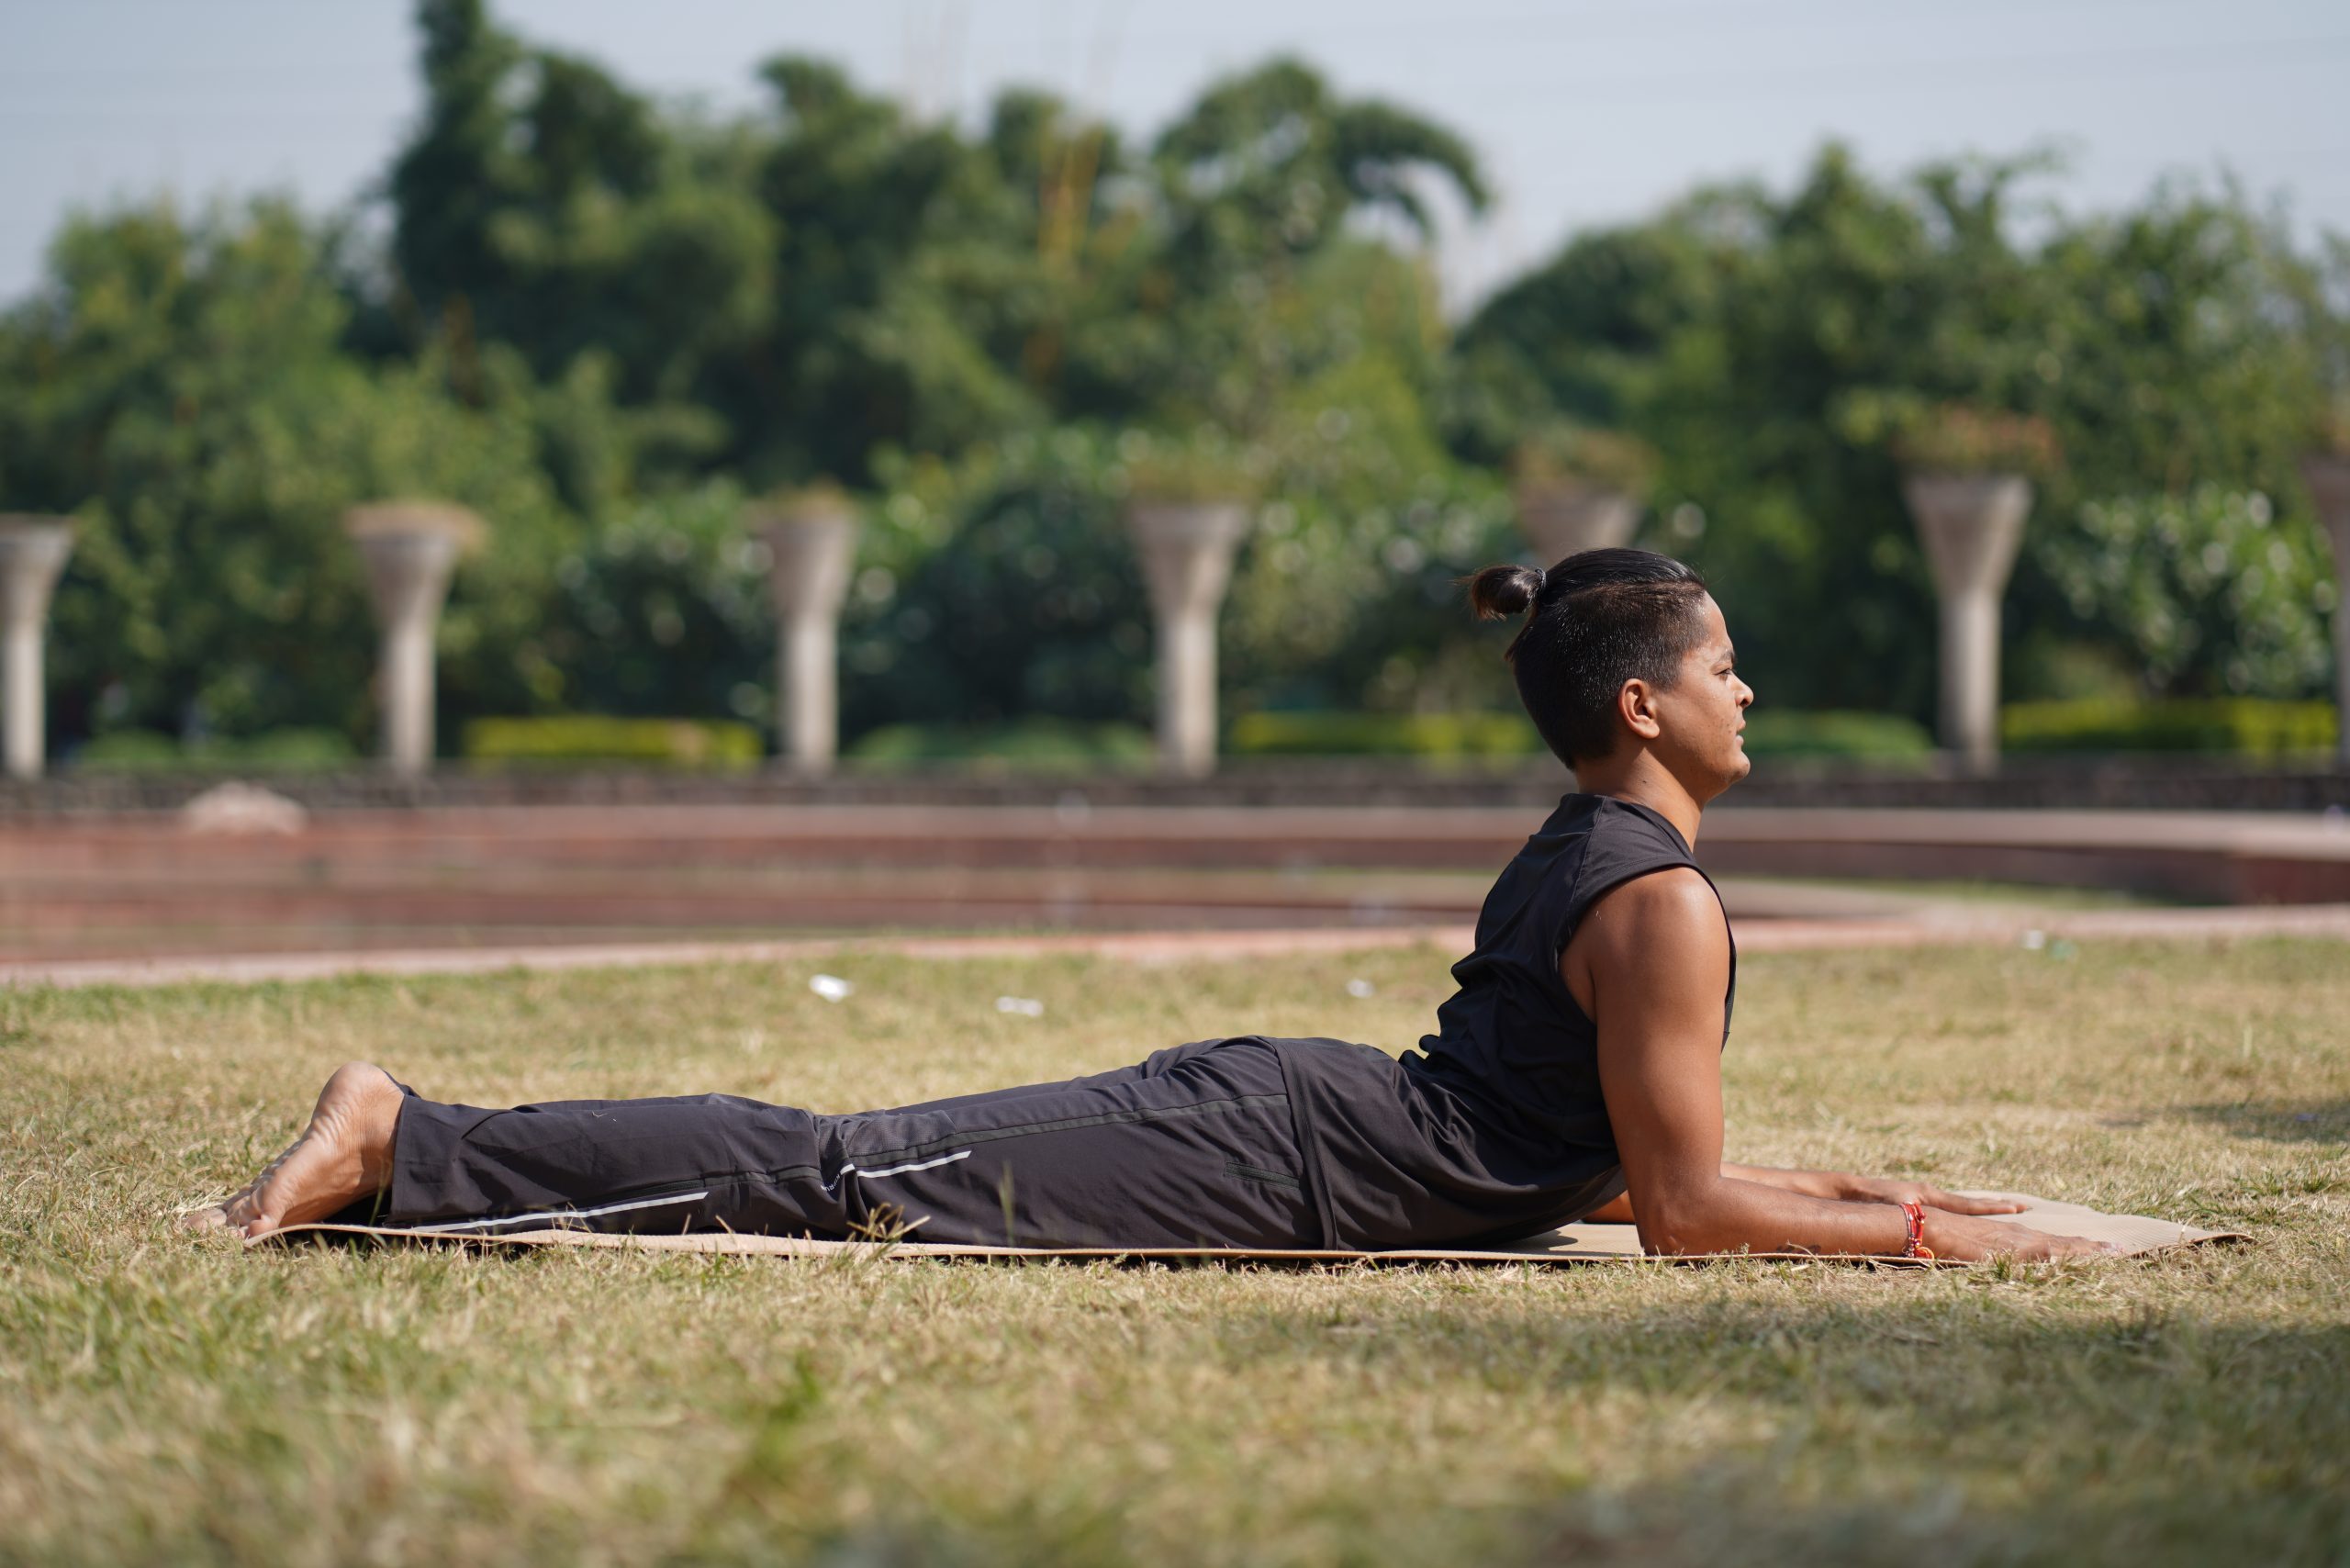
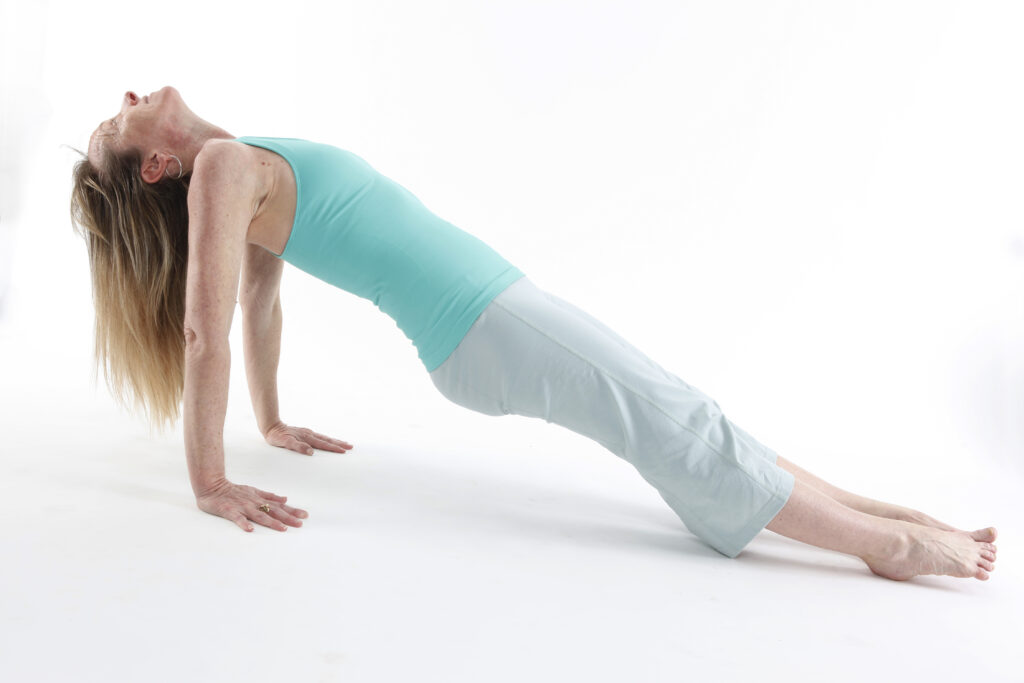
3. **Cobra Pose Progression (Half and Full Cobra)**The Cobra Pose, in its various forms, is a highly recommended exercise for sciatica, especially when the pain is linked to a disc bulge or herniation. These poses induce spinal extension, a movement that can help push displaced disc material back towards the center of the spine, reducing pressure on nerve roots and alleviating sciatic pain symptoms.
Initiating with the Half Cobra Pose, you begin by lying on your stomach, also known as the prone position. Slowly, you prop yourself up on your elbows, taking care to keep your hips in continuous contact with the floor. Hold this position for 10-15 seconds, allowing the spine to gently extend. As your tolerance improves, gradually increase the holding time to 30 seconds. Aim to perform 10 repetitions, always starting slowly and carefully, especially if you’re experiencing significant pain.
For those who find the Half Cobra manageable and wish to progress, the Full Cobra Pose offers a deeper spinal extension. Start lying on the ground, hands flat at shoulder level. Slowly push through your hands to raise your shoulders off the ground until you feel a slight, comfortable stretch in your lower back. As you exhale, gently push further into lumbar extension. Aim for 5 repetitions, but always proceed with caution and do not overdo it. Stop if any movement exacerbates your pain or causes it to shoot down your leg.
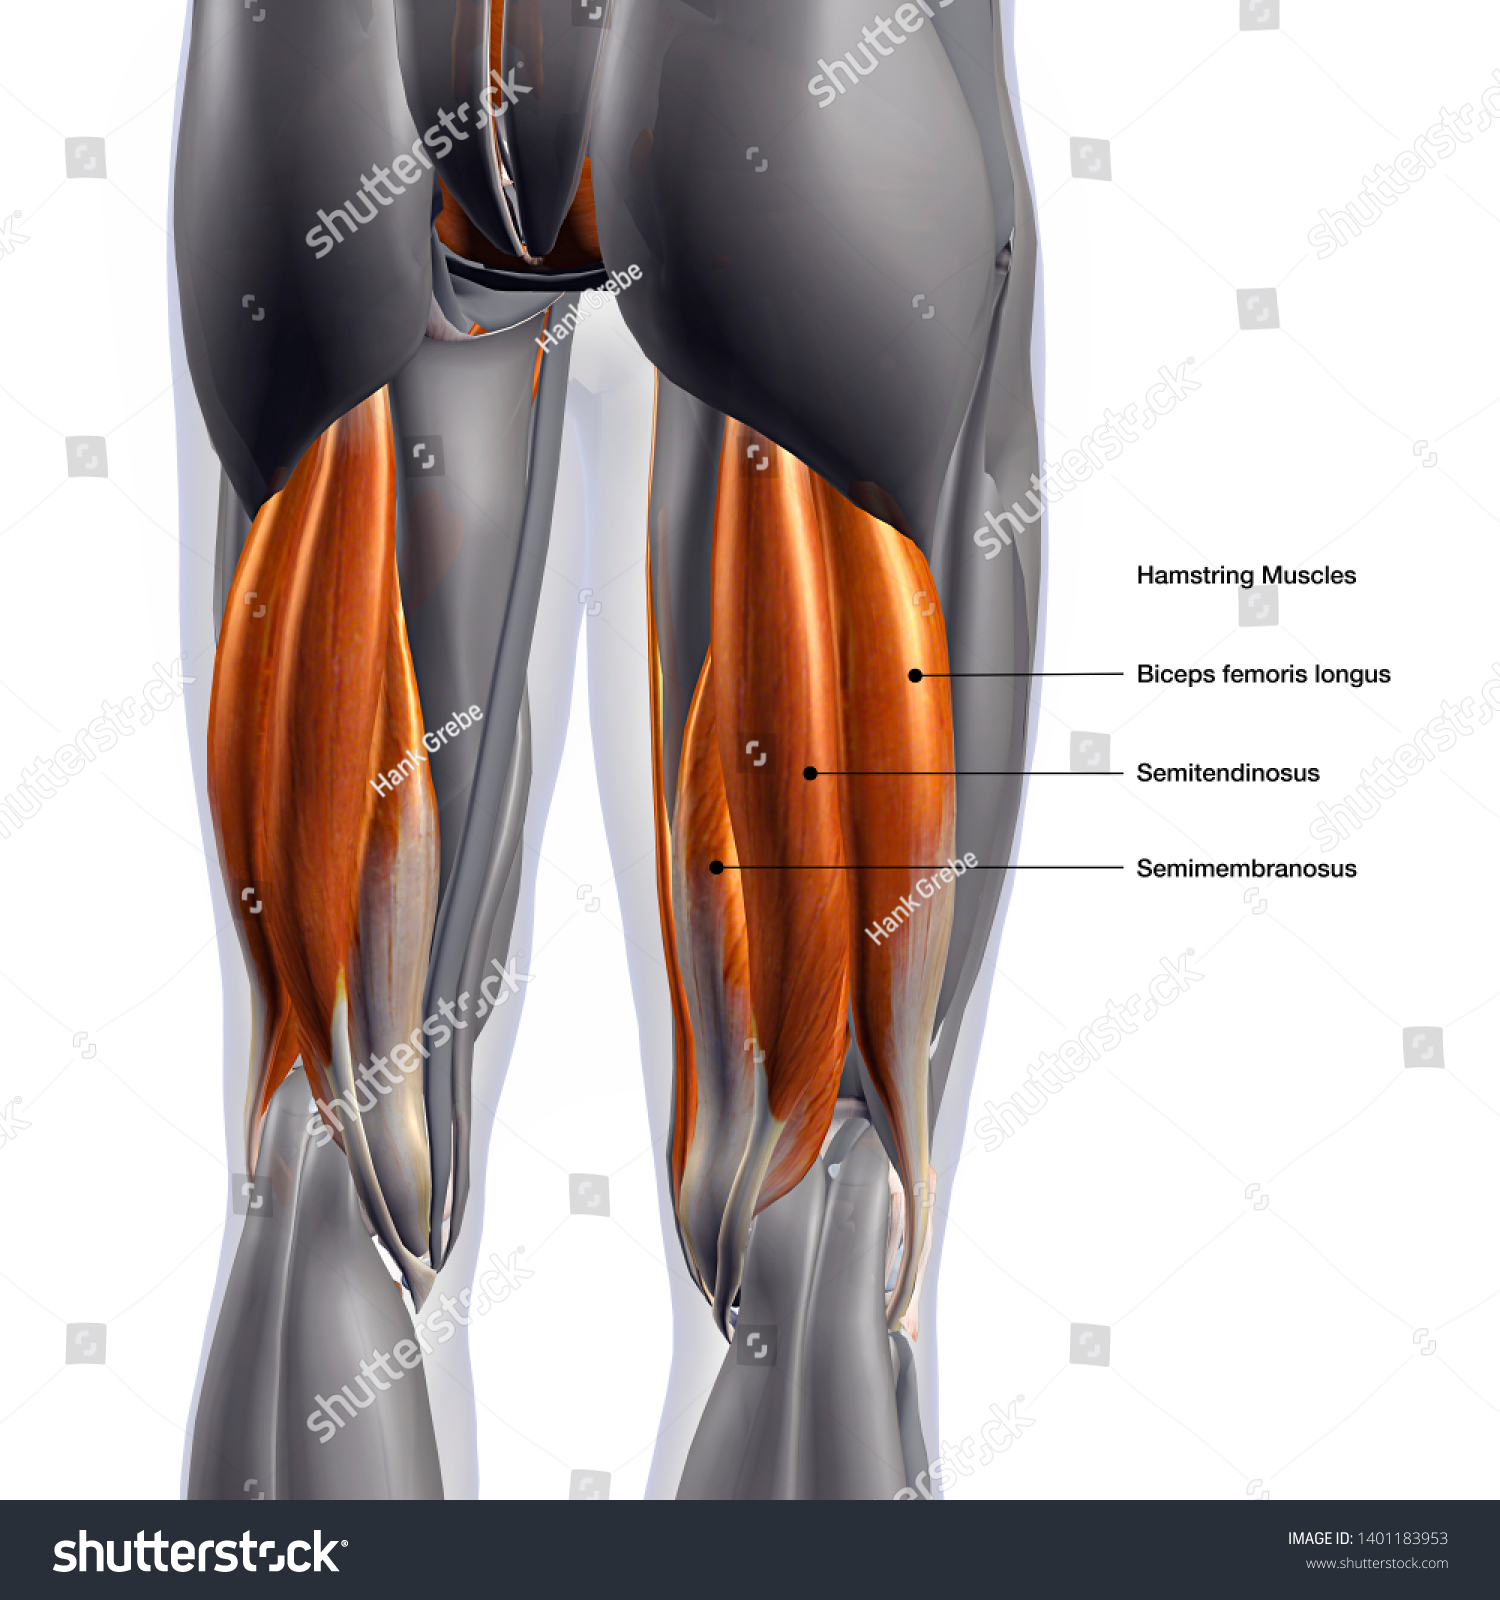
4. **Hamstring Stretch (Lying and Standing Variations)**Tightness in the hamstring muscles is a common factor that can exacerbate or even contribute to sciatica symptoms. The hamstrings are a group of three muscles situated at the back of your thighs, and given that the sciatic nerve passes through these muscles, excessive tightness can lead to compression of the nerve, resulting in pain and discomfort radiating from the thigh downwards. Dedicated hamstring stretching is vital to alleviate this.
One effective method is the lying hamstring stretch. Begin by lying comfortably on your back. Raise the affected leg towards the ceiling, using your hands to hold the thigh for extra support. Gently extend your knee joint until you feel a mild, comfortable stretch along the back of your thigh. Hold this stretch for 20-30 seconds, allowing the hamstring muscles to lengthen and relax. Slowly release the leg and repeat 3-4 times on the affected leg.
For a standing approach, place one foot on a slightly elevated surface, such as a stair step, ensuring the leg on the step is straight with toes pointed upward. While keeping your back straight, gently lean slightly forward at your hips until you feel the stretch intensify along the back of your thigh. Avoid rounding your back. Hold for 20-30 seconds, and repeat for two to three repetitions with each leg. This helps improve nerve mobility by freeing the sciatic nerve from potential compression.
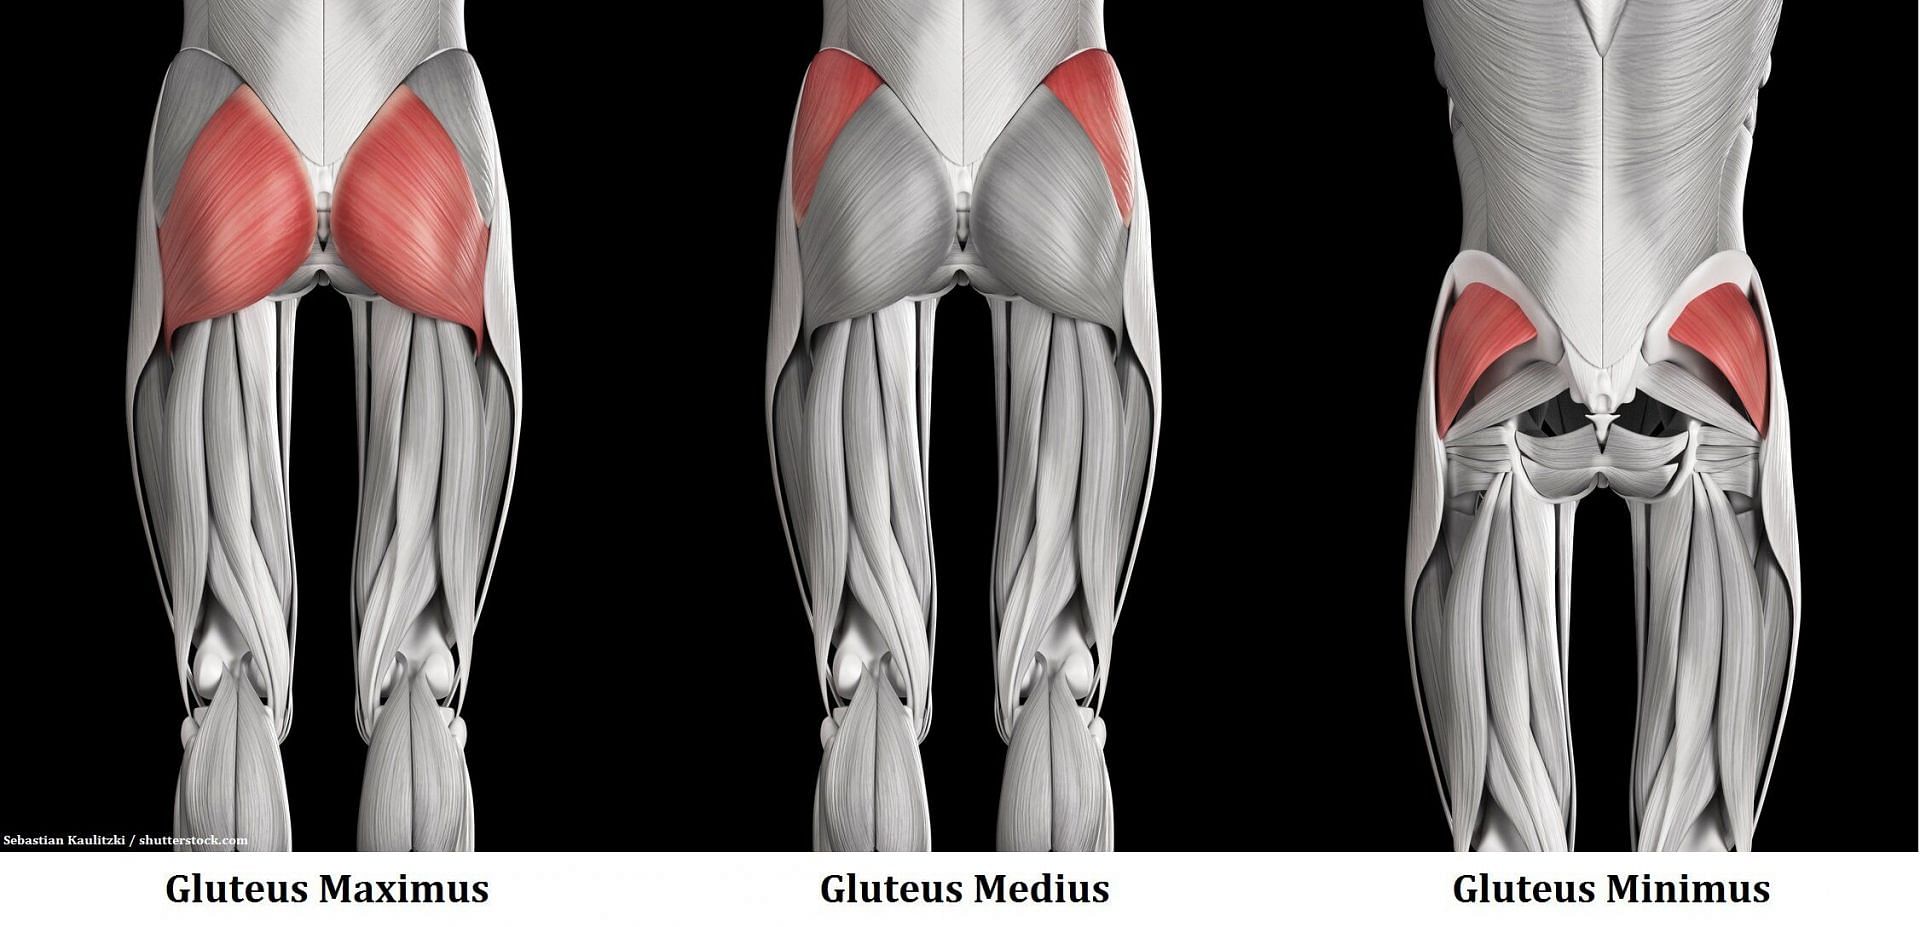
5. **Glute Stretch (Crossover Technique)**Overly tight gluteal muscles can significantly contribute to sciatic nerve compression and pain, as the glutes, particularly deeper muscles like the piriformis, are in close proximity to the sciatic nerve. When these muscles become tight, they can directly impinge upon the nerve, leading to uncomfortable sciatic symptoms. The crossover glute stretch is an excellent way to target these muscles, specifically helping to reduce tightness and prevent complications.
To begin this stretch, lie down on your back with both legs bent and your feet placed flat on the floor. Next, cross the affected leg over the other leg’s knee. For instance, if your right side is affected, place the outside portion of your right ankle on the outside portion of your left knee. Using the hand corresponding to your unaffected side, gently push the affected side’s knee towards the unaffected side.
As you push, feel a distinct, gentle stretch in the glute area of the affected leg. Control movement, pushing only until comfortable tension, not pain. Hold this position for 20-30 seconds, allowing muscles to relax and lengthen. Slowly release and repeat 3-4 times on each side for balanced flexibility. This glute stretch provides substantial relief by addressing muscle tightness contributing to sciatic nerve irritation.
Navigating the landscape of sciatica relief means embracing a comprehensive set of movements designed to support and strengthen your entire core and lower body. Having explored the initial set of foundational exercises, we now turn our attention to additional highly effective strategies that build on spinal stability, core engagement, and gentle muscle lengthening. These next exercises further empower you to take an active role in managing your discomfort and fostering long-term well-being.
6. **Plank**Building a strong core is paramount in managing sciatica and preventing future flare-ups. The plank is an exceptional exercise for achieving this, as it effectively builds core strength while simultaneously improving spinal stability. By engaging multiple muscle groups across your trunk, the plank creates a natural muscular corset that supports your lower back, helping to stabilize the spine and reduce the risk of irritation to the sciatic nerve.
This exercise works by requiring your abdominal muscles, back muscles, and glutes to work in concert to maintain a rigid, straight line with your body. This isometric hold strengthens deep core muscles without any spinal movement, making it particularly safe and effective for those with sciatica. A strong and stable core reduces the pressure on spinal discs and nerve roots, which are often implicated in sciatic pain.
To perform the plank, begin by lying face down on a mat or the floor, with your feet placed about shoulder-width apart. Prop yourself up on your elbows, ensuring they are directly beneath your shoulders. Then, lift your entire body off the ground, forming a straight, horizontal line from your head to your heels.
Engage your abdominal muscles by imagining you are pulling your belly button towards your spine, and avoid letting your hips sag or rise too high. Hold this position for 10 to 15 seconds, focusing on controlled breathing. Gently lower yourself back to the starting position and repeat this sequence 3 to 4 times. As your strength improves, you can gradually increase the holding time.
Read more about: Beyond the Bulk: Chris Hemsworth’s Real Health Journey and the Truth About ‘Harmless’ Supplements
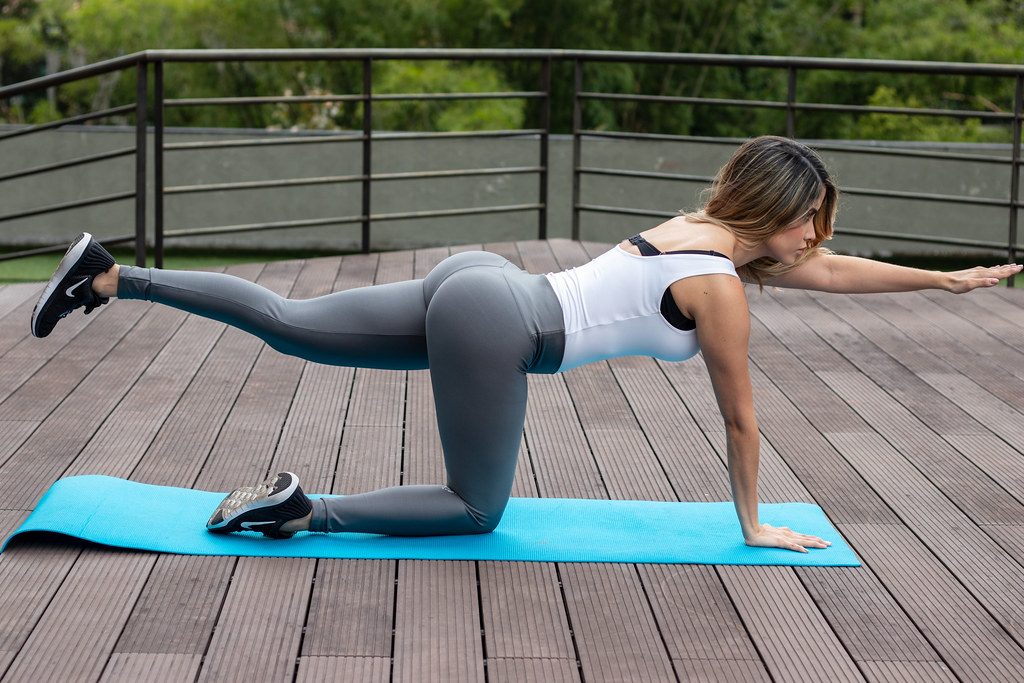
7. **Bird Dog Pose**The Bird Dog Pose is another excellent exercise for cultivating core strength, but it also brings the added benefit of enhancing coordination. This movement challenges your body to maintain spinal stability while moving opposing limbs, thereby strengthening the muscles that support your lumbar spine and improving neuromuscular control. For individuals with sciatica, better coordination and spinal stability translate to more efficient movement and reduced strain on the lower back.
This exercise teaches your core to brace effectively during dynamic movements, which is essential for protecting the sciatic nerve during daily activities. It helps to develop an awareness of proper spinal alignment and strengthens the deeper stabilizing muscles around the spine, ensuring that the back remains supported and protected as you move through your day.
To begin the Bird Dog Pose, kneel down on all fours, positioning your hands directly under your shoulders and your knees directly under your hips. Maintain a neutral spine, avoiding any arching or rounding, and gently brace your abdominal muscles. Your gaze should be focused about a foot in front of your hands to keep your neck in alignment.
Slowly raise your left arm straight out in front of you, bringing it to shoulder level with your fingers pointing forward. Simultaneously, lift your right leg straight behind you to hip level, stretching it backwards. Your arm, leg, and back should form a straight, continuous line. Hold this position briefly for 15 to 20 seconds, then gently relax and return to the starting position. Repeat the movement on the opposite side, raising your right arm and left leg. Aim for 3 to 4 repetitions on each side, focusing on slow, controlled movements and maintaining a stable core throughout.
Read more about: The Enduring Saga of the American Robin: An In-Depth Look at North America’s Most Prolific Songbird

8. **Knee-to-Chest Stretch**For those experiencing the deep ache of sciatica, the Knee-to-Chest stretch offers a wonderfully gentle yet effective way to lengthen the muscles of the lower back and gluteal region. This simple movement provides a gentle decompression for the lumbar spine and can help to ease tension in the deep muscles of the buttocks, which may be contributing to sciatic nerve irritation. It’s a fundamental stretch for promoting relaxation and reducing stiffness.
The soothing nature of this stretch can significantly aid in pain relief by gently stretching out compressed areas and encouraging better blood flow to the lower back. By gently pulling the knee towards the chest, you create a mild traction effect on the lower spine, which can help to reduce nerve impingement and alleviate radiating pain, especially beneficial after periods of prolonged sitting or standing.
To perform this calming stretch, lie comfortably on your back with your legs bent and your feet placed flat on the floor, hip-width apart. Keeping your head and shoulders relaxed on the mat, gently bring one knee towards your chest, using your hands to grasp the back of your thigh or shin. Pull your knee in only as far as is comfortable, feeling a gentle stretch in your lower back and glute.
Hold this position for up to 30 seconds, maintaining a steady and deep breath. Slowly release your leg back to the starting position and repeat the process with the other leg. Aim for 3 repetitions on each leg. For an advanced variation, you can bring both knees to your chest simultaneously, holding them for 30 seconds, ensuring your lower back remains pressed into the floor throughout the stretch.

9. **Glute Bridges**The gluteal muscles, or glutes, are powerhouses that play a critical role in supporting your pelvis and lower back. When these muscles are weak or inactive, other structures, including your spinal column, can bear undue stress, potentially exacerbating sciatica. Glute bridges are a fantastic exercise designed to strengthen these vital muscles and improve hip mobility, providing robust support for your lower back and helping to alleviate pressure on the sciatic nerve.
Strong glutes not only act as a protective shield for your spine but also improve your body’s overall biomechanics. This exercise specifically promotes hip extension, which can counteract the effects of prolonged sitting that often contribute to glute weakness and tightness. By engaging and strengthening your glutes, you help to restore balance in your posterior chain, which is key to reducing strain on the sciatic nerve pathways.
To execute the glute bridge, lie on your back with your knees bent and your feet placed flat on the floor, approximately shoulder-width apart. Your arms should rest comfortably at your sides, palms down. As you exhale, push through your heels and actively squeeze your glutes to lift your hips off the floor.
Continue lifting until your body forms a straight line from your knees to your shoulders. Hold this elevated position for several seconds, maintaining a strong glute contraction, then gently and with control, lower your hips back to the floor. Focus on a smooth, fluid movement, avoiding any sudden drops or arching of your back. Begin by aiming for 8 to 10 repetitions, and as your strength increases, you can progress to multiple sets, ensuring good form is maintained throughout.
Read more about: 14 Wild Ways Cycling Is More Than Just a Ride (Plus, How You Can Join the Fun!)

10. **Sitting Trunk Stretch**The Sitting Trunk Stretch is a beneficial exercise for enhancing both spinal rotation and overall flexibility. For those suffering from sciatica, this controlled twisting movement can gently mobilize the thoracic and lumbar spine, promoting greater range of motion without placing excessive stress on the sciatic nerve. It’s particularly effective at relieving tightness in the back and hip muscles that might be restricting movement and contributing to discomfort.
By carefully improving your spinal flexibility, this stretch helps to decompress the spine and can ease the tension that might be impinging upon the sciatic nerve. The rotational aspect encourages improved circulation and can help to release knots and stiffness that often accompany sciatic pain, allowing for a more fluid and less restricted feeling in your torso and hips.
To perform this stretch, sit comfortably on the ground with your legs extended straight out in front of you and your toes flexed upward. Bend your right knee and lift your foot, placing it on the outside of your left leg, positioned near your left knee. Now, bring your left elbow to the outside of your right knee and gently push into it, initiating a gentle twist towards the right side of your body. You should feel a mild stretch through your back and gluteal region.
Hold this position for 20 to 30 seconds, allowing your body to relax into the stretch with each breath. Be mindful not to force the twist; the movement should be gentle and pain-free. Slowly release the stretch and return to the starting position, then switch sides and repeat the entire process for the other leg. Aim for 2 to 3 repetitions on each side, ensuring that you maintain a controlled and steady movement throughout.
Read more about: Tire Specialist’s ‘Crucial’ Tips: Double Your Tire Life Without Ever Buying a More Expensive Brand
11. **Pelvic Tilts**Pelvic tilts are deceptively simple yet profoundly effective exercises for strengthening the lower back, glutes, and lower abdominal muscles. This movement is excellent for increasing awareness and control over the pelvic region, which is often a cornerstone of effective sciatica management. By consciously engaging your core, pelvic tilts help to stabilize the lumbar spine and can provide gentle decompression, offering relief from persistent back pain.
The practice of pelvic tilts helps to restore the natural curve of your lower back and strengthens the muscles that support it, counteracting the effects of poor posture or prolonged sitting. This improved muscular support can directly reduce mechanical stress on the sciatic nerve, fostering an environment conducive to healing and pain reduction. It’s a foundational exercise for rebuilding core strength and spinal health.
To begin, lie on your back with your knees bent and your feet flat on the floor, hip-width apart. Your arms should rest comfortably at your sides. Gently tighten your abdominal muscles, imagining you are pulling your belly button towards your backbone, and simultaneously press your lower back firmly into the floor. As you do this, you will notice your hips and pelvis gently tilting upward.
Hold this tilted position for a few seconds, taking deep, steady breaths, and focusing on the engagement of your core and lower back muscles. Slowly release the position, allowing your back to return to its natural curve and your muscles to relax. Aim to perform 2 to 8 repetitions of this exercise. Consistency with pelvic tilts can significantly improve your core stability and provide lasting relief from sciatica symptoms.
Embarking on a journey to alleviate sciatica pain can feel daunting, but with the right knowledge and a commitment to movement, significant relief is within reach. The exercises outlined in this comprehensive guide, from gentle nerve glides to core-strengthening planks and targeted stretches, represent a powerful arsenal approved by physical therapists to help you reclaim comfort and mobility. Each movement is a step towards understanding your body better and empowering it to heal.
Remember, consistency is your greatest ally in this process. Incorporating these exercises into your daily routine can gradually strengthen supporting muscles, decompress your spine, and improve the overall flexibility that your body craves. The path to relief is not a sprint, but a steady progression, celebrating small victories along the way as you regain freedom from pain.
Ultimately, managing sciatica is about nurturing your body and providing it with the tools it needs to thrive. By embracing these evidence-based exercises and understanding when to seek professional guidance, you are taking an empowered approach to your health. Your body has an incredible capacity for healing, and with patience and persistence, you can move towards a life that is more active, more flexible, and wonderfully free from the grip of sciatica.


