

For anyone who’s ever turned the key and heard only a click, or noticed their dome lights flickering like a faulty neon sign, the frustration of an electrical problem in a car is all too familiar. An automobile, including the robust models from Japanese manufacturers, is a complex network—a veritable maze of wires, fuses, and a myriad of electrical components. When even one of these crucial parts decides to malfunction, the consequences can range from a noticeable dip in performance and efficiency to the outright refusal of your vehicle to start at all. Such issues are not just inconveniences; they can leave you stranded and facing unexpected repair bills.
Understanding the intricacies of your car’s electrical system, while seemingly daunting, is a fundamental aspect of proactive car ownership and basic maintenance. Far from being reserved for professional mechanics, a basic grasp of common electrical issues can empower you to diagnose problems early, potentially saving you time, money, and a great deal of stress. It’s about demystifying the ‘why’ and ‘how’ behind those perplexing electrical glitches that can plague any vehicle.
In this in-depth guide, we’ll strip away the complexities and dive into some of the most prevalent electrical problems that can affect your car, providing practical insights and troubleshooting steps. We’ll start with the most frequent culprits and progress through other significant issues, offering you a clearer picture of what might be going wrong under the hood. Our aim is to equip you with the knowledge to identify, and in some cases even rectify, these common electrical conundrums, ensuring your ride stays smooth and reliable.

1. **Dead or Faulty Battery**Without a doubt, the dead or faulty battery reigns supreme as the most common electrical problem that car owners encounter, and it’s certainly a major one. When your car struggles to start, or presents you with the unwelcome silence of no power at all, the battery is invariably the very first component you should inspect. Its role is fundamental: upon startup, the engine demands a significant burst of amperage from this power reservoir.
If your battery is depleted, or has simply reached an age where it can no longer deliver sufficient power, you’ll notice the engine taking longer than usual to ignite, if it even fires up at all. One of the classic indicators of a weak or aging battery is a slow, labored cranking sound from the engine. Alternatively, you might experience a hard-starting problem where the engine doesn’t crank at all, but instead produces a rapid clicking sound, signaling an almost or completely dead battery with insufficient power to even turn the engine over. A slight click followed by no start might also point to a faulty battery or one that isn’t receiving adequate charge from the alternator, which is another common electrical problem in its own right.
Beyond starting issues, a weakened battery often manifests through the simultaneous malfunction of multiple electrical accessories. If several features cease to work correctly at once, it’s a strong indicator of a battery problem, rather than an isolated accessory failure. This can include anything from dim headlights struggling to cut through the night, to the dashboard lights gradually dimming while the car is running, or even a persistent buzzing noise emanating from the radio speakers. The battery, when compromised, simply cannot provide the consistent power needed to operate these various systems.
Hard starting problems tend to be more prevalent during the colder months, as extreme temperatures place additional stress on car batteries. While newer batteries (under three years old) generally exhibit better resilience to freezing conditions, a battery’s strength naturally diminishes with age. Therefore, if you reside in an area where winter temperatures frequently dip below freezing and you awaken to a dead battery, it’s often a clear signal that your battery is nearing the end of its serviceable life and will soon require replacement. It’s also crucial to avoid repeatedly depleting your car batteries too deeply before recharging, as too many deep discharges accelerate battery deterioration and shorten its overall lifespan, leading to costly premature replacements.
Monitoring your battery’s health is made simple with a multimeter or voltmeter, which measures its stored power in voltage. A fully charged battery typically holds 12.6 volts or above. A reading of 12.2 volts indicates it’s only 50% charged, and anything at or below 12.2 volts is considered weak, necessitating a recharge to restore it to full capacity. Should your battery measure 12 volts, it’s generally deemed ‘dead’ and is due for a replacement. Maintaining a sufficiently charged battery is also vital for the health of other components; a depleted battery forces the alternator and starter motor to draw excessive voltage to compensate, overworking them and potentially leading to their premature malfunction and replacement.
Read more about: The 2025 Lemon List: 14 Cars to Avoid That Mechanics Already Dread Seeing

2. **Other Battery Problems (Loose/Corroded Terminals)**While a dead or faulty battery is a primary concern, other common battery-related issues often involve the connections themselves: loose battery terminal connections and corrosion on the terminals. For your battery to perform its critical function properly, all connections must be secure and intact. Corroded or loose terminals, alongside frayed or damaged cables, can significantly impede the alternator’s ability to effectively charge the battery and deliver the necessary power to start your car. This essentially creates a bottleneck in the electrical flow, even if the battery itself is otherwise healthy.
These seemingly minor electrical problems can produce symptoms remarkably similar to a weak or dead battery. You might experience weak or no cranking, dim dash lights and dome lights, malfunctioning electrical accessories, or a complete lack of ignition. This similarity can be misleading, often causing car owners to unnecessarily purchase and install a new battery when the underlying issue lies solely with the connections. To avoid such expensive and unneeded replacements, it’s always a smart practice to thoroughly inspect your battery for loose or corroded terminals before jumping to conclusions about the battery’s health itself.
Corrosion is a natural phenomenon inherent to all types of automotive batteries, resulting from the chemical reactions that occur at the terminals and battery cable ends. This corrosive buildup typically appears as a crusty, ashy substance forming around the battery posts, commonly presenting in white or green hues. Another specific corrosive process known as “sulfation” manifests as white sulfur crystals, usually found on the negative battery terminal. This occurs when a battery is persistently undercharged, perhaps because the car is only driven for short trips, preventing the alternator from having sufficient time to fully replenish the battery, or simply due to an aged battery that struggles to hold a charge. Conversely, if sulfur crystals accumulate around the positive electrode, it’s often a sign that the alternator is overcharging the battery, a condition equally detrimental to its lifespan.
Fortunately, addressing loose terminals and cleaning corrosion is a straightforward task that most car owners can manage. Begin by safely disconnecting the negative cable first, followed by the positive cable, to prevent accidental shorts. Then, apply a mixed solution of baking soda and water, or a specialized commercial cleaner designed for this purpose, directly to the corroded terminals. Using a detailing brush or even an old toothbrush, gently but thoroughly scrub away the accumulated corrosion until the connections are clean. After scrubbing, wipe the areas clean and allow them to dry completely before reattaching the cables.
However, if the terminals or cables show signs of severe physical damage, such as deep pitting from corrosion or extensive fraying, a complete replacement will be necessary to ensure reliable electrical flow. Furthermore, it’s prudent to inspect the insulation – the plastic or rubber cover on the cables – for any signs of drying, cracking, or peeling, and to verify that the copper strands within are intact. Damaged insulation can expose wires to further corrosion or short circuits, so replace these if any damage is noted.

3. **Damaged or Broken Alternator**Should you encounter a hard-starting problem, especially when the engine is warm—meaning the car has been running—and you’ve already confirmed your battery is relatively new and in good condition, then the alternator typically becomes the primary suspect. The alternator functions as your car’s charging system, essentially a generator. It converts the car’s mechanical energy, derived from the engine’s rotation, into electrical energy. This electricity is crucial not only for continuously recharging the battery but also for powering the myriad of electrical components throughout your vehicle, including dash lights, dome lights, the stereo system, and the air conditioning. Optimal performance from your alternator is directly linked to maximizing your car’s battery lifespan, as both undercharging and overcharging can be significantly detrimental to the battery’s health and longevity.
It’s important to note that a hard-starting problem isn’t exclusively caused by a faulty alternator itself. A damaged or worn alternator belt can also be the culprit, preventing the alternator from spinning efficiently and generating power. Therefore, as part of your diagnostic routine, always check if the alternator belt is intact and properly tensioned, replacing it if it shows any signs of wear, cracks, or looseness. This simple inspection can sometimes save you the effort of delving deeper into the alternator unit itself, addressing a common accessory issue that directly impacts the charging system’s effectiveness.
Regular testing of your alternator, much like your battery, is a recommended practice, ideally every four to six months using a multimeter. To accurately test the alternator, you must first ensure your battery is healthy enough to start the car. This is because the battery initiates the engine’s start-up sequence; once the engine runs, it spins the alternator, which then maintains the battery’s charge. If the battery is too weak to start the car, the alternator cannot be engaged and thus cannot be properly tested. This sequence highlights the interconnectedness of these critical electrical components.
When testing an alternator, the procedure mirrors that of checking battery voltage, with a key difference: the engine must be running. Before taking a reading, ensure all electrical accessories that might draw power are switched off. A healthy alternator should consistently produce a voltage output between 13.1V and 14.6V at regular idle speed. A reading lower than this range indicates that your car is undercharging, which can lead to a depleted battery over time. Conversely, a reading higher than this range suggests overcharging, a condition equally detrimental as it can boil the battery’s electrolyte, significantly shortening its life and potentially damaging other electrical components.
Common alternator issues can manifest in various ways, often signaled by the car battery warning light on the dashboard. Low voltage output, where the warning light remains on or appears dim, typically means the alternator isn’t generating sufficient power (below 13.5 volts). This could stem from issues with the voltage regulator, rectifier diodes, weak or corroded wiring connections to the alternator, a loose serpentine belt, or problems with the commutator, rotor, or stator – though rotor and stator failures are rarer. Weak power output usually leads to poor cranking, dim headlights, and eventually a completely depleted battery that cannot start the car. On the other hand, high voltage output (above 14.5 volts) is usually caused by a faulty voltage regulator or, less commonly, a stator overload from a regulator malfunction or a rare rectifier issue. Telltale signs include car bulbs, particularly headlight bulbs, burning out frequently, and a distinct sulfur-like smell emanating from the engine bay. This odor signifies the battery receiving too much charge and starting to ‘boil’ internally. Such a problem demands immediate attention, as it can inflict major damage on the car battery, other electrical appliances, the ECU, and the alternator unit itself.
Read more about: A Wallet-Sized Disaster: 14 Critical Engine Symptoms That Signal Early Motorcycle Rebuilds

4. **Faulty Starter**Following a weak or dead battery and a compromised alternator, the next most probable electrical mishap leading to a slow or non-starting problem is a faulty starter motor. This critical component may very well be in need of repair or a complete replacement. As its name implies, the starter motor is an integral part of an electrical circuit specifically designed to set the engine in motion, initiating the combustion process. To perform its essential task, it relies on receiving an electrical current directly from the battery, effectively transforming electrical energy into mechanical force.
Diagnosing a faulty starter is often quite straightforward once you rule out battery and alternator issues. Since the starter is solely responsible for kickstarting the engine, a key indicator of its malfunction is the distinct absence of any cranking noise when you turn the ignition key. Unlike a dead battery that might produce a rapid clicking sound, a truly faulty starter often results in silence or a single, weak click with no further action, indicating it’s not engaging the engine’s flywheel. This direct correlation makes it relatively easy to pinpoint the starter as the source of your woes.
If you suspect the starter, the initial troubleshooting step involves checking for anything that might be obstructing the flow of electrical current to the starter motor. Pay close attention to the connections and joints of all cables that run between the starter and the battery. Loose connections at these points can prevent the necessary power from reaching the starter, effectively rendering it useless. Carefully inspect these connections and tighten anything that appears to be slack, ensuring a proper and uninterrupted flow of current to the starter motor. This simple act of tightening can often resolve what appears to be a more complex issue.
Furthermore, corrosion accumulation can also be a significant impediment to the starter’s operation. Inspect both the starter motor itself and the cable clamps and terminals of the battery for any signs of corrosive buildup. Just as with battery terminals, corrosion on starter connections can create resistance, hindering the electrical current. To address this, first, disconnect the battery for safety. Then, use a fine-grade sandpaper or a wire brush along with a suitable cleaning solution to thoroughly remove any buildup. A clean, conductive connection is vital for the starter to draw sufficient power and function as intended.
Another specific reason for the starter not working, yet often overlooked, is a stuck gear. This particular scenario typically presents itself when the starter motor appears dead, but other electrical components like the windshield wipers and headlights are functioning perfectly normally. In such cases, the starter’s drive gear, which engages with the engine’s flywheel, might be stuck. To attempt a temporary fix, locate the starter motor—it’s usually bolted to the engine block—and give it a few gentle taps with a hammer or a wrench. It’s crucial to use a light hand to avoid causing any damage to the component. This physical nudge can sometimes dislodge the stuck gear, allowing the starter to operate again, at least for a short period, enabling you to get your car started and to a repair shop.
Read more about: $1000 Repair: The 1 Thing Your Mechanic Doesn’t Want You to Know About Your Brakes
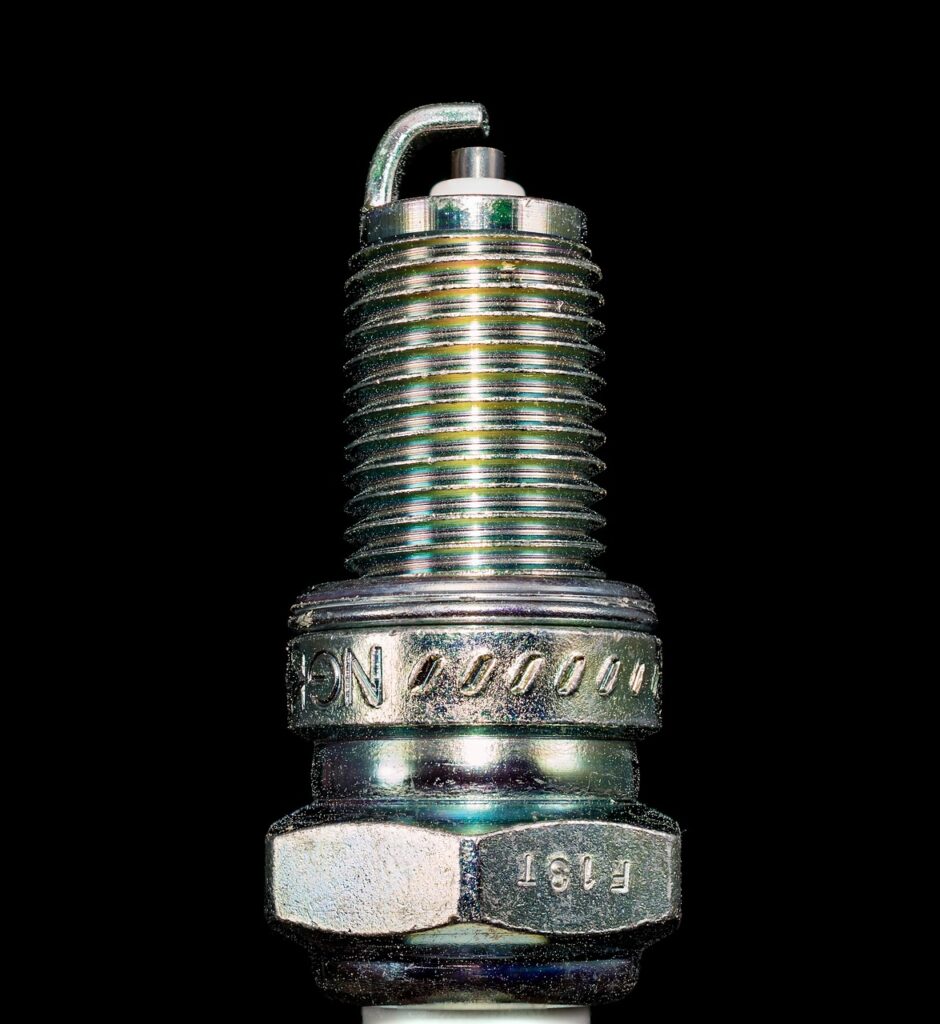
5. **Failed Spark Plugs / Glow Plugs**The spark plug, in petrol engines, and the glow plug, in diesel engines, are both vital electrical components prone to wear and tear due to their extensive and demanding use. In petrol engines, spark plugs are responsible for supplying the electrical spark that ignites the precisely measured air and fuel mixture within the engine’s combustion chamber. This ignition creates a series of controlled explosions, which is the fundamental mechanism for producing the power that drives your vehicle. Glow plugs, conversely, are found in diesel engines and serve to heat up the cylinder, making it easier for the diesel fuel to ignite under pressure, especially during cold starts.
Automotive spark plugs are generally manufactured from highly durable materials, engineered to withstand millions of these intense, miniature explosions before they eventually require replacement. However, over time, the relentless cycle of repeated explosions, combined with the effects of corrosion, inevitably leads to the electrodes becoming worn. This wear reduces their ability to generate robust sparks, resulting in smaller or weaker electrical arcs. Most automakers provide clear guidelines, typically recommending that spark plugs be replaced roughly every 30,000 to 50,000 miles to maintain optimal engine performance.
Faulty spark plugs can lead to a variety of noticeable problems, significantly impacting engine operation. These include tell-tale engine misfires, where one or more cylinders fail to ignite properly, causing a rough idle or hesitation. The Check Engine light on your dashboard is also a common indicator of spark plug issues, as the engine’s computer detects these misfires. Furthermore, worn-out spark plugs are a frequent cause of hard starting problems, as not all cylinders receive the necessary spark for ignition, especially in colder conditions when the engine needs reliable, consistent sparks to fire up.
At the core of spark plug wear is the erosion of the electrode. If you closely examine a spark plug, you’ll notice its distinct shape: one end is often bulbous, with a small metal rod protruding from its center. This central rod is the electrode, from which electricity arcs across to a small metal hook (the ground electrode). Through normal operation, this crucial gap between the two leads gradually widens due to erosion. As this gap increases, the spark plug struggles to create a strong, consistent electric arc, or in severe cases, any arc at all. The worst-case scenario involves a spark plug corroding to the point of breaking apart, which could lead to significant internal damage within the cylinder, necessitating an extremely expensive engine repair.
When you decide to replace your spark plugs, it’s also a highly recommended practice to replace the spark plug wires simultaneously. While you should periodically inspect your spark plugs for integrity, it’s equally important to examine their accompanying wires for any signs of frays, cracks, or even unexpected bites. Some spark plug wires are manufactured using soy-based materials, which, surprisingly, can become an appealing snack for rodents, leading to damage that compromises the electrical connection. For diesel engines, while glow plugs are also made from heavy-duty materials, they are fundamentally heaters and, like all heating elements, will eventually burn out. Typically, glow plugs fail one by one rather than all at once, which means if only one burns out, the engine may still start normally, sometimes without any warning light. However, when two or more glow plugs fail, problems become evident, most notably with hard cold starts where the engine requires significantly more cranking than usual to ignite. The best preventative measure for both spark and glow plug issues is adhering to regular maintenance intervals and, if possible, replacing the complete set rather than individual units to ensure consistent performance across all cylinders.
Read more about: Demystifying the Dreaded Engine Knock: Your Ultimate Guide to Diagnosis, Repair, and Prevention for a Quiet Ride

6. **Blown Fuse**In any electrical installation, particularly within the intricate systems of a car, the potential for a “short” or short circuit is an ever-present concern, which can lead to significant hazards such as burned wirings and appliances, and in extreme cases, even fire. To preempt such catastrophic outcomes, fuses are ingeniously integrated into the electrical system. These small, yet vital, components are deliberately designed as weakened spots within the circuit. Their purpose is to burn out and break the circuit the moment a short-circuit or any other form of electrical overload occurs. This sacrificial action effectively isolates the fault, protecting more expensive and crucial components, as well as the entire electrical installation, from major damage. Thus, fuses are an absolutely vital part of any electric installation, acting as the first line of defense against electrical catastrophes.
Given their protective role, fuses are, by design, meant to burn out when an electrical fault occurs. This means that a blown fuse is not necessarily a sign of a deep, systemic problem, but rather an indication that the safety mechanism has done its job. Consequently, this particular electrical problem is, thankfully, one of the easiest to fix, requiring minimal tools and expertise. The solution is straightforward: you simply need to locate the burned-out fuse, carefully pull it out from its housing, and replace it with a new one.
The most crucial aspect of replacing a blown fuse is to ensure that the new fuse has the correct amperage rating. Using a fuse with a lower amperage might cause it to blow prematurely, while a fuse with a higher amperage rating could fail to protect the circuit effectively, potentially leading to more serious damage to the wiring or electrical components it’s meant to safeguard. Therefore, always match the new fuse exactly to the specifications of the old one or to what is indicated in your car’s owner’s manual or on the fuse box cover.
While replacing a blown fuse is a simple repair, it’s also a good idea to pay attention to its behavior. If the same fuse you recently replaced blows out again too soon after, or if it happens repeatedly over a short period, then this recurrence serves as a critical warning sign. Such repeated failures strongly suggest that the problem extends beyond a mere fuse replacement; it indicates an underlying, persistent electrical issue, likely a short circuit or an intermittent overload, that is still present in the system. In such scenarios, it’s imperative that you troubleshoot the root cause as soon as possible, as neglecting it could lead to more extensive and costly damage down the line. Ignoring these repeated warnings can compromise the safety and functionality of your vehicle.
Read more about: 14 Brand Rebrands and Logo Disasters That Had Everyone Talking (and Cringing!)

7. **Short Circuits**Where there is any electric installation, there is an inherent likelihood of a “short,” or a short circuit, which fundamentally represents a fault in the wiring harness. Short circuits are one of the oldest electrical problems known in automobiles, dating back to the very first integration of electrical systems into vehicles. These faults are particularly dangerous because they can cause a runaway electrical current, leading to rapid overheating and even the burning of wiring looms and associated appliances within the car. Such critical events can occur in various locations, including discreetly under the hood, within the trunk or cargo area, or even behind the instrument panel, making their detection challenging.
Numerous factors can contribute to the development of a short circuit. Common causes include faulty connectors, which fail to maintain a secure electrical pathway, or damaged relays that regulate power flow. Damaged insulation on wires is another frequent culprit, often occurring if a wire is pinched or abraded during maintenance work on the car, even seemingly simple tasks like paint jobs. Additionally, damaged electrical appliances, or custom appliances that have been improperly installed without adherence to proper electrical guidelines, can induce shorts. Faulty car bulbs, particularly those that have experienced internal filament failure, can also sometimes create a short circuit as their integrity is compromised.
Despite the potential for severe consequences, the repair of a short circuit is often not prohibitively expensive or labor-intensive in terms of tools and materials required. The real challenge, and often the most time-consuming aspect, lies in accurately locating the short circuit. To pinpoint its exact position, you might need to engage in a process of dismantling various parts of the car, which could include removing covers, trim components, and accessing fuse boxes. This necessity for deconstruction means patience and methodical investigation are key when dealing with these types of electrical problems.
Generally, finding a short circuit requires a systematic elimination process. This involves sequentially disconnecting certain parts of the electrical installation until the fault is isolated, at which point the specific location of the short can be pinpointed. For instance, if you suspect a particular circuit, you might disconnect components one by one or test sections of the wiring until the short disappears, narrowing down the search area. This methodical approach is critical, given the complexity of modern automotive wiring.
Once a short circuit is located, the repair usually involves mending or replacing the damaged wire or component. However, it’s important to understand the broader implications of a severe short circuit. When a runaway electrical current overheats and burns through wiring, the excessive heat generated can also cause damage to other wires bundled within the same loom, even if they weren’t directly part of the shorted circuit. Therefore, if a severe short has occurred, it’s highly recommended to perform a complete check-up of that entire section of the wiring installation to ensure there isn’t any collateral damage that could lead to future electrical problems. This comprehensive inspection helps prevent recurring issues and ensures the long-term reliability and safety of your vehicle’s electrical system.
Read more about: Unstoppable Beasts: Ranking the 12 Toughest SUVs That Defy High Mileage and Decades of Wear

8. **Bad or Faulty Electrical Connections and Contacts**While your car’s battery and alternator often take center stage for power-related issues, the entire electrical system is a complex web of connections, each a potential point of failure. Every time a wire is interrupted to insert a switch, a fuse, a relay, or any other component, a vulnerable link is created. These connections are crucial for ensuring power flows precisely where needed, and their integrity is paramount for reliable vehicle operation. Over time, these seemingly robust links can silently degrade, becoming the unexpected source of frustrating and often baffling electrical gremlins.
The harsh automotive environment significantly contributes to connection problems. Corroded or loose contacts are widespread culprits, manifesting as slack screws, loose nuts, or failing internal connector mechanisms. Despite sophisticated insulation, moisture, dirt, and road grime can penetrate defenses, leading to corrosion that impedes electrical conductivity and causes intermittent failures. Constant vibrations from daily driving also cause connections to loosen or wires to fray, creating resistance and interrupting vital current, resulting in varied symptoms like flickering lights or erratic gauge readings.
Fortunately, identifying and rectifying these pervasive electrical problems often involves straightforward, hands-on solutions. A systematic inspection of accessible connectors for corrosion, looseness, or damage is a smart first step. Once located, the fix typically involves thorough cleaning of the contacts with specialized electrical cleaner and a brush, followed by securely tightening any loose fasteners. In cases of severe damage or persistent intermittency, a complete replacement of the affected connector or component is the most reliable long-term solution, restoring proper electrical flow and preventing recurring issues.
Read more about: The Mechanic’s Guide to Silencing Your Dashboard Squeak: A 10-Minute Fix You Can Do at Home

9. **Ground (Minus) Connection**Often overlooked during troubleshooting, the ground connection is a critical, comprehensive network originating from your battery’s negative (-) terminal, extending to the car’s metallic body, engine block, and gearbox. Electrical current requires a complete, closed circuit to flow, traveling from the positive terminal, through components, and back to the negative via these ground paths. A robust and unimpeded ground connection is indispensable for every electrical device in your vehicle to function reliably.
The deceptive nature of ground issues lies in their ability to cause dramatically severe symptoms from seemingly minor faults. A rusty screw, a slightly loose nut, or a corroded connector in the ground path can introduce enough resistance to cripple the entire electrical system. This can lead to anything from dangerous overheating of wiring, to weak cranking, or even complex malfunctions within the Engine Control Unit (ECU) that generate misleading diagnostic codes. These diverse symptoms often send owners down expensive rabbit holes, chasing problems that appear to be located elsewhere.
Compounding the challenge, numerous ground points are scattered throughout modern vehicles, many in hidden locations beyond the main battery-to-chassis links. Locating the exact faulty ground often requires careful visual inspection and systematic multimeter testing. Once found, the repair is usually simple: safely disconnect the battery, loosen and thoroughly clean all contact surfaces (wire terminals, mounting surface, fastener) using sandpaper, a wire brush, and electrical contact cleaner, then firmly re-tighten everything. This small effort can resolve a multitude of perplexing electrical headaches.
10. **Broken or Damaged Wiring (Looms and Connectors)**Your vehicle’s electrical system is a vast, intricate nervous system, comprising hundreds of meters of wiring bundled into looms and snaking throughout the car. Given this complexity, diagnosing a broken or damaged wire can be one of the most formidable challenges in automotive repair. While mending a wire is often simple, finding that elusive break within the labyrinthine network can feel like searching for a needle in a haystack, demanding immense patience and methodical detective work.
The diagnostic journey for compromised wiring often necessitates significant disassembly of vehicle components. This means carefully removing plastic trimming, protective covers, interior panels, and even unbundling entire wire looms to gain visual access to suspect areas. This labor-intensive process is a primary reason why damaged wiring frequently leads to misdiagnoses, where symptoms are wrongly attributed to more complex and expensive components like sensors or relays, sending owners on costly “wild goose chases.”
Wiring damage can stem from various sources. Constant vibrations from daily driving can cause wires to rub against sharp edges, leading to frayed insulation and eventual conductor breakage. Improper maintenance, such as a pinched wire during a paint job or engine overhaul, is another common cause. Sadly, rodents are also culprits, sometimes chewing through soy-based wire insulation. Additionally, poorly executed aftermarket installations can create stress points that eventually fail or induce short circuits.
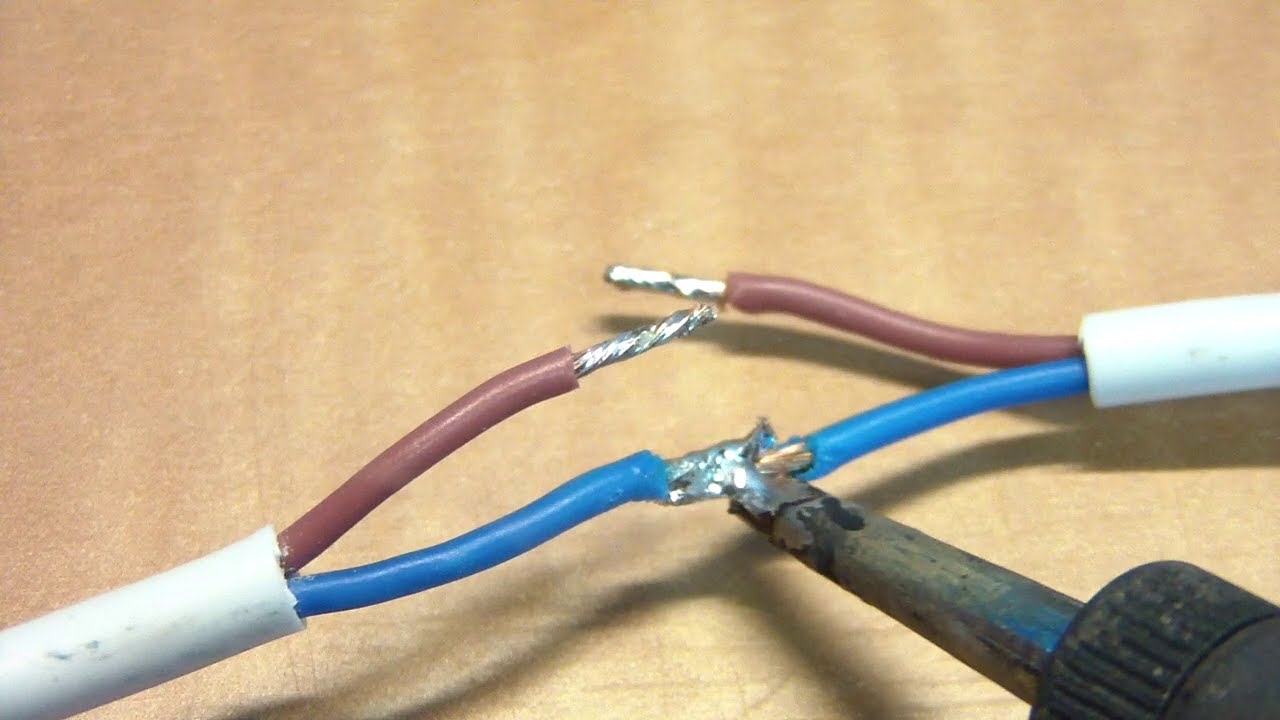
When tackling this, knowledge of your car’s electrical schematics is invaluable, and specialized tools like cable detectors can help pinpoint invisible breaks. Once identified, the repair typically involves carefully splicing in a new section of wire with heat-shrink connectors. In some cases, if the damage is confined to a small, inaccessible segment, strategically bypassing the faulty section with a new, properly protected wire is an option to restore electrical integrity. This meticulous approach prevents recurring issues and safeguards system functionality.
11. **Car Bulbs**While perhaps not as dramatic as a dead battery, malfunctioning car bulbs are undoubtedly one of the most common electrical annoyances drivers face. Like any light source, automotive bulbs have a finite lifespan, and those used most frequently—such as low-beam headlights, high-beams, and position lights—are naturally the first to burn out. These small electrical components are critical for both your visibility and for signaling your intentions to other drivers, making their prompt replacement a matter of safety as much as convenience.
For many vehicles, replacing a burnt-out bulb is a simple, quick DIY task, often involving little more than accessing the bulb housing and swapping the old unit for a new one. The most vital consideration is ensuring the replacement bulb precisely matches the original’s specifications, especially its voltage (commonly 12V) and wattage, to prevent damage or poor performance. However, modern vehicle designs with their crammed engine bays and intricate headlight assemblies can turn this routine task into an ergonomic nightmare. Accessing some bulbs can be so difficult that it necessitates specialized tools or even a trip to a professional garage.
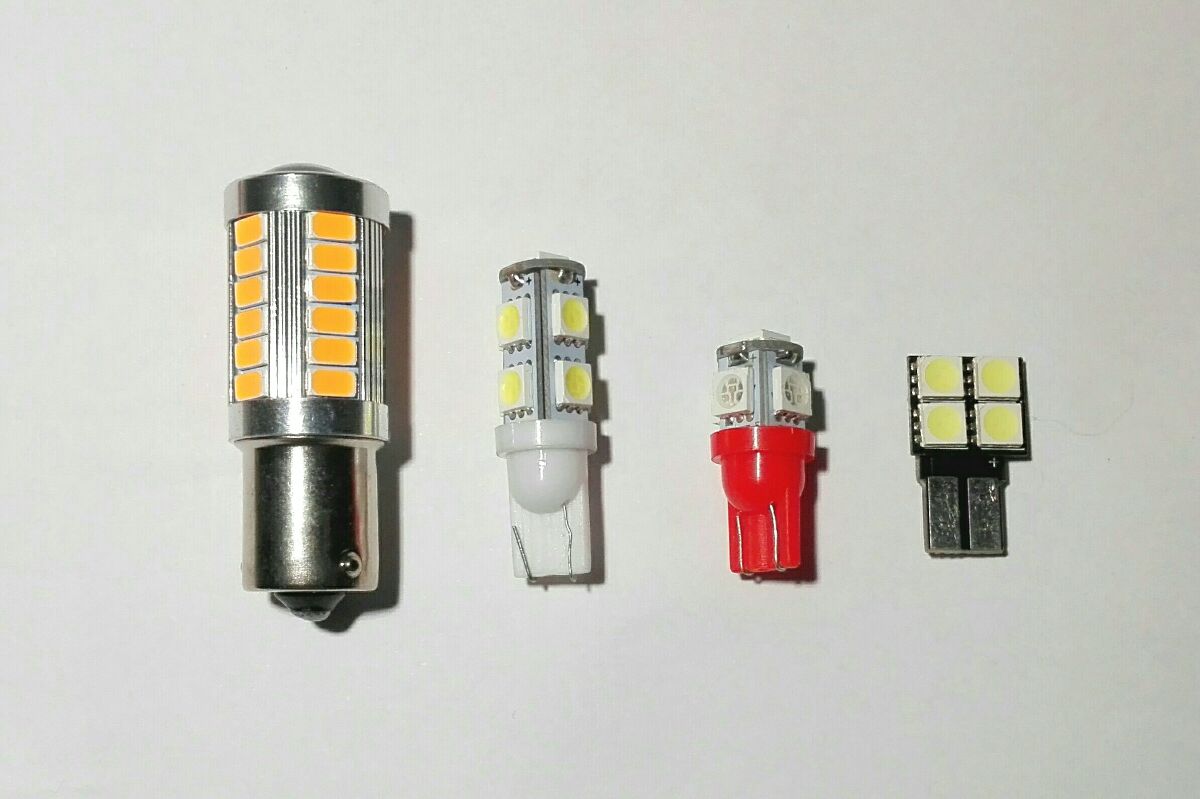
The automotive lighting landscape is also rapidly evolving, with traditional halogen bulbs increasingly giving way to advanced LED technology. LEDs offer compelling advantages: significantly less electricity consumption, minimal heat generation, a superior and more focused beam, and a remarkably longer operational lifespan. Many new cars now feature LED technology as standard. The main drawback, however, is the replacement cost; while they last longer, when an entire LED headlamp unit eventually fails, the expense can be substantial compared to a conventional bulb.
Read more about: The State of Play: Why Aftermarket Headlight Tint Is Prohibited in Nearly Every U.S. State and What Drivers Need to Know

12. **Sensors**In a modern vehicle, the Engine Control Unit (ECU) relies on a myriad of sensors as its vital “eyes and ears,” constantly feeding it critical data on engine temperature, oxygen levels, throttle position, and more. Without accurate input from these sophisticated electrical sentinels, the ECU cannot make the precise adjustments needed for optimal performance, fuel efficiency, and emissions control. They are the silent, indispensable communicators between your car’s physical world and its digital brain.
However, like all electrical components, sensors are susceptible to the relentless march of time and material fatigue. They are often strategically placed in harsh operating environments—exposed to extreme heat, moisture, oil, road grime, and even corrosive exhaust gases. This exposure inevitably leads to their degradation, causing internal electrical failures, corrosion on connectors, or physical damage. Any compromise to a sensor’s integrity means erroneous data is sent to the ECU, leading to a cascade of performance issues that can be difficult to trace.
Physically replacing a faulty sensor can often be straightforward, typically involving unscrewing it, disconnecting the harness, and installing a new unit. The ease of this, however, depends on its accessibility. The true challenge, and where owners frequently encounter problems, lies not in the physical swap but in making an accurate diagnosis. While onboard diagnostics (OBD) tools provide error codes, a faulty sensor can be surprisingly elusive, sometimes operating intermittently or providing misleading readings that mimic other system failures.
This propensity for irregular patterns and false data makes sensor-related electrical problems particularly tricky, demanding a “measure twice, cut once” approach. Advanced diagnostic techniques, including live data monitoring with scan tools and oscilloscope analysis, are often essential to confirm a sensor’s failure definitively. Ultimately, a malfunctioning sensor is a prime suspect for persistent performance issues, erratic behavior, or the illumination of the dreaded “Check Engine” light, highlighting the critical importance of a thorough and informed diagnostic process to avoid costly, unneeded repairs.
Read more about: From Billion-Dollar Bloopers to Daily Drive Disasters: The Top 15 Automotive Tech Fails That Left Drivers Shaking Their Heads

13. **Key Fob Battery**To conclude our exploration of common automotive electrical problems, we turn to one that, despite its utter simplicity, can cause an outsized amount of frustration: a dead key fob battery. In today’s digitized automotive landscape, where physical keys are often secondary, our reliance on these small, unassuming electronic devices has become absolute. These tiny transmitters, powered by a coin-sized battery, facilitate everything from unlocking doors and disabling alarms to initiating the ignition. When that small battery gives up the ghost, a minor electrical issue can rapidly escalate into a major headache, especially if you find yourself without a spare key or battery.
The scenario is a common one: you press the unlock button, and nothing happens. Or, worse, you slide into the driver’s seat, press the start button, and the car refuses to acknowledge your presence, leaving you stranded. This stark reality underscores how dependent modern drivers have become on reliable key fob function. A dead battery can unexpectedly lock you out of your vehicle or prevent it from starting, transforming a mundane routine into a stressful ordeal. The absence of a spare key or even a spare battery only compounds the predicament, potentially necessitating a costly service call.
Fortunately, solving this particular electrical problem is almost universally straightforward and stands as one of the quintessential DIY jobs for nearly all key fobs across various makes and models. The procedure typically involves carefully prying open the fob’s casing, noting the battery type (usually a CR2032 or similar coin cell), swapping in a fresh one, and carefully snapping the casing back together. This quick, inexpensive fix can restore full functionality, saving you the expense and annoyance of a professional visit, and proving that sometimes, the simplest solutions can avert the biggest inconveniences in your automotive journey.
Read more about: From Billion-Dollar Bloopers to Daily Drive Disasters: The Top 15 Automotive Tech Fails That Left Drivers Shaking Their Heads
From the foundational power supply of the battery to the often-overlooked nuances of a key fob, understanding these common automotive electrical challenges is more than just about fixing what’s broken; it’s about empowering yourself as a car owner. Armed with this knowledge, you’re better equipped to accurately diagnose problems, perform minor repairs when appropriate, and communicate effectively with trusted mechanics when professional intervention is required. While Japanese car brands are justly celebrated for their inherent reliability and engineering excellence, even the most robust machines are susceptible to the inevitable wear and tear of time and use. By adopting a proactive and informed approach to your vehicle’s electrical health, you can minimize downtime, prevent costly spiraling repairs, and ensure that those perplexing electrical gremlins remain minor roadblocks on your journey. After all, a meticulously maintained electrical system is the silent, indispensable partner in every reliable and enjoyable mile you drive.


