

Your Windows desktop is more than just a background; it’s the digital workspace where you begin countless tasks, organize essential files, and launch your favorite applications. Yet, for many, it can quickly become a cluttered mess or, conversely, a barren landscape devoid of the shortcuts and system icons that could truly boost productivity. Understanding how to effectively manage these visual cues is key to maintaining an efficient and personalized computing experience, whether you’re a seasoned power user or just looking to tidy things up.
From the critical system icons that offer quick access to core functions like ‘This PC’ and the ‘Recycle Bin,’ to the myriad of application shortcuts that populate your screen, each element plays a role in your daily interactions with Windows 10 or Windows 11. However, the default settings often leave much to be desired, with important shortcuts hidden by default in newer Windows versions, leading many users down a rabbit hole of Google searches to restore functionality they expect.
This in-depth guide is designed to empower you with the knowledge and practical steps needed to take full control of your desktop icons. We’ll explore everything from re-enabling vital system links and personalizing their appearance to understanding the nuances of shortcut management and temporarily decluttering your view. Get ready to transform your desktop into a highly functional, visually appealing, and perfectly organized hub that works precisely the way you do.

1. **Understanding the Core Desktop Icons and Their Purpose**At the heart of every Windows desktop lies a set of predefined system icons, each serving a crucial function that can significantly streamline your interaction with the operating system. While newer Windows versions, particularly Windows 10 and 11, tend to favor a minimalist desktop, displaying only the ‘Recycle Bin’ by default, the potential for quick access to critical system areas through these icons is immense and often overlooked.
The ‘This PC’ icon, for instance, provides direct entry into your computer’s storage, allowing you to browse partitions, folders, and files, as well as shared content from other network computers. Historically known as ‘Arbeitsplatz’ (My Computer) in Windows XP and simply ‘Computer’ in Vista and Windows 7/8, it has evolved in name but retained its core utility. Interestingly, in the ‘Desktop Icon Settings’ window, Microsoft still refers to it as ‘Computer,’ even though selecting it will place an icon named ‘Dieser PC’ on your desktop. This icon’s context menu, accessed with a right-click, also offers powerful functions like ‘Properties’ to view system specs and ‘Manage’ to open ‘Computer Management,’ a comprehensive tool for system professionals.
The ‘Network’ icon, another valuable asset, displays a list of computers currently connected to your network, along with the folders and devices they are sharing. This can be incredibly useful for quickly accessing shared resources in a home or office environment without navigating through multiple explorer windows. Similarly, the ‘Control Panel’ provides the classic pathway to access important system settings, offering a centralized hub for managing hardware, software, user accounts, and more, which is particularly useful for those accustomed to older Windows interfaces.
For personalized access to your most frequently used files, the ‘User Files’ (or ‘Username Folder’) icon is indispensable. This icon offers swift entry to directories specifically linked to your user account, such as ‘Documents,’ ‘Downloads,’ ‘Music,’ and ‘Pictures.’ This prevents you from having to ‘dig’ through file explorer to locate these common storage locations. Finally, the ‘Recycle Bin’ remains a universally recognized icon, serving as a temporary storage for deleted files and folders before their permanent removal, a critical safety net against accidental data loss. Understanding these core functions is the first step toward a more efficient desktop.
Read more about: Beyond the Hype: Unraveling Apple’s Deep-Seated Concerns Over Opening Its Platform to External Apps
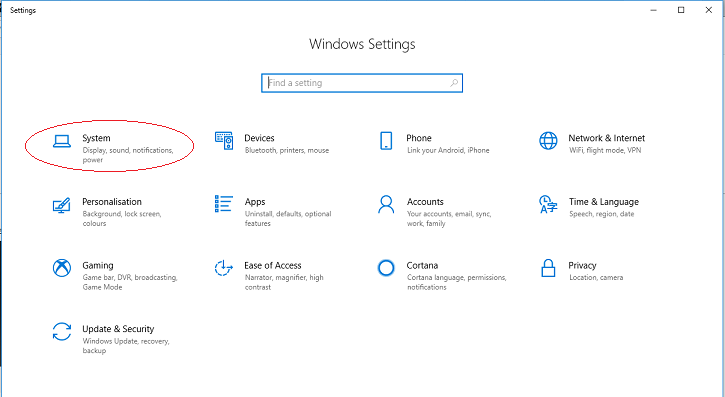
2. **Accessing Desktop Icon Settings in Windows 10 & 11**Before you can begin to customize your desktop icons, the crucial first step is to locate and access the ‘Desktop Icon Settings’ window. This central hub is where you manage the visibility and appearance of Windows’ predefined system icons. While the interface for Windows 10 and Windows 11 shares many similarities, the navigation path to reach this window has some subtle differences that are worth noting to ensure a smooth experience.
For both Windows 10 and Windows 11, the most common and user-friendly method involves right-clicking on an empty area of your desktop. In the context menu that appears, select ‘Personalize.’ This action will open the ‘Personalization settings’ window. In Windows 10, you’ll then navigate to ‘Themes’ in the left-hand column and scroll down to find the ‘Desktop icon settings’ link under ‘Related Settings.’ For Windows 11, after clicking ‘Personalize,’ you’ll find ‘Themes’ within the right panel, and then you’ll again locate the ‘Desktop icon settings’ link under the ‘Related settings’ section. This slight variation in menu structure is something to be aware of.
Alternatively, for those who prefer a more direct approach or encounter issues with the graphical user interface, Windows offers a powerful command-line method to open the ‘Desktop Icon Settings’ window instantly. Simply press the keyboard shortcut `[Windows] + [R]` to open the ‘Run’ dialog box. In this box, you can type `control.exe desk.cpl,,0` or `rundll32 shell32,Control_RunDLL desk.cpl,,0` and then press `[Enter]`. Both commands will bypass the ‘Settings’ app and directly launch the ‘Desktop Icon Settings’ dialog, providing a quick solution for immediate access. This can be especially handy for advanced users or when troubleshooting.
Once the ‘Desktop Icon Settings’ window is open, you will see a list of standard icons that you can activate or deactivate. The layout is quite similar across Windows 10 and 11, presenting clear checkboxes next to each icon option. Activating or deactivating these checkboxes, then clicking ‘OK’ or ‘Apply,’ will directly influence which of these system symbols appear on your desktop. This foundational understanding of access methods ensures you’re always just a few clicks or a quick command away from tailoring your desktop environment.
Read more about: Unlock Your Digital Superpowers: 11 Keyboard Shortcuts That Will Transform Your Workflow and Save You Hours
3. **Enabling/Disabling Standard Desktop Icons**One of the simplest yet most impactful ways to customize your Windows desktop is by controlling the visibility of its standard system icons. As mentioned, newer Windows versions default to a very clean desktop, often displaying only the ‘Recycle Bin.’ While this can look aesthetically pleasing, it might mean sacrificing quick access to essential system functions like ‘This PC’ or the ‘Control Panel.’ Fortunately, Windows provides straightforward options to bring these useful icons back into view or hide them if they’re causing clutter.
The process begins, as outlined previously, by accessing the ‘Desktop Icon Settings’ window. Once you’re in this dialog, you’ll be presented with a clear list of options: ‘Computer,’ ‘Recycle Bin,’ ‘User Files,’ ‘Control Panel,’ and ‘Network.’ Next to each of these options, you’ll find a checkbox. To display an icon on your desktop, simply place a checkmark in the box next to its name. If you wish to hide an icon, ensure the corresponding checkbox is unchecked. For example, to quickly access your drives and network shares, you would activate the checkbox for ‘Computer’.
It’s important to remember the naming convention Microsoft uses within this settings window. Even though the option is labeled ‘Computer,’ selecting it will place an icon titled ‘Dieser PC’ (This PC) on your desktop in Windows 8.1, 10, and 11. This is a common point of minor confusion, but the functionality remains consistent. Similarly, selecting ‘User Files’ will create a shortcut to your personal user folder, granting direct access to documents, downloads, and other personal files without extra navigation.
After making your selections, whether you’re adding or removing checkmarks, it is crucial to confirm your changes. Click the ‘OK’ button or the ‘Apply’ button within the ‘Desktop Icon Settings’ window. This action saves your preferences and instructs Windows to update your desktop accordingly. The icons you’ve chosen to display should appear, and those you’ve deselected should vanish, instantly transforming the look and functionality of your desktop to better suit your workflow and preferences. This level of granular control is vital for a truly personalized Windows experience.
4. **Customizing Desktop Icon Appearance with Your Own Images**Beyond merely showing or hiding system icons, Windows offers a fantastic way to truly personalize your desktop: changing the default icon images to something more aligned with your aesthetic or organizational needs. If you find the standard Windows icons a bit bland or wish for a unique visual cue for a specific function, this feature allows you to replace them with custom graphics, transforming your desktop’s look and feel.
To embark on this visual customization journey, you’ll once again need to open the ‘Desktop Icon Settings’ window. Once there, select the system icon you wish to modify from the list – for instance, ‘Computer’ (which appears as ‘Dieser PC’ on the desktop) or ‘Recycle Bin.’ After highlighting your chosen icon, look for the ‘Anderes Symbol…’ (Another Icon…) button, typically located at the bottom of the dialog box, and click it. This action will open a new window, presenting you with a selection of system-provided icons.
However, the real magic happens when you venture beyond the default options. Windows allows you to use your own `.ico` files as custom icons. For optimal results and compatibility, it’s highly recommended to use files in the `.ico` format. If you have images in other formats like PNG or JPG, you can easily convert them online using dedicated tools before applying them. A practical tip is to store your favorite custom `.ico` files in a dedicated folder, such as `C:\Icons\`, making them easily accessible whenever you decide to refresh your desktop’s appearance. Once you’ve located your desired custom icon, select it and confirm with ‘OK’ in both windows.
This customization extends to even the most dynamic system icons, such as the ‘Recycle Bin.’ You have the flexibility to set distinct emblems for both its ‘full’ and ’empty’ states, providing an immediate visual indicator of its contents. This level of detail ensures that every element on your desktop can reflect your personal style. It’s also crucial to understand the ‘Wiederherstellen’ (Restore) button in this context: it serves to revert the *selected icon’s image* back to its original Windows default, not to restore a hidden icon *to* the desktop itself. This ensures that if a custom icon doesn’t quite work out, you can always go back to the original with ease.
Read more about: Beyond the Showroom: 14 Iconic Classic Cars You Can Restore for Less Than Buying Them
5. **Deleting Unwanted Shortcuts Safely**While system icons serve as direct links to Windows functionalities, desktop shortcuts are user-created pointers to applications, files, folders, or even websites. Most programs, upon installation, automatically place a shortcut on your desktop for convenience. Over time, however, these can accumulate, turning your once-organized desktop into a confusing array of icons. Knowing how to safely and efficiently remove these shortcuts is vital for maintaining a clean and functional workspace, without accidentally deleting the underlying software or data.
It’s important to differentiate between removing a shortcut and uninstalling an application or deleting a file. Deleting a shortcut merely removes the pointer to the item, leaving the actual program, file, or folder intact on your system. This makes shortcut management a low-risk activity focused purely on interface organization. The simplest way to delete a shortcut is to select it by clicking it once and then pressing the `Delete` key on your keyboard. This will send the shortcut directly to the ‘Recycle Bin’, from where it can be recovered if you change your mind.
Alternatively, for those who prefer mouse-based interaction, right-clicking on the unwanted shortcut will open a context menu. In Windows 10, you’ll typically see a ‘Delete’ option directly within this menu. If you’re using Windows 11, the context menu has been redesigned, and you’ll find the ‘Delete’ option represented by a trashcan icon in the first section of the new menu. Clicking on this will achieve the same result as using the `Delete` key, moving the shortcut to the ‘Recycle Bin’.
A third intuitive method involves using the drag-and-drop functionality. Simply click and hold the shortcut you wish to remove, then drag it directly over the ‘Recycle Bin’ icon. When the message ‘Move to Recycle Bin’ appears, release the mouse button. This is another quick and visual way to dispose of unnecessary shortcuts. Remember, while you can easily delete application or file shortcuts using these methods, the ‘Recycle Bin’ system icon itself cannot be deleted this way; it can only be hidden through the ‘Desktop Icon Settings’ as discussed earlier.
Read more about: Unlock Your Digital Shield: 15 Essential Cybersecurity Tricks Everyone Needs to Master Today

6. **Temporarily Hiding All Desktop Icons for a Cleaner View**Sometimes, you don’t want to permanently delete or meticulously manage individual icons; you just want them out of sight for a moment. Perhaps you’ve set a stunning new wallpaper and want to appreciate it without any visual distractions, or maybe you’re presenting your screen and prefer a minimalist, clutter-free look. Windows offers a remarkably simple, temporary solution for this: completely hiding all desktop icons with a single click, and just as easily bringing them back.
This feature provides an instant decluttering effect without requiring you to delete any shortcuts or reconfigure system settings. The instructions for this are identical for both Windows 10 and Windows 11, making it a universally applicable trick. To temporarily hide your desktop icons, begin by right-clicking on any empty space on your desktop. This action will open the standard context menu, which contains a variety of desktop-related options.
Within this context menu, you’ll find an option labeled ‘View.’ Hover your mouse over ‘View’ to expand a sub-menu. Among the choices presented, you’ll see ‘Show desktop icons.’ This option acts as a toggle. If there’s a checkmark next to it, your desktop icons are currently visible. Clicking on ‘Show desktop icons’ will deselect it, and instantly, all your desktop shortcuts and system icons will disappear, leaving you with a perfectly clean view of your background.
When you’re ready to bring your icons back, perhaps after admiring your wallpaper or finishing a presentation, simply follow the exact same steps. Right-click on the desktop, hover over ‘View,’ and then click on ‘Show desktop icons’ once more. This will re-enable the checkmark next to the option, and all your icons will reappear exactly where you left them. This quick toggle is an invaluable tool for maintaining visual order and flexibility on your Windows desktop, giving you control over your workspace’s appearance at a moment’s notice.
 Revealed: 718 HP Power, But Is It Too Heavy at 5368 Lbs?")

