

The open road, the freedom of travel, the boundless possibilities of vanlife – it’s a dream for many, yet lurking beneath the glossy paint and sturdy frame of your beloved vehicle is a silent, insidious enemy: rust. Many van owners face the disheartening reality of corrosion setting in far too soon, sometimes threatening to compromise floorboards before even a second winter passes. This isn’t just a cosmetic annoyance; it’s a serious threat to your van’s longevity, safety, and ultimately, your investment.
Indeed, the stories are plentiful, from minor blemishes that escalate rapidly to critical structural failures. One compelling anecdote recounts a harrowing drive from the northernmost tip of Sweden to the Cote d’Azur. A van, seemingly robust, was taken for a routine service only for a French mechanic to discover that its disc brakes had completely disintegrated into a “rust heap” due to road salts, posing an “extremely dangerous” risk. This stark example underscores the profound impact rust can have, not just on aesthetics but on fundamental operational safety.
While the prospect of a van succumbing to rust can be daunting, especially for those considering a conversion or already living the #VANLIFE dream, despair not. You can conquer rust! This in-depth guide is designed to empower you with the knowledge and strategies needed to understand, prevent, evaluate, and effectively repair rust, ensuring your van remains a reliable and safe companion on countless adventures for years to come. We’ll delve into the nuances of this pervasive issue, from its hidden costs to the critical steps you can take to keep it at bay.
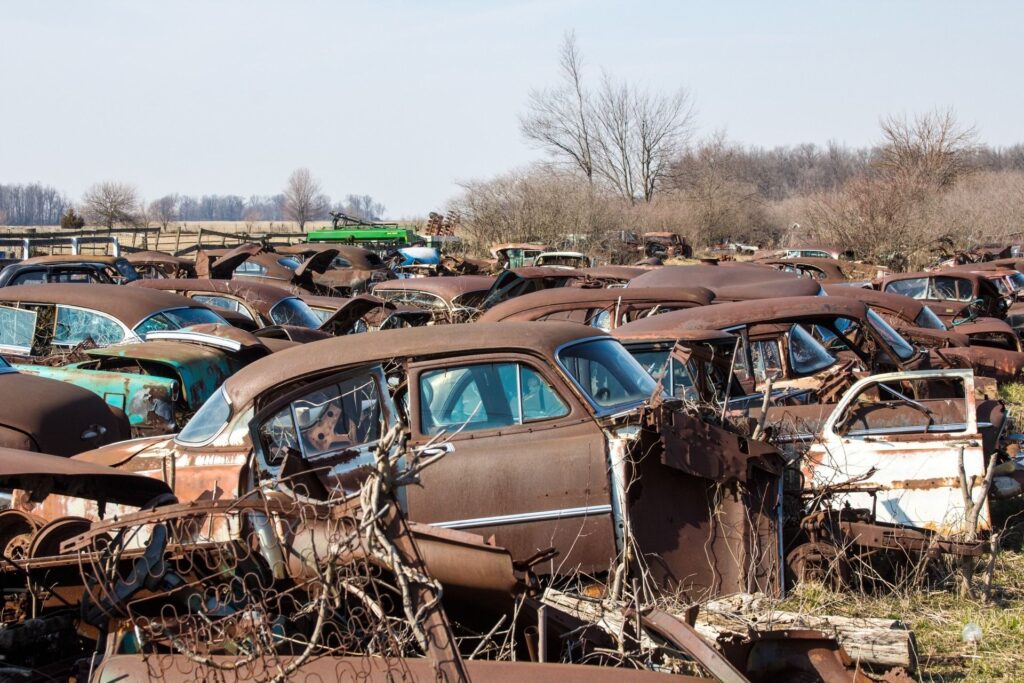
1. **Rust: The Silent Van Killer and Its True Cost**Rust is far more than just a minor blemish on your van’s exterior; it truly is “a van-killer.” This pervasive issue represents a serious threat to both the longevity and inherent safety of your vehicle. Formed through a process called oxidation, rust occurs when iron, the primary component of your van’s metal body, reacts with oxygen and moisture. Given that vans are constantly exposed to environmental elements such as rain, humidity, and particularly corrosive road salts, rust is an almost inevitable challenge that must be proactively addressed from its earliest stages.
Failing to tackle rust at the outset can lead to significant financial repercussions. “Globally, rust-related corrosion accounts for about 10-15% of vehicle maintenance costs,” a figure that can quickly escalate for individual van owners. The impact isn’t just theoretical; personal experiences highlight the tangible expenses involved. For instance, some individuals have reported spending “£1,000 getting a professional rust removing job” just to pass an MOT inspection, with a quote of “£3,000 to do a full and lasting job” for a complete re-weld of the base. It’s a stark reminder that what starts as a small patch can evolve into a considerable financial burden.
Within vanlife communities, discussions frequently revolve around rust repairs that can climb “as much as £1,500 ($2,000) for severe cases.” These figures don’t even begin to account for the crucial elements of downtime and safety concerns that extensive rust inevitably introduces. A van with compromised structural components due to rust can become unsafe to operate, leading to potential accidents or, at the very least, outright failure during mandatory vehicle inspections. Addressing rust early isn’t just about saving money; it’s about safeguarding your vehicle’s structural integrity and your peace of mind on the road.
Read more about: Behind the Box Office: 12 Action Star Incidents from Blockbuster Sets That Were Mysteriously Forgotten
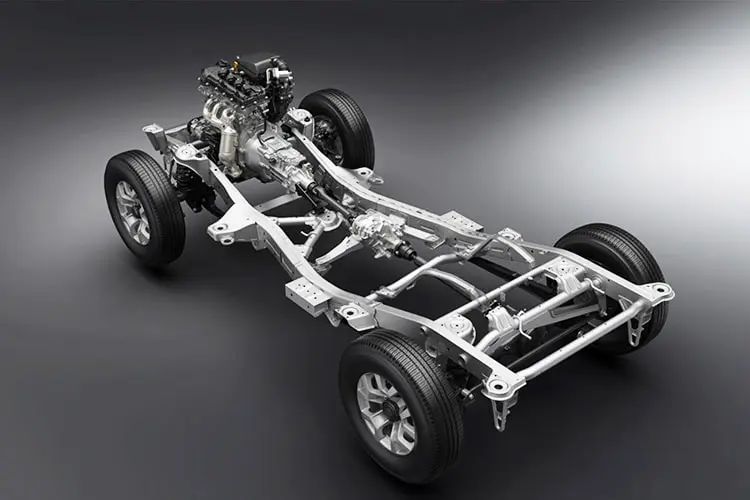
2. **Vulnerable Areas and Early Detection**To effectively combat rust, it’s essential to understand where it typically takes hold. The underside of a van stands out as a particularly vulnerable zone, primarily due to its constant exposure to corrosive elements like water and abrasive road salts. This relentless exposure means that if left unchecked, rust can aggressively “eat through body panels and the van’s framework, causing expensive damage and potentially putting your entire van at risk of scrapping.” It’s a critical area that demands regular inspection and protective measures.
Beyond the undercarriage, several other specific areas of your van are also highly susceptible to rust, largely because of their constant exposure and propensity to trap moisture or debris. These include the wheel arches, which are continuously bombarded with water and grit flung up by tires, and the door sills, where moisture can collect and sit, especially after rain or washing. Additionally, the areas “around the windows” are often points where seals can fail, allowing moisture to seep in and initiate corrosion on the underlying metal.
Given the rapid and destructive nature of rust, the importance of “early detection and prevention” cannot be overstated. These two factors are unequivocally “key to minimizing long-term damage and ensuring your van’s longevity.” Regular, thorough inspections of these vulnerable areas can catch rust spots when they are still superficial and manageable, preventing them from escalating into costly and dangerous structural issues. A proactive approach is the most effective defense against this persistent adversary.
Read more about: The Future of Work: 16 Careers Experts Predict Will Vanish by 2035 Amidst AI and Automation

3. **Essential Preventative Maintenance Strategies**When it comes to rust, a proactive stance is always the most advantageous, embodying the wisdom that “An ounce of prevention is worth a pound of cure.” Implementing preventative measures is not only critical for maintaining your van in peak condition but is also significantly “easier and cheaper than repairing rust damage” once it has taken hold. A consistent routine of care can dramatically extend your van’s lifespan and protect your investment.
Starting with the basics, “Regular Washing and Cleaning” is paramount. Accumulations of dirt, road salt, and moisture are all potent contributors to rust formation. It is particularly crucial to wash your van diligently “during the winter months or after driving on salted roads.” Special attention should be directed to “the underside of the van, where road salt can easily build up,” utilizing a pressure washer for its effectiveness in reaching typically inaccessible areas. Following this, “Underbody Protection” provides a robust barrier. Applying a protective sealant such as Waxoyl or Dinitrol to the underside of your van creates “a thick, durable layer that repels water, salt, and road debris,” offering a powerful defense against corrosion. While Waxoyl excels at treating both existing and preventing new rust, Dinitrol is often favored for its professional-grade, long-lasting protection.
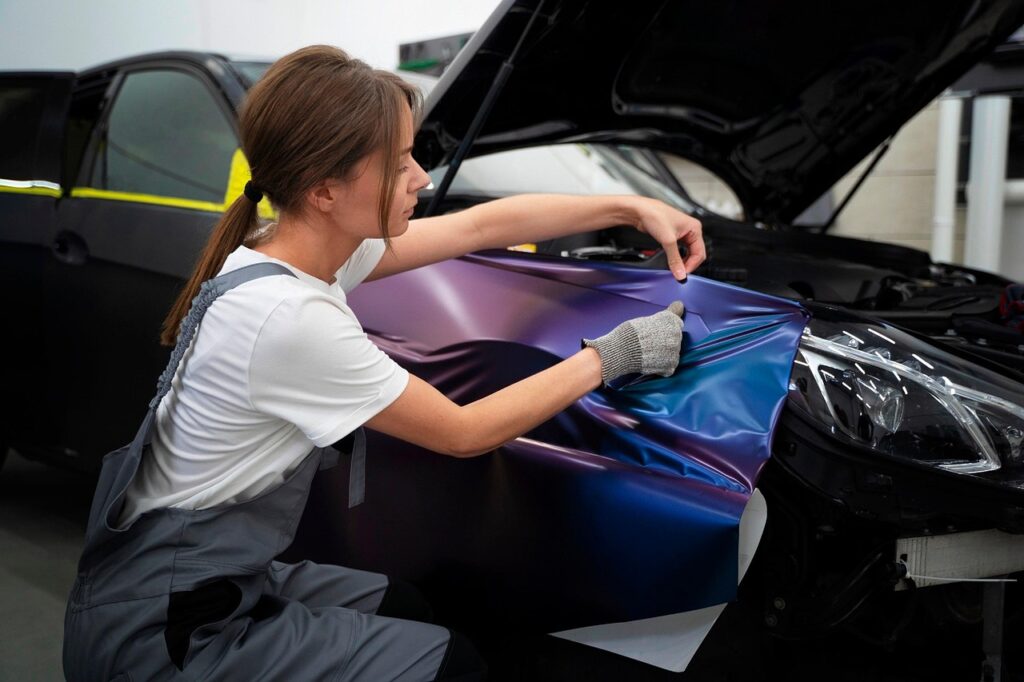
Further reinforcing your van’s defenses involves “Rust Inhibitor Sprays.” These products, like CorrosionX and Fluid Film, should be applied to particularly “vulnerable areas like wheel arches, door sills, and seams.” They work by forming “a water-resistant barrier, preventing rust from forming” and are simple to apply for annual maintenance. Beyond these specialized treatments, simply “Waxing the Exterior” every six months safeguards the paint and seals the underlying metal from environmental exposure. High-quality carnauba waxes, such as Meguiar’s Ultimate Wax, establish a “hard protective layer,” guarding against chips and scratches that could expose metal to moisture. Even small imperfections matter, so “Touching Up Paint” immediately on any chips or scratches is vital to prevent air and moisture from initiating the rusting process. This involves using a rust-preventative primer, like Rust-Oleum Automotive Primer, followed by a matching paint coat, with Hammerite metal paint being a practical option.
Finally, the environment in which your van rests plays a significant role. “Storing Your Van Properly” in a dry, sheltered location whenever possible drastically reduces its exposure to moisture. If indoor storage is not feasible, opting for a breathable van cover can help keep it dry while actively deterring condensation buildup. By adopting these comprehensive preventative measures and making a habit of using rust prevention sprays and conducting regular checks, you can profoundly “extend the life of your van and avoid costly rust repairs.” This diligent approach is especially crucial for vans operating in wet or coastal regions, ensuring they remain rust-free and road-ready.
Read more about: 9 Expensive Pet Care Mistakes That Could Be Harming Your Dog: A Lifehacker’s Guide to Smarter Pet Ownership
4. **Understanding Rust Severity: From Surface to Penetrating**Before embarking on any rust repair, a critical initial step is to accurately “assess how severe the rust is.” Rust is not a monolithic problem; it exists on a spectrum, ranging “from superficial surface rust to deep, structural damage that compromises the integrity of your van.” Gaining a clear understanding of where your van’s rust damage falls within this spectrum is indispensable for determining the most appropriate and effective course of action, whether it involves a straightforward DIY repair or necessitates the expertise of a professional.
Rust severity can typically be categorized into three distinct levels, each demanding a different approach. The most common and least severe form is “Surface Rust,” which manifests as small patches of reddish-brown discoloration on exposed metal surfaces. This type of rust is primarily caused by simple oxidation and is generally quite manageable. It can often be “removed easily with light sanding and treated with rust inhibitors and paint,” making it a relatively simple fix for a vigilant owner. This early stage is the ideal point for intervention, as it prevents further progression.
Should surface rust be neglected, it will inevitably advance to the next stage, known as “Scale Rust.” At this point, the corrosion begins to penetrate more deeply into the metal, causing the surface to “flake and pit.” While scale rust is still within the realm of repairable damage, it demands a more intensive and robust approach compared to surface rust. Repairs for scale rust typically involve “grinding and filling” to properly restore the metal’s integrity, signifying a more serious level of damage that requires more dedicated effort and materials.
The most severe and perilous stage of corrosion is “Penetrating Rust.” This occurs when the rust has aggressively “eaten through the metal, creating holes and weakening the structure of the van.” At this advanced stage, the damage is no longer superficial or even moderately deep; it has fundamentally compromised the vehicle’s structural components. Addressing penetrating rust often requires significant interventions, such as cutting out the affected sections of the van and replacing them entirely. Such extensive repairs frequently necessitate “professional welding,” underscoring the serious implications of neglecting rust to this critical degree.

5. **Evaluating Rust Depth and When to Call a Professional**Beyond simply classifying rust, accurately measuring its severity and depth is crucial for making informed repair decisions. One definitive method for quantifying rust damage involves checking the metal thickness. A widely accepted guideline states that “If more than 25% of the original metal thickness is lost due to rust, structural integrity is compromised.” This objective measure provides a clear threshold for when rust transitions from a cosmetic issue to a serious structural concern, dictating a need for more comprehensive intervention.
For a more practical, on-the-spot assessment, a simple yet effective technique is “Testing for Rust Depth.” This involves using a rust pick or even a screwdriver to “lightly poke at the rust spots.” The feel of the metal under this slight pressure can reveal a great deal about the extent of the corrosion. If the metal feels “soft or you can easily push through it,” this is a strong indicator that “the rust has penetrated deeply” and will most likely require more than just a superficial surface repair. Conversely, if the rust appears “confined to the surface,” you may confidently “sand it down and treat it yourself.”
Knowing “When to Call a Professional” is a cornerstone of responsible van maintenance. If your evaluation reveals “penetrating rust or extensive scale rust,” particularly if it affects critical structural components, it is unequivocally “best to consult a professional.” The van’s frame or chassis, being fundamental to its structural integrity, demands expert attention if weakened by corrosion. Crucially, tasks like “Welding and metal replacement should be done by someone with experience,” as any “improper repairs can lead to unsafe driving conditions.” This was a lesson learned the hard way by some, as mentioned in the context, where severe rust necessitated professional intervention across most of the vehicle’s base.
Therefore, by diligently evaluating the severity and depth of rust, you are empowered to determine the correct approach for repair. This discernment ensures that your van not only receives the appropriate treatment but also “remains both safe and functional for years to come.” Investing in proper assessment and professional help when warranted is an investment in your van’s longevity and your safety on every journey.
Read more about: Navigating the New FICO Score Changes: What Buy Now, Pay Later Integration Means for Your Next Loan

6. **Sprinter Van’s Unique Rust Challenges**Sprinter vans have carved out a reputation for versatility, serving as everything from commercial hauling workhorses to the foundation of countless #VANLIFE dreams. Their widespread appeal, however, comes with a notable caveat: a distinct susceptibility to rust. While no vehicle is entirely immune, Sprinters possess particular design characteristics and common usage patterns that predispose them to corrosion, often manifesting even before the van has endured many winters.
At the core of this vulnerability are inherent design elements from the factory. Sprinters feature numerous seams, gaps, and an interior framework that exposes bare metal. Crucially, the metal wall panels often include v-shaped pouches, which, by design, become unintended reservoirs for water. This structural reality means that any moisture ingress, whether from rain, condensation, or spills, is likely to linger, creating an ideal environment for rust to take hold and proliferate.
Furthermore, the factory-fresh state of a Sprinter typically lacks comprehensive moisture-proof finishing in critical areas. This absence of protective layers means that condensation, a common occurrence in any enclosed space, sits directly on metal surfaces. Given that rust is simply iron oxide—a chemical reaction of metal with oxygen and moisture—this lack of finishing touches leaves the van’s body panels and framework acutely exposed to the corrosive process.
Their highly customizable nature, often leveraged for conversions, also plays a role. The interior of a Sprinter, with its metal arches and pockets, is designed to be adaptable. However, this unfinished state translates to more exposed metal areas throughout the vehicle, increasing the potential surfaces where rust can initiate. Owners, therefore, must remain vigilant; while a Sprinter is a robust vehicle, its rust tendencies demand proactive care from day one, serving as a critical reminder that “buyers beware; owners take care.”

7. **Weathering the Storm: How Climate Accelerates Van Corrosion**The environment a Sprinter van operates in significantly influences its battle against rust. These vehicles are primarily utility-focused, meaning they spend considerable time “on the road a lot and not very often coddled in a warm, dry garage somewhere.” This constant exposure to the elements—be it humidity, rain, or snow—creates an ongoing challenge for metal integrity.
Winter, in particular, presents an amplified threat. When temperatures drop and roads become slick, city and state agencies deploy de-icing agents. While traditional rock salt was once common, modern practices frequently involve a more insidious culprit: brine. This mixture of salt and water, preferred for its cost-effectiveness and ability to coat road cracks, also effectively coats every inch of your vehicle. Brine is “extremely corrosive” and is a major contributor to rust, rapidly destroying undercarriages and paint jobs alike.
Summer, surprisingly, also brings its own set of corrosive conditions. High humidity, especially in coastal regions, introduces a constant supply of moisture to the air. The ocean, replete with salt, releases microscopic particles that travel through the air and settle on vehicles. This combination of salt and water creates a particularly aggressive environment that can significantly damage a Sprinter’s finish, paint, and any exposed metal on the undercarriage.
Adding to summer’s challenges is the issue of condensation. Sprinter vans, due to their internal metal gaps and lack of moisture-wicking layers like insulation and fabric finishes in their factory state, are prone to moisture lingering inside. This trapped moisture, combined with the salty air, accelerates internal corrosion. While sunlight might appear to dry surfaces, excessive exposure to baking-hot sun can paradoxically weaken the paint and protective clear coats, compromising the van’s defenses against rust, and potentially baking the salt into the paint.
To combat these environmental aggressors, consistent preventative measures are paramount. Regularly washing your van, especially after exposure to salted roads or sea air, is crucial for removing corrosive residues. Furthermore, whenever possible, storing your Sprinter in a garage or using a breathable cover can significantly reduce its exposure to direct sun, extreme moisture, and the elements that eagerly accelerate rust.

8. **Patching Up: Simple DIY Rust Hole Repairs with Metal Epoxy Putty and Fibreglass**Once rust has progressed beyond superficial spots, it can leave unsightly and structurally compromising holes. Addressing these holes before any major van conversion is not just advisable; it’s essential for the vehicle’s long-term integrity. While several methods exist for repair, including welding, fibreglass, body filler, and metal epoxy putty, some offer more accessible DIY solutions for smaller to medium-sized perforations, providing effective and economical fixes.
Once rust has progressed beyond superficial spots, it can leave unsightly and structurally compromising holes. Addressing these holes before any major van conversion is not just advisable; it’s essential for the vehicle’s long-term integrity. While several methods exist for repair, including welding, fibreglass, body filler, and metal epoxy putty, some offer more accessible DIY solutions for smaller to medium-sized perforations, providing effective and economical fixes.
One of the most straightforward and cost-effective methods is using metal epoxy putty. Often described as “metal playdough,” this industrial-strength polymer compound becomes rigid when mixed and can be molded into any shape to repair or patch steel or iron components. After thoroughly sanding down the rust and applying a rust remover like Rustins Rust Remover—ensuring all traces of corrosion are eliminated—the epoxy putty is applied. This involves warming it up in your hands, then firmly pressing it onto the inside and underside of the hole, allowing it a full 24 hours to dry. Remember to always prioritize safety by wearing gloves, a mask, and protective glasses during application, as epoxy can be toxic and irritating.
Following the epoxy’s hardening, the repair requires careful finishing. The excess putty should be sanded smooth, either manually with sandpaper or more efficiently with a random orbital sander, to create a flush surface with the surrounding metal. An optional but recommended step is to apply a primer layer, such as Rust-Oleum Automotive Primer, before painting. This enhances rust protection. Finally, a durable metal paint like Hammerite should be applied to both the top and underside of the repaired area, providing a smooth finish and further safeguarding against future corrosion.
For repairing rust holes in non-structural areas like body panels or door sills, fibreglass offers another popular and effective DIY solution. This composite material, a blend of woven glass fibers and resin, cures into a tough, lightweight, and inherently rust-resistant patch. It excels in bodywork repairs due to its moldability and strong adhesion to metal, providing a durable patch without the need for welding equipment. Fibreglass repair kits typically include the necessary mat and resin, making it accessible for home mechanics.
To utilize fibreglass, the initial steps of rust removal and surface cleaning mirror those for epoxy putty. Once the area is prepared, the fibreglass mat is cut to size, mixed with its hardener as per instructions, and applied in layers. A base layer of resin is brushed onto the sanded area, followed by the mat, which is then thoroughly saturated with more resin, ensuring it adheres well to the metal. Multiple layers can be built up for added strength. After allowing the fibreglass to cure and harden, the patch is sanded smooth to blend with the surrounding metal, followed by priming and painting with metal paint for a seamless and protected finish.
9. **Restoring Aesthetics: Body Filler Techniques for Smooth Finishes**When dealing with small to medium rust holes that require a smooth, paint-ready surface, body filler—often popularly referred to as Bondo—stands as a go-to solution. This two-part compound, consisting of a filler paste and a hardener, is designed not for structural reinforcement, but primarily for cosmetic repairs. It excels at restoring the original shape and appearance of metal surfaces, effectively concealing imperfections left after rust removal and preparing the area for a flawless paint job.
Body filler’s utility lies in its ability to create a seamless blend with the existing bodywork. Unlike welding, which replaces metal, or fibreglass, which forms a robust patch, body filler’s main objective is aesthetic restoration. When applied correctly, it can make rust-damaged areas visually disappear, providing a uniform texture that accepts paint beautifully. This makes it an invaluable tool for ensuring a professional-looking finish after more intensive rust removal or hole patching has been completed.
The application process begins with meticulous preparation, consistent with all rust repairs: thoroughly removing all rust and cleaning the area. Once the surface is clean and dry, the body filler components are mixed. Typically, a golf-ball-sized amount of filler paste is combined with a pea-sized amount of hardener, though exact ratios should always follow manufacturer guidelines. It is crucial to mix these components thoroughly until a consistent color is achieved, but to work quickly, as body filler typically begins to harden within 5-10 minutes.
Using a plastic applicator or spreader, the mixed filler is then applied to the rust hole. The technique involves pressing the filler firmly into the hole and spreading it over the surrounding metal, ensuring a smooth transition. For larger holes or deeper imperfections, it’s often more effective to build up the filler in several thin layers rather than attempting one thick application. This approach minimizes the risk of cracking and makes the subsequent sanding process considerably easier, contributing to a more durable and aesthetically pleasing repair.
The final and perhaps most crucial stage involves sanding. After the body filler has fully cured—a process that usually takes 20-30 minutes, depending on the product and ambient conditions—the repaired area must be sanded smooth. Starting with a coarser grit sandpaper (around 80-grit) helps to quickly level the material, gradually progressing to finer grits (180-220 grit) to achieve an impeccably smooth finish. Utilizing a random orbital sander is highly recommended for achieving an even, professional-grade surface. Once perfectly smooth and level with the surrounding bodywork, the area is then ready for priming and, finally, a matching metal paint application, completing the restoration.

10. **The Permanent Fix: Welding for Structural Integrity and Professional Intervention**For rust holes that compromise a van’s structural integrity, particularly in load-bearing areas, welding stands as the undisputed gold standard for repair. Unlike surface treatments or patch methods, welding is a permanent solution that involves cutting out the deteriorated metal and replacing it with new material, fused in place. This method is indispensable for larger perforations or when the chassis, frame, or suspension mounts have been weakened by corrosion, ensuring the repair is not merely cosmetic but fundamentally restores the vehicle’s original strength and longevity.
Welding is the only method capable of fully restoring a van’s structural integrity. This is paramount for safety, especially in critical components like the frame, where a compromised section could lead to catastrophic failure. By bonding new metal to the van, a properly executed weld ensures the repaired area is as robust as, or even stronger than, the original body. It’s a process that doesn’t just cover damage; it systematically replaces it, creating a solid, long-lasting repair that, when combined with proper rust-proofing, is highly resistant to future corrosion.
The process begins with meticulously cutting out all rusted metal using a grinder or cut-off wheel. It’s crucial to extend the cut beyond the visible rust to reach clean, solid metal, preventing any lingering corrosion from spreading. This step creates a clean, even opening. Next, a patch panel is prepared: a piece of sheet metal, matching the original thickness (typically 18 to 22 gauge for body panels), is cut to precisely fit the void. Often, the removed rusted section can serve as a template for this new piece.
With the patch panel ready, a MIG or TIG welder is used to tack weld it into place, securing it at several points to prevent warping from heat. Subsequently, a series of small, continuous welds are applied around the perimeter, ensuring a strong, consistent bond between the new and old metal. A key technique is to avoid welding continuously in one area; instead, moving around the patch in short bursts helps dissipate heat and minimizes the risk of panel distortion. Once the welding is complete, the welds are carefully ground down to create a seamless transition, making the repair virtually invisible.
Finally, the repaired area is cleaned, primed with a rust-resistant primer like Rust-Oleum Automotive Primer, and painted to match the van’s body. For repairs on the undercarriage, an additional layer of underbody sealant is highly recommended for enhanced protection against moisture and road debris. While welding offers unmatched strength and durability, it requires specialized equipment and considerable skill. Improper welds can weaken the repair or warp panels, leading to unsafe driving conditions and further complications.
Therefore, if you lack experience with welding, it is unequivocally “best to consult a professional.” Expert welders possess the necessary tools, knowledge, and technique to ensure the job is done correctly, providing a strong, durable repair that stands the test of time and restores your van’s safety and roadworthiness. Investing in professional welding for structural rust damage is an investment in your van’s future and your peace of mind.
***
The battle against rust is a perennial one for van owners, especially those embarking on the #VANLIFE adventure. From understanding the silent creep of corrosion and identifying vulnerable zones, to implementing robust preventative maintenance, and finally, executing precise repairs, this comprehensive guide has aimed to equip you with the knowledge needed to safeguard your mobile home. Whether it’s a quick patch with epoxy putty or a structural overhaul via professional welding, addressing rust proactively ensures that your van remains a reliable, safe, and enduring companion on countless journeys. Your vigilance today promises many more miles of open road tomorrow.


