

There’s nothing quite like the feeling of stepping into your car on a sweltering day, turning on the air conditioning, and being greeted by a refreshing blast of cool air. But what happens when that expected comfort turns into a disappointing gust of warm or lukewarm air? It’s not just uncomfortable; a malfunctioning AC system can also be a tell-tale sign of underlying mechanical issues in your vehicle.
Indeed, the air conditioning system is one of the most essential comfort features in any vehicle, especially during the relentless heat of summer. When it decides to stop working, it not only impacts your comfort but can quickly turn a short drive into a miserable experience. While the causes of a malfunctioning AC system can vary widely, many of them are surprisingly common and, with the right knowledge, can often be resolved without resorting to major, costly repairs if diagnosed early.
In this in-depth guide, crafted with the practical insights you’ve come to expect from Popular Mechanics, we’re going to walk you through twelve of the most common reasons your car air conditioner might not be blowing cold air. We’ll delve into the specific signs to look out for, what each issue entails, and, most importantly, what you can do about it. By understanding these common problems, you’ll be better equipped to diagnose the issue yourself or, at the very least, speak confidently with your mechanic, saving you time, money, and frustration on the road to a cooler ride.
1. **Low Refrigerant Levels (Freon)**
One of the most frequent culprits behind a car’s AC system failing to cool effectively is simply a low level of refrigerant. This vital chemical, often referred to by its older brand name, Freon (though newer cars use R-134a or R-1234yf), is the workhorse of your cooling system. Its primary job is to absorb heat from your car’s cabin and then release that heat outside, sending cooled air back through your vents. Without enough of it, the entire system’s ability to perform its core function is severely compromised.
Refrigerant levels aren’t necessarily static; they can gradually diminish over time due to small leaks or natural dissipation, a phenomenon particularly noticeable in older vehicles. A minor, slow leak might go unnoticed for months, steadily reducing cooling performance until the AC eventually stops blowing cold air altogether. If your AC is blowing warm or mildly cool air, you may also hear a soft hissing noise when the AC is on, and the compressor clutch might not engage, signaling insufficient pressure in the system.
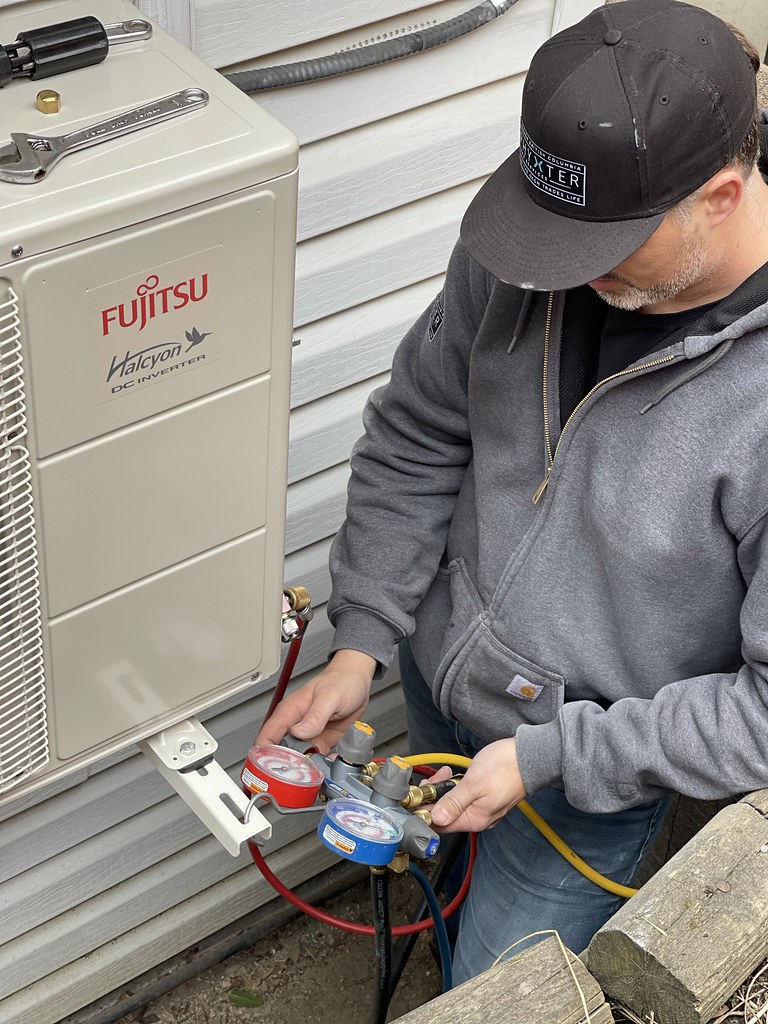
If you suspect low refrigerant is the problem, the immediate action is to check the levels and recharge the system. However, it’s crucial to understand that simply adding more refrigerant without addressing the root cause – typically a leak – will only provide a temporary fix. The problem will inevitably return, and repeatedly topping off the refrigerant without fixing the source of the loss is environmentally irresponsible. Many DIY AC system recharging kits are available, some even including oil, dye to help locate leaks, or additives to rejuvenate O-rings and seals. Ensure you get a kit that matches your vehicle’s refrigerant type and includes a gauge to test system pressure before adding refrigerant.
It’s important to exercise caution when working with refrigerants. Always wear safety gear like glasses and gloves, as refrigerant can freeze skin quickly and painfully. If you do come into direct contact, flush the affected area with plenty of water and seek medical attention immediately. While a DIY recharge might offer a temporary solution, especially if it’s a very slow leak, for persistent issues, it’s strongly recommended to let a professional handle it. An ASE-certified technician or other qualified mechanic has specialized tools to pinpoint and repair the leak before safely evacuating old refrigerant and recharging the system to the correct pressure. Expect a coolant recharge service to cost around $200, but replacing damaged components like a hose or seal will add to the bill, with average AC repair costs at dealerships around $500, varying by region and vehicle.
2. **Leaks in the AC System**
While low refrigerant is a symptom, leaks in the AC system are often the underlying problem that leads to refrigerant loss. These leaks are incredibly common and can remain undetected until they start to significantly impact your AC’s performance. Refrigerant flows through a complex network of rubber hoses, metal pipes, the condenser, evaporator, and various compressor seals, and a leak can occur at any point along this path, creating a breach in the closed system.
The consequences of leaks extend beyond just the loss of cooling capacity. A leaky system doesn’t just let refrigerant out; it also allows unwanted moisture to seep in. When moisture mixes with the refrigerant, it can form corrosive acids that begin to eat away at the internal components of your AC system. This internal damage can lead to a cascade of further failures, making a simple leak a much more expensive and complicated repair if not addressed promptly.
Symptoms of a leak often include a gradual decline in cooling performance, as the refrigerant slowly escapes. You might also notice oily residue or a tell-tale UV dye (if previously added for diagnostic purposes) on various AC components, which are clear indicators of a refrigerant escape. Additionally, a chemical or musty smell can sometimes accompany a leak, particularly if moisture has led to mold or bacterial growth within the system. Visually inspecting your AC components for these oily spots or colored dyes is a crucial first step in diagnosis.
Diagnosing a leak effectively usually requires specialized tools. Technicians commonly employ UV dye, which glows under a blacklight, or electronic leak detectors to precisely locate the source of the escape. Once a leak is detected, the appropriate repair involves replacing the faulty component, whether it’s a worn O-ring, a cracked hose, a damaged evaporator, or a compromised condenser, before the system can be properly recharged. Remember, simply adding more refrigerant without fixing the leak is not only a temporary fix but also harmful to the environment, as refrigerant is a potent greenhouse gas. Addressing the leak permanently is key to long-term AC health.
Read more about: Minivans That Ace Safety and Family Life: Your Top Choices and What to Avoid
3. **Faulty Compressor**
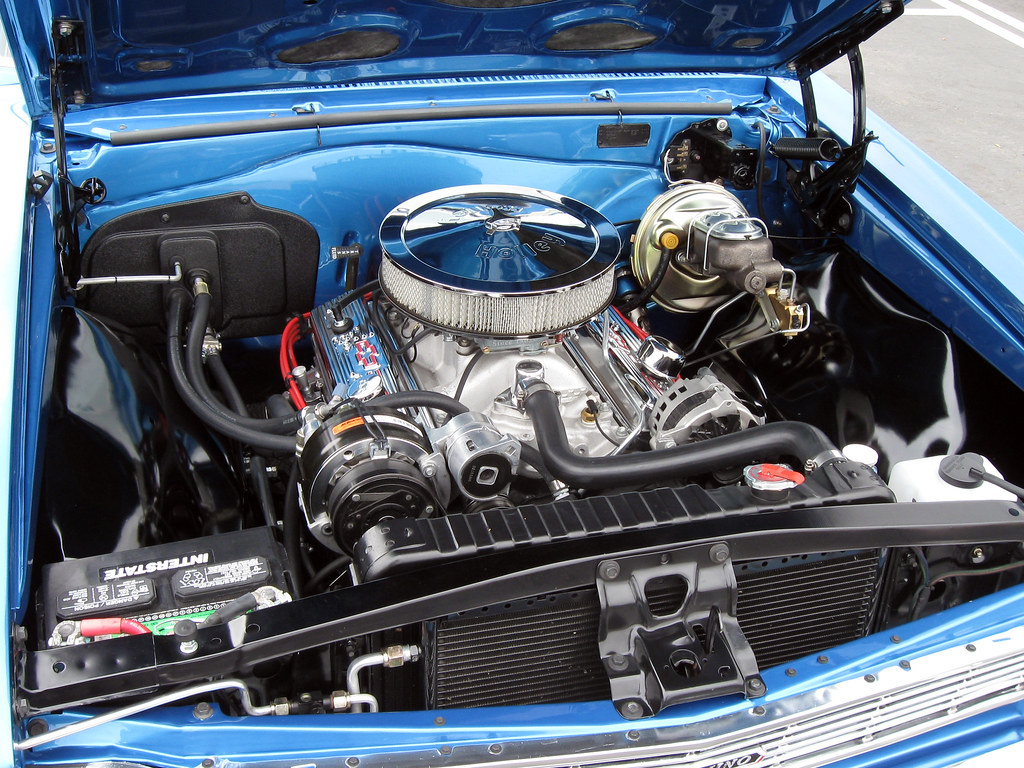
The compressor is unequivocally the heart of your car’s air conditioning system. Its critical role is to pressurize the refrigerant and circulate it throughout the system, initiating the cooling cycle. If this central component fails, the entire cooling process grinds to a halt, meaning no cold air will be produced – even if your refrigerant levels are perfectly optimal. Without the compressor, the system simply cannot function, leaving you with nothing but warm air from the vents.
Compressor failure can stem from several issues. Electrical faults, such as a problem with the wiring or control module, can prevent it from engaging. Worn-out bearings, often signaled by unusual noises, can cause mechanical failure. A loss of lubricant, which typically circulates with the refrigerant, can lead to increased friction and eventual breakdown. Furthermore, corrosion caused by moisture ingress, a common side effect of unaddressed leaks, can significantly damage the compressor’s internal workings. Sometimes, the compressor itself is fine, but the issue lies with the compressor clutch, a vital component that engages and disengages the compressor from the engine, preventing it from spinning properly.
When a compressor is failing, the symptoms are often quite pronounced. You might hear loud clicking, grinding, or squealing noises when the AC is turned on, indicating mechanical distress within the unit or its clutch. Another clear sign is if the compressor clutch simply doesn’t spin when the AC is activated, which means the refrigerant isn’t being pressurized. In the most straightforward cases, the AC will fail to cool at all, regardless of other system parameters, solidifying the compressor as the prime suspect. Checking for a click when the AC is turned on can provide a quick diagnostic clue, as this indicates the clutch is trying to engage.
Addressing a faulty compressor is typically one of the more expensive AC repairs you might encounter. Depending on the extent of the damage, sometimes only the clutch needs to be replaced, which is a less invasive and costly fix. However, if the main unit is compromised by contamination or internal wear, a full compressor replacement will be required, potentially costing $1,700 or more according to Kelley Blue Book data. Due to the complexity and cost involved, compressor repairs are generally not a DIY fix and should be entrusted to a qualified professional mechanic. They have the specialized tools and expertise to accurately diagnose the problem and perform the necessary repair or replacement.
Read more about: The Ultimate Guide to Tire Pressure: Unlocking Safety, Savings, and Superior Driving Performance
.jpg)
4. **Electrical or Sensor Failures**
In today’s increasingly sophisticated vehicles, the air conditioning system relies heavily on an intricate web of electrical components and sensors. These include everything from simple fuses and relays to more complex switches, wiring, temperature sensors, and even control modules. If any one of these electrical elements malfunctions, it can throw the entire AC system out of whack, often causing it to shut down as a precautionary measure to prevent further damage or simply failing to operate correctly.
For instance, a seemingly minor issue like a blown fuse can prevent the compressor from receiving power, stopping it dead in its tracks. A faulty relay might intermittently cut power, leading to an AC system that works sporadically. Furthermore, a defective temperature sensor could feed inaccurate readings to the climate control unit, causing it to believe the cabin is already at the desired temperature and prematurely stop refrigerant circulation, even when the interior is still blazing hot. Loose connections or damaged wiring can also disrupt critical signals, leading to erratic AC behavior or a complete shutdown.
The symptoms of electrical or sensor failures can vary widely, making them sometimes tricky to diagnose. The AC system might simply refuse to turn on, with the control panel not lighting up or responding to inputs. In other scenarios, the system might turn on but the temperature doesn’t change from warm to cold, or it might change randomly. Sometimes, you might notice that the fan only works on certain speeds, suggesting a problem with the blower motor resistor or its electrical supply. These inconsistencies often point to a breakdown in the electronic commands that govern the AC’s operation.
When faced with suspected electrical issues, a good starting point is to check your vehicle’s fuse box for any blown fuses related to the AC system. This is a relatively easy and inexpensive DIY fix. If the fuses are intact, or if the problem persists, professional diagnostics become essential. Mechanics use specialized scan tools to communicate with your car’s onboard computer, identifying faulty sensors, modules, or electrical pathways that are preventing the AC from working correctly. In some cases, recalibrating or resetting the climate control system can resolve issues stemming from sensor misreadings, but often, a replacement of a specific sensor, relay, or even a control unit may be required.
Read more about: Beyond the Hype: Can the 2025 Cadillac Lyriq Truly Capture Traditional Luxury Buyers?
5. **Blocked or Damaged Condenser**
The condenser plays a crucial role in the automotive air conditioning system, working in tandem with the compressor to facilitate the heat exchange process. Typically situated at the very front of your car, often directly in front of the radiator, its primary job is to cool the hot, high-pressure refrigerant gas that comes from the compressor, transforming it back into a liquid state. This vital cooling step is how the heat absorbed from your cabin is released into the surrounding atmosphere, making way for new cool air.
However, because of its exposed location, the condenser is highly susceptible to becoming blocked or damaged. Over time, road grime, leaves, bugs, plastic bags, or other debris can accumulate on its delicate fins, forming a barrier that severely restricts airflow through the component. This blockage prevents the condenser from effectively dissipating heat, leading to increased refrigerant pressure within the system and potential overheating. When this happens, the AC system might shut down entirely as a self-protective measure, leaving you without cold air.
The signs of a blocked or damaged condenser often include reduced or non-existent cooling, especially noticeable when your car is idling or moving slowly, as there’s less natural airflow over the component. You might also observe your engine overheating when the AC is on, as the blocked condenser contributes to overall heat buildup in the engine bay. Visually, you can often spot the problem by inspecting the front of your car; visible dirt, leaves, bent fins, or debris on the condenser are clear indicators that it’s not getting the airflow it needs.
Fortunately, addressing a blocked condenser can sometimes be a simple DIY fix. Begin by inspecting the front of your car for any obvious obstructions. Leaves, bugs, or road grime can often be gently removed with a soft brush or flushed away with a garden hose, ensuring not to bend the delicate fins. For more stubborn debris, compressed air can be used carefully. If, however, the condenser itself has suffered damage – such as from an impact – it will need to be replaced. While cleaning is straightforward, replacement is a job best left to professionals, as it involves evacuating and recharging the refrigerant system. Regularly cleaning the condenser can significantly enhance its efficiency and the overall performance of your AC system, ensuring optimal heat exchange and consistent cool air.
Read more about: Unexpected Appliance Disasters: 10 Common Breakdowns That Cause Genuine Homeowner Panic – And How to Tackle Them Confidently

6. **Clogged Cabin Air Filter**
Among the more overlooked and surprisingly common culprits behind diminished AC performance is a clogged cabin air filter. Many drivers are not even aware their car has one, yet this inexpensive component plays a crucial role in maintaining both air quality and HVAC system efficiency. Its job is simple but vital: to clean the air before it enters your car’s interior, trapping dust, pollen, soot, and other airborne particles, protecting your lungs and keeping the inside of your vehicle cleaner.
When this filter becomes saturated with accumulated debris, its ability to allow air to pass through is severely restricted. This restriction means that even if your AC system is producing perfectly cold air, that air simply cannot flow effectively into the cabin. Drivers often mistakenly attribute the resulting weak airflow to a cooling failure, thinking the AC isn’t working, when in reality, the underlying issue is nothing more than a choked air filter. This is a classic case where a seemingly complex problem has a remarkably simple and inexpensive solution.
Symptoms of a clogged cabin air filter are primarily related to airflow. You’ll likely notice weak or uneven airflow coming from the vents, even when the fan speed is set high. A musty or dusty smell inside the cabin is another strong indicator, as the trapped debris can start to decompose or harbor mold. Additionally, the fan might sound noisier than usual as it struggles to push air through the clogged filter. In some cases, windows might fog more easily, as the filter also helps manage moisture removal from the incoming air.
The good news is that replacing the cabin air filter is one of the easiest and most cost-effective DIY fixes for AC issues. Most vehicle manufacturers recommend replacing it every 12,000 to 15,000 miles, or more frequently if you drive in dusty environments or areas with heavy traffic. You can usually find instructions in your owner’s manual for locating and replacing it, as it’s often positioned behind the glove box or under the dashboard. A new filter will immediately restore proper airflow, leading to noticeably improved cooling performance and better air quality inside your car. This simple maintenance step is often all it takes to transform a struggling AC back into a refreshing one.
The first section meticulously covered the most common and immediate issues that plague a car’s air conditioning system, from refrigerant levels and leaks to major components like the compressor and the condenser, along with the often-overlooked cabin air filter. Now, we’re going to delve deeper into the intricate workings of your vehicle’s cooling system, exploring those internal components and electronic controls that, when faulty, can leave you sweltering. Understanding these more complex issues empowers you to not only diagnose problems but also to appreciate the sophisticated engineering that keeps your cabin cool.
Read more about: Seriously, What Happened? 12 Once-Iconic Features Mechanics Just Don’t Fix Anymore.
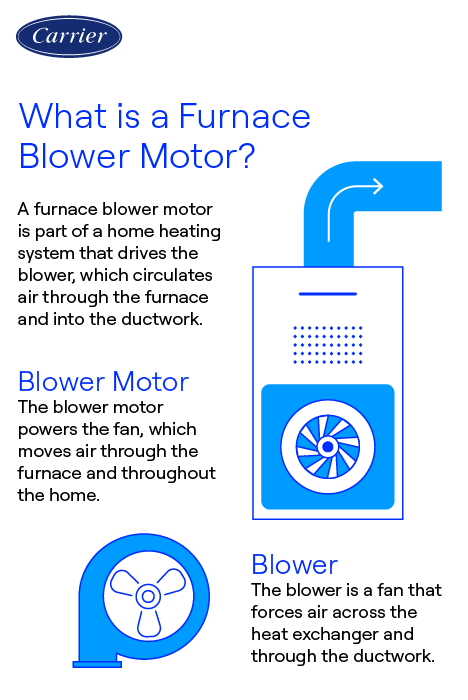
7. **Blower Motor or Fan Failure**
Even if your AC system is producing perfectly chilled air, that refreshing blast won’t reach you if the blower motor or its associated fan isn’t working properly. The blower motor is essentially the muscle that pushes air through your car’s vents, whether it’s heated air in winter or cooled air in summer. Over time, these motors can simply wear out from continuous use, or they might become obstructed by debris, leading to a noticeable reduction in airflow or a complete cessation of air movement.
A common companion to blower motor problems is a faulty blower motor resistor. This small but crucial component is responsible for regulating the fan’s speed. When the resistor fails, you might find that your fan only works on certain speeds (often just the highest setting) or, in worse cases, it might stop working entirely. This isn’t just an inconvenience; it means you can’t control the volume of air circulating, drastically impacting your comfort and the system’s ability to cool or heat the cabin effectively.
When a blower motor or its resistor is failing, the symptoms are usually quite distinct. The most obvious sign is a complete lack of air coming from the vents, even when the AC system is on and the fan speed is set high. You might also notice that the fan speed doesn’t change when you adjust the controls, or it only works erratically on specific settings. Sometimes, a failing motor can produce unusual clicking, rattling, or squealing noises from under the dashboard, indicating mechanical distress as it struggles to spin.
If you suspect the blower motor is the culprit, diagnosis can involve testing the motor’s electrical connections with a multimeter to check for power supply or using a diagnostic tool to pinpoint resistor issues. While some basic checks might be within a confident DIYer’s capability, replacing a faulty blower motor often involves accessing components under the dashboard, which can be a more involved repair. For these situations, professional replacement is often the most reliable solution, ensuring the new component is correctly installed and integrated into your vehicle’s electrical system for consistent airflow.
Read more about: The 8 Most Common Reasons Why Your Classic Car’s Heater Fails in Winter: A Comprehensive Guide
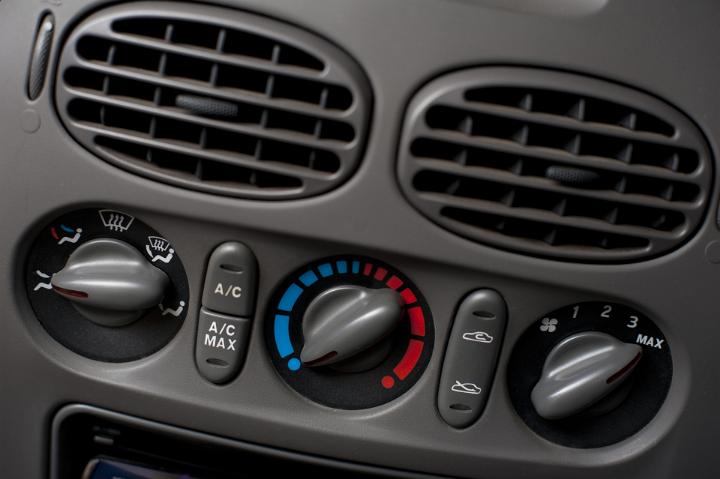
8. **Faulty Climate Control Settings or Sensor Misreadings**
Modern vehicles are incredibly smart, and many come equipped with sophisticated automatic or dual-zone climate control systems that rely heavily on a network of sensors and electronic modules to maintain your desired cabin temperature. These systems continuously monitor interior and exterior temperatures, humidity, and even sun load to precisely adjust fan speed, air distribution, and cooling output. However, this reliance on technology means that if any of these sensitive sensors or control modules malfunction, your AC system can behave erratically or stop cooling altogether.
A common scenario stemming from sensor misreadings is when the climate control system “thinks” the cabin is already at the set temperature, even if it’s still uncomfortably warm inside. This can happen if an interior temperature sensor provides inaccurate data, causing the system to prematurely reduce or stop the flow of cold refrigerant. Similarly, a fault in the electronic module that processes these readings can lead to inconsistent cooling, where the air temperature fluctuates seemingly at random, making it impossible to achieve stable comfort.
Symptoms of these electronic gremlins can be frustratingly inconsistent. You might experience the AC blowing cold for a few minutes before switching to warm air, or the fan speed might inexplicably drop or surge without your input. The control panel itself might appear to function normally, yet the actual performance of the AC system doesn’t match the settings you’ve selected. In some advanced systems, specific error codes might be stored in the car’s onboard computer, which a professional diagnostic scan tool can retrieve to identify the precise sensor or module that’s causing the problem.
In some fortunate cases, issues related to faulty climate control settings or sensor misreadings can be resolved with a simple recalibration or resetting of the system, much like rebooting a computer. Your owner’s manual might offer guidance on how to perform a basic reset. However, if the problem persists, it typically indicates a deeper issue, necessitating a professional diagnosis. A qualified mechanic with specialized scan tools can accurately identify and, if possible, repair or replace the faulty sensor or control unit, restoring your climate control system to its intelligent and efficient operation.

9. **Leaking or Clogged Evaporator**
The evaporator is a vital, yet often unseen, component of your car’s AC system, typically tucked away under the dashboard. Its primary function is to absorb heat from the air that passes over its coils, effectively cooling the air before it’s blown into your car’s interior. It’s essentially the inverse of the condenser; while the condenser releases heat outside, the evaporator brings the cold inside. However, its hidden location makes it susceptible to a different set of problems that can significantly impact your cooling.
One common issue is that the evaporator can become clogged. Because air flows through it, dust, leaves, pet hair, and other debris can accumulate on its fins over time. This buildup acts as an insulating layer, severely reducing the evaporator’s ability to exchange heat and often restricting airflow into the cabin. Moreover, the moist environment around the evaporator coils is a perfect breeding ground for mold and bacteria, leading to a pervasive, unpleasant musty or chemical smell whenever the AC is running.
Another critical problem is a leak in the evaporator. Like other components in the refrigerant circuit, the evaporator can develop small cracks or corrosion that allow refrigerant to escape. Because it’s located inside the cabin, often under the dash, an evaporator leak can be particularly difficult to diagnose without specialized equipment. Signs of a leaking evaporator might include a gradual loss of cooling performance, as well as the distinctive musty or sweet chemical smell of refrigerant inside the car. In some cases, you might even notice visible moisture or a sticky residue under your floor mats, particularly on the passenger side.
Addressing a clogged evaporator can sometimes involve a professional cleaning process, which aims to remove debris and eliminate mold and bacteria growth, improving both airflow and air quality. However, if the evaporator itself is leaking refrigerant, a repair is rarely an option due to its complex construction and location. In such instances, a full evaporator replacement is required. This is typically a labor-intensive and costly repair because it often necessitates disassembling a significant portion of the dashboard to gain access, making it a job best entrusted to an experienced mechanic.
Read more about: Stay Cool & Save Cash: 15 Simple DIY Fixes for Your Car’s Air Conditioner
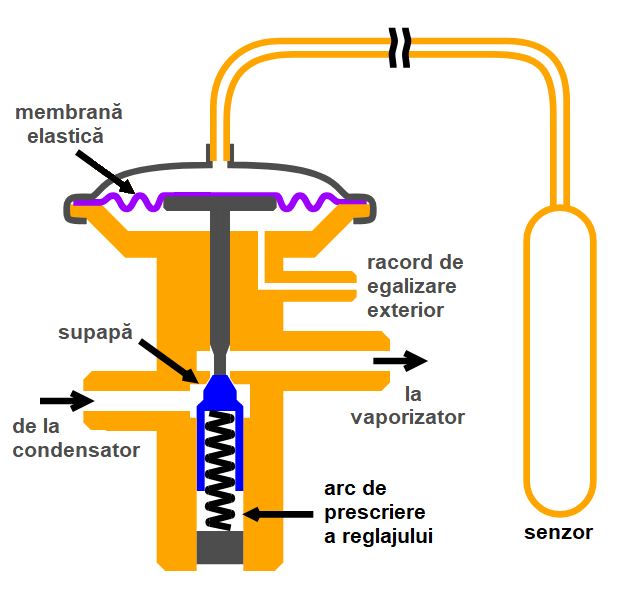
10. **Malfunctioning Expansion Valve or Orifice Tube**
In the intricate ballet of refrigerant flow, the expansion valve or orifice tube plays a surprisingly critical, yet often overlooked, role. These components are strategically placed between the high-pressure side (coming from the condenser) and the low-pressure side (leading to the evaporator) of the AC system. Their job is precise: to control the amount of liquid refrigerant that enters the evaporator, converting it from a high-pressure liquid to a low-pressure spray. This sudden pressure drop causes the refrigerant to rapidly expand and cool, a fundamental step in the heat absorption process.
When the expansion valve or orifice tube malfunctions, this delicate balance is thrown off. An expansion valve can become stuck open or closed, or its internal mechanism can fail to regulate flow effectively. An orifice tube, being a simpler, fixed component, is more prone to becoming clogged by debris or corrosive particles that might have entered the system, particularly if moisture has been present. Any blockage or improper operation here means the wrong amount of refrigerant is reaching the evaporator, severely hindering its ability to cool the air.
The symptoms of a faulty expansion valve or orifice tube often manifest as inconsistent or non-existent cooling. If the component is stuck closed or severely clogged, insufficient refrigerant will reach the evaporator, resulting in little to no cold air from the vents, even if the compressor and condenser are working perfectly. Conversely, if an expansion valve is stuck open, too much refrigerant might flood the evaporator, potentially leading to ice formation on the evaporator coils or abnormally high pressure readings on the low-pressure side of the system, further disrupting cooling.
Diagnosing a malfunctioning expansion valve or orifice tube typically requires a professional mechanic who can connect specialized gauges to the AC system to monitor high and low-side pressures. Abnormal pressure readings are key indicators of issues with these components. Due to their location and the necessity of properly evacuating and recharging the refrigerant system, replacing an expansion valve or orifice tube is not a DIY task. This repair ensures that the correct amount of refrigerant is consistently delivered to the evaporator, allowing your AC to produce steady, reliable cold air.
Read more about: Stay Cool & Save Cash: 15 Simple DIY Fixes for Your Car’s Air Conditioner
11. **Broken Blend Door Actuator**
While your AC system might be technically producing ice-cold refrigerant, if you’re still feeling only warm air from the vents, the culprit might not be the cooling components themselves, but rather a mechanical issue within your car’s climate control – specifically, a broken blend door actuator. This small, motorized component is responsible for directing airflow. It essentially acts as a gatekeeper, determining whether air passes over the heater core (for warm air) or the evaporator (for cold air), or a blend of both.
The blend door actuator often uses an electric motor to move a “door” inside the HVAC ductwork, allowing you to seamlessly adjust the temperature from hot to cold via your climate control settings. If this actuator fails, it can get stuck in one position. Most commonly, it gets stuck in the “heat” position, meaning that no matter how much you crank down the temperature on your dash, all the air flowing into your cabin has first passed through the heater core, leaving you with nothing but warm or hot air, even on the hottest days.
Symptoms of a broken blend door actuator are usually quite straightforward. The most common sign is the inability to change the temperature of the air coming from your vents, despite adjusting the temperature controls on your dashboard. You might set it to the coldest setting, yet consistently feel warm air. Sometimes, a failing actuator can also produce clicking, whirring, or ticking noises from behind the dashboard as it attempts, unsuccessfully, to move the blend door. In some vehicles, especially those with dual-zone climate control, one side of the car might receive cold air while the other only gets warm.
Replacing a blend door actuator can range from a relatively simple DIY task to a more complex professional repair, depending on its location in your specific vehicle. Some actuators are easily accessible behind the glove box or under the dash, while others require extensive dashboard disassembly. It’s always a good idea to consult your car’s service manual or a professional to determine the best approach. Restoring the function of this actuator is crucial for regaining full control over your car’s cabin temperature and ensuring that cold air can actually reach you when you need it most.
Read more about: 14 Vintage Boomer Rides Millennials Shun: The Undeniable Reasons Young Drivers Skip These Automotive Legends

12. **Oversaturated Accumulator/Receiver Drier**
Often overlooked, the accumulator (in orifice tube systems) or receiver drier (in expansion valve systems) plays a vital preventative role in your car’s AC system. This component serves two primary functions: first, it acts as a reservoir for liquid refrigerant, ensuring a steady supply to the expansion valve or orifice tube. Second, and perhaps more crucially, it contains a desiccant material, similar to the little packets found in new shoes, which is designed to absorb any moisture that might enter the AC system.
Moisture is the enemy of an AC system. Even small amounts can react with the refrigerant and oil to form corrosive acids, which can slowly but surely eat away at internal components like the compressor and expansion valve, leading to catastrophic failure over time. When the AC system experiences a leak, it’s not just refrigerant escaping; moisture can also be drawn in. If the accumulator/receiver drier becomes oversaturated with moisture due to a persistent leak or simply age, its desiccant can no longer do its job effectively.
The consequences of an oversaturated accumulator/receiver drier can be severe and far-reaching. Once the desiccant is saturated, it loses its ability to protect the system, allowing corrosive acids to form and circulate. Worse still, if the desiccant material itself breaks down, it can release particles into the refrigerant stream, effectively clogging the expansion valve, orifice tube, or even the delicate internal passages of the compressor and evaporator. This leads to a complete breakdown of cooling and necessitates extensive, costly repairs to clean or replace multiple contaminated components.
Diagnosing a failing accumulator/receiver drier isn’t always straightforward, as its symptoms often overlap with other AC issues, such as poor cooling or system blockages. However, if your system has been subjected to significant leaks or has been open to the atmosphere for an extended period, it’s highly probable that the drier has become saturated. Generally, it’s recommended to replace the accumulator/receiver drier any time the AC system is opened for major repairs, especially after a leak has been fixed, to ensure all moisture and contaminants are removed before recharging the system. This proactive maintenance step is relatively inexpensive compared to the potential damage an oversaturated drier can cause down the line.
**Final Thoughts: Keeping Your Cool On the Road**
A car AC that isn’t blowing cold air can transform even a short drive into an uncomfortable ordeal, especially when the mercury rises. As we’ve explored through these twelve common issues, the reasons behind a malfunctioning AC system can range from the remarkably simple to the genuinely complex. From a low refrigerant charge or a clogged cabin filter that you might tackle yourself, to intricate electrical failures, internal component blockages, or major compressor woes that call for a seasoned professional, each problem has its unique signs and solutions.
The key takeaway here is the power of early detection and proactive maintenance. Don’t let a minor inconvenience fester into a major breakdown. Pay attention to changes in airflow, listen for unusual noises, and address any persistent decline in cooling performance promptly. Regularly checking your cabin air filter, keeping your condenser clean, and scheduling periodic AC inspections can save you significant time, money, and frustration. By understanding the inner workings of your vehicle’s cooling system, you’re not just fixing a problem; you’re investing in a more comfortable, safer, and ultimately more enjoyable driving experience, no matter what the weather outside brings.


