

Building your own high-end PC is an adventure, a personal quest to craft a machine perfectly tailored to your gaming and productivity desires. It’s an incredibly rewarding process, allowing you to handpick every component, from the formidable CPU and powerful GPU to the intricate cooling systems and ample storage. The satisfaction of powering on a system you’ve built yourself, knowing every part works in harmony, is truly unparalleled for any tech enthusiast or dedicated gamer.
However, this journey, while exhilarating, is also fraught with potential pitfalls. Even seasoned builders and expert gamers can fall prey to subtle errors that lead to frustrating delays, suboptimal performance, or, in the worst-case scenario, expensive damaged components. The difference between a dream machine and an expensive paperweight often lies in meticulous attention to detail and an awareness of these common blunders. Avoiding these traps is key to unlocking the full potential of your meticulously chosen hardware.
We’re here to guide you through the initial stages of your high-end PC build, focusing on the critical mistakes that can derail your project right from the start. From the delicate handling of your processor to ensuring every component plays nicely together and that your power delivery is rock-solid, we’ll walk through the essential checks and habits that safeguard your investment and pave the way for a flawless first boot. Let’s dive into the core missteps to avoid, ensuring your custom rig is built for peak performance and longevity.

1. **Improper CPU Installation**Imagine the nightmare scenario: you’ve just unboxed your brand-new, top-tier CPU, a centerpiece of your high-end build, and in a moment of haste or inexperience, you turn it into an expensive paperweight. This is the stark reality for builders who mishandle their processors during installation. Modern CPUs, despite their robust appearance, have incredibly fragile connection points—be it the delicate pins on AMD processors or the equally vulnerable LGA socket pins on Intel motherboards. These tiny contact points are surprisingly easy to bend or break, often spelling game over for an otherwise perfect component.
Proper CPU installation hinges on precision and a gentle touch. Every CPU is designed to fit into its specific socket type in only one correct orientation. For Intel CPUs, where the contact pads are on the underside of the processor and the pins are in the motherboard socket, alignment markers (usually small triangles) on both the CPU and the socket are your best friends. Similarly, AMD CPUs, which typically feature pins directly on the processor, require careful alignment with the holes in the motherboard socket.
Crucially, you should never, ever force a CPU into its socket. If it doesn’t drop in smoothly and effortlessly, it’s a clear sign that something is amiss. Stop immediately, re-examine the alignment markers, and double-check your orientation. Forcing it will almost certainly result in bent or broken pins, rendering either the CPU or the motherboard—or both—unusable. This single mistake can be instantly fatal to expensive components and is entirely avoidable with proper care.
Additionally, it’s wise to handle the CPU by its edges to avoid touching the gold contact pads or pins. The oils from your fingers can interfere with electrical connections over time. Treat your CPU like the precious, delicate component it is, and take your time during this critical step. A few extra seconds of careful alignment can save you hundreds, if not thousands, of dollars and immense frustration.
2. **Neglecting Component Compatibility**Few things sting quite like the realization that your eagerly awaited, shiny new component won’t fit or function with the rest of your system after you’ve already torn open the packaging. Neglecting component compatibility is a widespread mistake, particularly for first-time builders, but it can equally catch out experienced enthusiasts who get complacent. Ensuring that every part in your high-end build is designed to work harmoniously together is foundational to avoiding performance issues, stability problems, or even outright hardware damage.
The relationship between your CPU and motherboard is the most vital compatibility check. Different CPU manufacturers, and even different generations from the same manufacturer, utilize distinct socket types. For instance, Intel’s 12th and 13th-generation CPUs require an LGA 1700 socket, while AMD’s Ryzen 7000 series demands an AM5 socket. Attempting to pair an incompatible CPU and motherboard will simply prevent your system from booting. Beyond the physical socket, you must also verify motherboard chipset compatibility, as the chipset dictates the CPU features and capabilities your system can leverage, such as advanced overclocking, PCIe 5.0 support, or specific RAM speeds. Always consult your motherboard’s official documentation or manufacturer’s website to confirm supported CPUs.
RAM compatibility is another critical area often overlooked. Modern motherboards support either DDR4 or DDR5 RAM, but never both. Installing the wrong type will result in a failed build. Beyond type, consider RAM speed and capacity. While motherboards support a range of speeds, exceeding the maximum supported speed means your RAM will likely downclock, wasting its potential. Conversely, using slower RAM can bottleneck your CPU, especially in demanding applications and games. Motherboard documentation will also specify maximum RAM capacity, and the motherboard’s memory compatibility list (QVL) is an invaluable resource for tested and supported RAM models.
Finally, the physical fit of your GPU within your case is a surprisingly common oversight. High-end graphics cards can be exceptionally long, wide, and thick, often taking up multiple expansion slots. Many builders, drawn by aesthetics, purchase cases that are too small to accommodate their chosen GPU, leading to frustrating clearance issues or restricted airflow. Always check the GPU’s dimensions (length, width, height) against the maximum supported GPU length specified by your case manufacturer. Additionally, ensure your power supply has the necessary dedicated connectors to feed your beastly GPU, as high-end cards have significant wattage requirements.
Read more about: A Wallet-Sized Disaster: 14 Critical Engine Symptoms That Signal Early Motorcycle Rebuilds

3. **Inadequate Power Supply Unit (PSU) Selection**The power supply unit is often dubbed the unsung hero of any PC build, yet it is astonishingly common for builders to undervalue its importance. Many are tempted to cut costs or dedicate less thought to the PSU, viewing it as less exciting than a shiny new GPU or CPU. This is a critical error; a failing or inadequate PSU doesn’t just die quietly—it can take connected components down with it, transforming your high-end dream machine into a very costly mess. The PSU is truly the foundation of your build; everything else depends on its ability to deliver clean, stable power.
One of the most frequent mistakes is underestimating the total power requirements of your system. Every single component, from the CPU and GPU to the smallest fan and storage drive, draws power. If your PSU lacks sufficient wattage to handle the collective demand, your system will suffer from random shutdowns, inexplicable crashes, or a complete inability to boot. To avoid this, it’s crucial to calculate your system’s total power consumption. Online power supply calculators are excellent tools for estimating wattage needs; however, it’s always wise to select a PSU that offers at least 20% more wattage than your estimated peak requirements. This overhead ensures stability, accounts for power spikes, and provides room for future upgrades without needing a PSU replacement.
Another grave mistake is choosing a low-quality or “no-name” PSU. While the initial savings might seem appealing, cheap power supplies often lack essential safety features like overvoltage or short-circuit protection. They typically use subpar internal components that degrade rapidly, leading to inconsistent voltage delivery, excessive heat generation, and a higher risk of premature failure. In the worst-case scenarios, a failing low-quality PSU can send incorrect voltages through your system, permanently frying your motherboard, GPU, and storage drives in a matter of seconds. This potential for widespread hardware damage makes a cheap PSU one of the riskiest shortcuts you can take.
Investing in a reputable brand with a proven track record for reliability is paramount. Brands like Seasonic, Corsair, and EVGA are consistently recommended for their robust, high-quality units that often come with reassuringly long warranties. Beyond brand, pay close attention to the 80 Plus certification, which indicates the PSU’s efficiency in converting AC power from the wall into usable DC power. An 80 Plus Bronze, Gold, Platinum, or Titanium rating signifies better efficiency, meaning less wasted energy, less heat generated, and a quieter system as the PSU fan doesn’t have to work as hard. A quality PSU is an investment that pays dividends in system stability, longevity, and peace of mind.
Finally, a particularly catastrophic error related to PSUs is mixing power supply cables. Even if the connectors physically fit into the ports, power supply cables are *not* universal across different manufacturers, or even sometimes across different models from the same manufacturer. Different PSUs use different internal pinouts, meaning that the wiring for specific voltages can vary dramatically. Using a cable from one PSU with another can send incorrect voltages to sensitive components, resulting in instant and irreversible damage to your motherboard, GPU, or storage drives. Always, without exception, use only the modular cables that came bundled with your specific power supply unit.
Read more about: Beyond the Hype: Decoding the True Impact of Every Gaming PC Component Pros Rely On
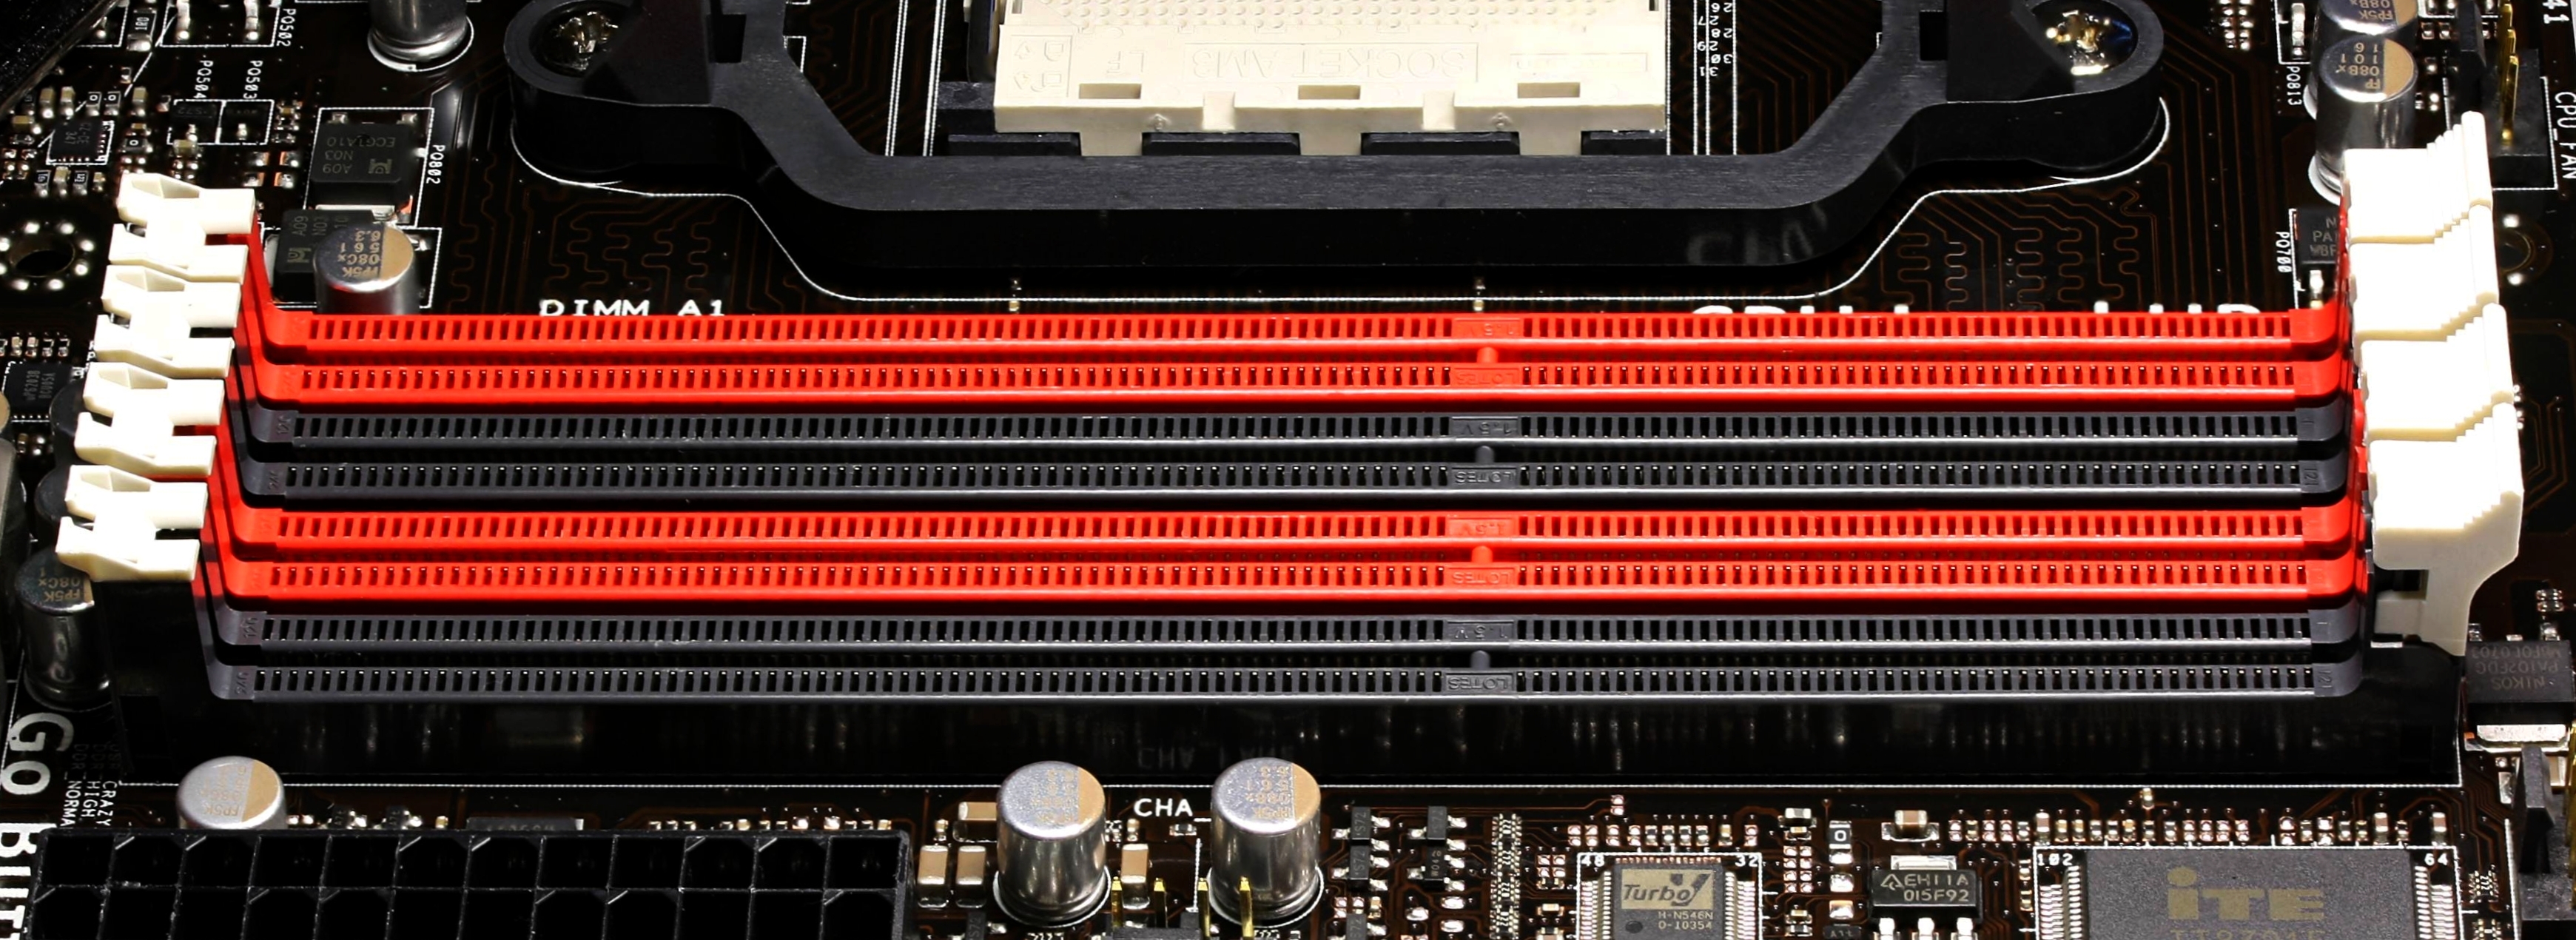
4. **Incorrect RAM Configuration**RAM, or Random Access Memory, is a vital component that significantly impacts your system’s overall responsiveness and performance, yet it is frequently undervalued or configured incorrectly. Many builders assume RAM is simply plug-and-play, but overlooking its specific requirements can lead to continuous reliance on the slower page file, severe reductions in multitasking fluidity, and subpar performance in memory-intensive applications and games. The wrong RAM setup can quickly become a bottleneck, negating the benefits of even the most powerful CPU and GPU.
One common error is installing memory modules in the wrong slots. Motherboards are designed to support dual-channel or quad-channel memory operation, which significantly boosts performance by allowing the CPU to access data from multiple RAM modules simultaneously. To enable these modes, RAM sticks must be installed in specific, paired slots—typically indicated by alternating colors or clear markings in your motherboard manual. Failing to follow these instructions will result in single-channel operation, drastically cutting your memory bandwidth and causing a noticeable hit to performance, especially in games and demanding applications. Always consult your motherboard manual for the correct slot configuration.
Beyond physical placement, paying attention to RAM capacity and speed is crucial. For a high-end gaming PC, 16GB of DDR4 or DDR5 RAM operating at speeds between 3200-6000 MHz is generally recommended for a smooth experience. However, for content creators, video editors, or users running multiple demanding applications, 32GB or more, combined with higher speeds, can be a game-changer. Ensure the chosen RAM speed is supported by your motherboard; installing RAM faster than your motherboard can handle might simply result in it running at a lower, supported speed, wasting your investment. Conversely, slow RAM can directly bottleneck your CPU, as it waits for data to be retrieved.
Another pitfall is attempting to mix different DDR5 capacities or speeds without proper understanding, which can lead to system instability, frequent blue screens, or outright boot failures. While some motherboards are more forgiving, it’s always best practice to use a matched kit of RAM (e.g., two identical 16GB sticks) to ensure optimal compatibility and stability. If crashes persist after installation, ensure your motherboard BIOS is updated to the latest version, and consider adjusting memory timing settings in the BIOS if you’re comfortable doing so. Optimizing your RAM capacity and speed for your system’s workload yields major gains in overall PC performance.
Read more about: Ford’s Hybrid Fire Risk: An In-Depth Consumer Report on Escape, Corsair, and Maverick Recalls
5. **Unbalanced CPU and GPU Budget**When assembling a high-end gaming PC, it’s natural to want the best of everything, but a common and costly mistake is failing to balance the budget between the CPU and GPU. Many builders mistakenly believe that pouring money into the absolute top-tier CPU, such as an Intel i9 or AMD Ryzen 9, will automatically deliver the best gaming experience. However, this often leads to an unbalanced system where one component restricts the full potential of the other, a phenomenon famously known as a bottleneck.
The reality is that for most modern games, the graphics processing unit (GPU) is the single most critical component influencing framerates and visual fidelity. Games depend far more on raw graphics processing power than on the multi-core performance offered by ultra-high-end CPUs. Pairing a premium RTX 4080 GPU with a low-end CPU, for instance, means the powerful GPU will often sit underutilized, waiting for the slower CPU to feed it data. Conversely, a blazing-fast CPU combined with a cheap, underpowered GPU will not deliver the gaming or rendering performance you’re hoping for, as the GPU simply can’t keep up with the CPU’s processing capabilities.
To avoid this bottleneck effect, the key is to aim for a balanced configuration. Researching standard processor and graphics card pairings and utilizing online bottleneck calculators can provide invaluable guidance. For gaming, a balanced setup might involve a mid-to-high-tier CPU like a Ryzen 7 or an Intel i7 paired with a capable GPU like an RTX 4070 or RX 7800 XT. This ensures that neither component is constantly waiting for the other, allowing both to operate near their full potential. For productivity tasks or content creation, where multi-core performance is more critical, a powerful CPU combined with a strong GPU might be more appropriate, but the principle of balance still applies.
Therefore, strategically allocate more of your budget to your graphics card if gaming is your primary objective. Choose a CPU that is powerful enough not to bottleneck your chosen GPU, rather than overspending on a CPU whose additional performance cores won’t be fully utilized by your gaming workload. This thoughtful approach ensures you get the best performance for your money and a system that truly excels at its intended purpose. This also ties into future-proofing; a balanced system with a strong GPU will remain more relevant for longer in the demanding world of PC gaming.
6. **Poor Cooling and Airflow Management**PCs generate heat—it’s a fundamental fact of computing. This might seem straightforward enough, but forgetting just how much heat a powerful system produces is a colossal mistake, often overlooked in the pursuit of raw power for the CPU, GPU, and PSU. As the adage from Marvel’s Spiderman goes, “With great power comes great responsibility.” In PC building, this translates directly to the responsibility of giving equal, if not greater, consideration to your PC’s cooling. Overheating components can lead to thermal throttling, where performance drops significantly, system instability, frequent crashes, or even permanent hardware damage. Proper airflow and effective cooling solutions are absolutely crucial for any high-end build.
One of the simplest yet most common errors is incorrect fan placement within the case. Fans are essential for maintaining a steady flow of air, but they must be installed with the correct orientation. Fans are designed either to intake cool air from outside the case or to exhaust hot air from within. Installing them in the wrong direction can disrupt this crucial airflow, trapping hot air inside and causing internal temperatures to skyrocket. A typical and effective setup involves intake fans at the front and bottom of the case, pulling in cool air, and exhaust fans at the rear and top, expelling hot air. Always check the directional arrows printed on the side of your fans, which clearly indicate the direction of airflow, to ensure proper installation.
Beyond simple direction, balancing the number of intake and exhaust fans is also important. Too many intake fans without adequate exhaust can create positive air pressure, where air is forced in but struggles to leave, leading to trapped hot spots. Conversely, an excessive number of exhaust fans can create negative pressure, pulling in unfiltered air and dust through every crevice. A balanced approach ensures a consistent and efficient airflow path, keeping internal temperatures low while minimizing dust buildup. Experimenting with fan curves in your motherboard’s BIOS can also help optimize cooling performance without excessive noise.
Another significant oversight is neglecting the case’s airflow design itself. Many builders choose a case based purely on aesthetics or price, without considering how its layout impacts cooling efficiency. Cases with restrictive front panels, minimal ventilation, or cramped interiors can severely hinder airflow, regardless of how many fans you install. For a high-end PC, prioritize cases with mesh front panels, ample top vents, and strategic mounting points for fans and radiators. These designs promote natural convection and allow your components to breathe, ensuring that the cool air can reach critical areas and hot air can be efficiently expelled.
Lastly, poor cable management can unexpectedly become a major culprit in cooling inefficiency. Tangled, unorganized cables can obstruct airflow, acting as physical barriers that block cool air from reaching components like the GPU and CPU, and preventing hot air from being exhausted. While it might seem like a minor aesthetic detail, taking the time to route cables neatly behind the motherboard tray and through designated cutouts is vital. Most modern cases offer built-in cable management features for this purpose. Utilizing zip ties or Velcro straps not only makes your build look professional but also significantly improves internal airflow, directly contributing to lower temperatures and better sustained performance for your powerful components. Remember that installing noisy fans, a common builder regret, can also ruin the experience, so considering fan acoustics as part of your cooling strategy is also advisable.
Read more about: High-Mileage Havoc: The Crippling Electrical & Mechanical Nightmares Haunting Your Sports Car – A Deep Dive into the Ford S197 Mustang

7. **Apply Thermal Paste Correctly**The application of thermal paste might seem like a small detail in the grand scheme of a high-end PC build, but its importance for efficient cooling cannot be overstated. This often-underestimated step directly influences how effectively heat is transferred from your blazing-fast CPU to its cooler, acting as a critical bridge between two essential components. Incorrect application can lead to significant thermal issues, compromising performance and stability.
Many builders, particularly those new to the high-end scene, tend to either use too much or too little paste, both of which can be problematic. Applying an excessive amount can create an insulating layer, preventing the cooler from making optimal contact with the CPU’s integrated heat spreader. Conversely, an insufficient amount leaves microscopic air gaps that hinder efficient heat transfer, creating hot spots that force your CPU to thermal throttle.
The ideal approach is surprisingly simple: a small, pea-sized dot applied precisely in the center of the CPU’s surface is generally all you need. When the CPU cooler is installed and gently pressed down, this dot will spread evenly across the surface, filling those tiny imperfections and ensuring consistent contact. It’s important not to overtighten heatsink screws during installation, as this can warp the CPU or even damage the delicate socket underneath, further compounding your cooling woes.
Beyond initial application, remember that thermal paste isn’t a one-and-done solution forever. If you ever need to remove your CPU cooler—perhaps for an upgrade or maintenance—it’s crucial to clean off the old, dried, or degraded paste thoroughly. Using a lint-free cloth and a small amount of isopropyl alcohol will ensure the CPU surface is pristine before applying a fresh layer. This simple habit guarantees optimal heat transfer, preventing needless throttling and ensuring your CPU runs at peak performance for years to come. Proper thermal paste application guarantees effective cooling and obviates needless throttling, safeguarding your investment.

8. **Prepare Network Drivers in Advance**Imagine completing your magnificent new PC build, eagerly powering it on, only to discover you can’t connect to the internet. This frustrating scenario is surprisingly common and entirely avoidable. Most motherboards, fresh out of the box, don’t come with preloaded Ethernet or Wi-Fi drivers, which means your pristine new system won’t be able to access the network right away. Without internet access, downloading those crucial drivers becomes an immediate and irritating roadblock.
This oversight can grind your initial setup to a halt, forcing you to find another device to download the necessary drivers, transfer them via a USB stick, and then install them on your new machine. It’s an unnecessary delay that can dampen the excitement of your first boot. This simple preparation step is often overlooked by even seasoned builders who get caught up in the hardware assembly, forgetting the software essentials that immediately follow.
The solution is straightforward and proactive: before you even begin assembling your PC, visit your motherboard manufacturer’s official website. Locate the support section for your specific motherboard model and download the latest Ethernet and Wi-Fi drivers. Save these drivers to a USB flash drive. This small act of foresight ensures that the moment your PC powers on for the first time, you’re ready to establish an internet connection, allowing you to access updates, install software, and dive straight into gaming.
Furthermore, when downloading drivers, it’s generally advisable to skip the bundled bloatware that motherboard manufacturers sometimes offer. While some utilities can be helpful, many include unnecessary software that can clutter your system, consume resources, and potentially even introduce stability issues. Focusing solely on the essential network drivers from the manufacturer’s site ensures a cleaner, faster, and more stable operating system right from the start, setting a strong foundation for your high-performance machine.
Read more about: Beyond Self-Parking: Unveiling 12 Transformative Futuristic Car Features That Will Revolutionize City Driving

9. **Start Fresh with Your Operating System**It might seem convenient to simply transfer your existing Windows installation from an old hard drive to your brand-new high-end PC. After all, it saves time on reinstalling applications and configuring settings, right? Unfortunately, this seemingly innocent shortcut is a significant mistake that can trigger a cascade of driver conflicts, stability issues, and subpar performance. Major hardware changes, especially when switching between different CPU platforms or generations, confuse the operating system’s previous configurations, leading to a host of headaches.
An operating system carried over from a vastly different hardware configuration will invariably have drivers and system settings optimized for the old components. When introduced to an entirely new motherboard, CPU, and GPU, these old configurations clash with the new hardware, leading to erratic behavior, frequent crashes, or even an inability to utilize the full potential of your expensive new components. The system often struggles to adapt, resulting in a frustratingly unstable and underperforming experience.
The best practice for any new high-end PC build is to perform a clean installation of your operating system. Yes, it takes a bit more time upfront—you’ll need to reinstall Windows, then all your applications and games—but the benefits far outweigh the initial effort. A fresh OS installation provides a pristine environment, allowing Windows to detect and configure itself perfectly for your specific new hardware. This ensures optimal driver compatibility, maximum stability, and the full utilization of your system’s capabilities.
A clean install also provides an excellent opportunity for “operating system hygiene.” It’s a chance to wipe away years of accumulated digital clutter, unused programs, and registry entries that can slow down any system. You start with a lean, efficient, and responsive machine, free from legacy issues and bloat. This meticulous approach saves countless hours of troubleshooting weird crashes and inexplicable performance drops down the line, ultimately delivering the smooth, high-performance experience you invested in.
Read more about: America’s Iconic Sports Car: Decoding the Most Problematic Corvette Models in History to Help You Buy Smart
10. **Connect Your Monitor to the GPU**This might sound like an unbelievably basic oversight, but connecting your monitor to the wrong port is a surprisingly frequent mistake, even among builders who should know better. The excitement of finally powering on a new PC can sometimes lead to rushing this crucial step, resulting in a blank screen or profoundly disappointing performance. If you’ve invested in a dedicated graphics card for gaming or content creation, ensuring your monitor is connected to it, rather than the motherboard’s integrated graphics ports, is absolutely non-negotiable.
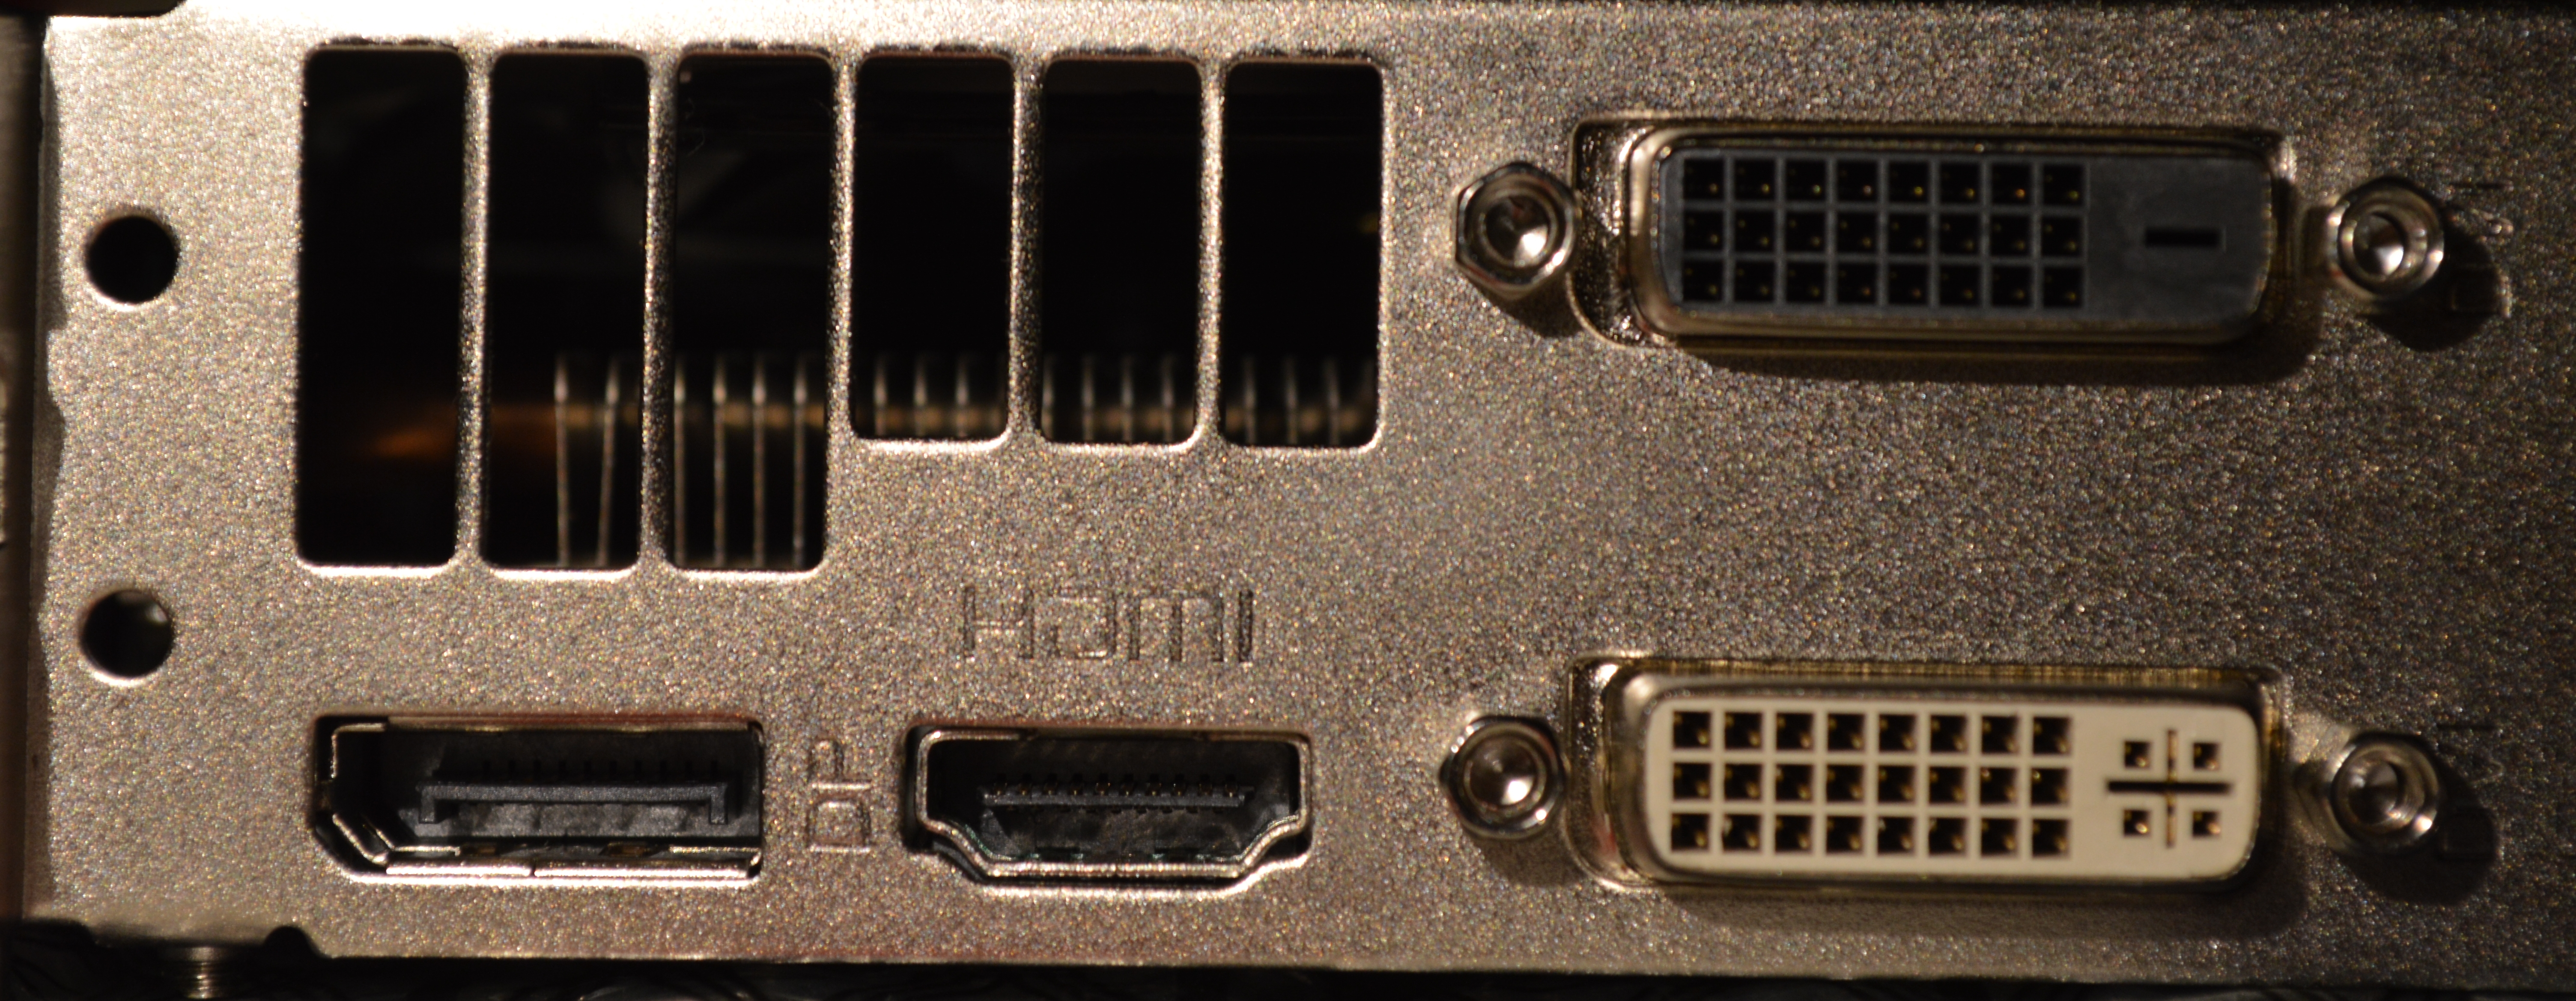
Many modern CPUs come with integrated graphics processing units (iGPUs) that allow your system to display an image even without a dedicated graphics card. These iGPU outputs are typically found on the motherboard’s rear I/O panel, alongside USB ports and audio jacks. However, integrated graphics, while convenient for basic desktop use, are fundamentally incapable of handling modern games at playable framerates or accelerating demanding creative applications. They simply lack the raw power and specialized hardware of a dedicated GPU.
The problem arises when a builder, by habit or oversight, plugs their monitor cable (HDMI, DisplayPort, DVI, or VGA) into the motherboard’s video output instead of the dedicated graphics card. The system will likely boot and display an image, but it will be using the weaker integrated graphics. This leads to extremely low framerates in games, visual stuttering, and a general feeling that your expensive new GPU isn’t working as intended—because it isn’t being used at all for display output.
Always double-check your connections before powering on for the first time. The dedicated graphics card will have its own set of video outputs, usually located lower down on the rear of your PC, typically within a PCIe slot. Connect your monitor directly to one of these ports. This ensures that your powerful, high-end GPU is actively rendering all your visuals, delivering the smooth framerates and stunning fidelity you built your system for. It’s a vital pre-boot check that guarantees you unlock the full potential of your graphics powerhouse.
Read more about: Why VR Headsets, Despite Decades of Innovation, Still Haven’t Crossed the Mainstream Threshold
11. **Seat All Connections Firmly**In the complex tapestry of a PC build, where countless wires and components interlink, it’s astonishing how often a seemingly minor issue can cause major system failures. One of the most insidious and frustrating mistakes, responsible for more build failures than genuinely faulty components, is simply failing to seat all connections firmly. A half-inserted power connector or a slightly askew data cable might look fine at a glance, but these loose connections are silent killers of stability and functionality.
The consequences of unseated connections range from frustrating intermittent issues to complete system inability to boot. For instance, if the main 24-pin ATX power connector or the supplemental 8-pin CPU power connector isn’t fully clicked into place, your motherboard might not receive adequate power, leading to immediate shutdown, repeated reboots, or no power-on whatsoever. Similarly, an improperly seated graphics card power cable can cause your high-end GPU to underperform, crash during games, or not be detected by the system at all.
This isn’t just about power; data connections are equally critical. A SATA cable that hasn’t fully clicked into your SSD or HDD can lead to the drive not being recognized by the BIOS or operating system, causing boot failures or missing storage. Even smaller headers, like those for front panel USB or audio, can cause frustrating non-functional ports if not properly connected. Each connection in your PC is a link in a chain, and a weak link compromises the entire system.
Therefore, before you even think about hitting that power button for the first time, make a meticulous pass through your entire build. Physically inspect every single cable and connector. Give each one a gentle push to ensure it’s fully seated and that any locking clip has engaged. Listen for the satisfying “click” that confirms a secure connection. This includes the main motherboard power, CPU power, GPU power, SATA cables, and even the smaller front panel headers. This vital pre-boot check, ensuring every connection is firm and secure, is your ultimate safeguard against hours of frustrating troubleshooting and the best way to guarantee a successful first boot.
Read more about: Under the Contract: Dissecting Hollywood’s A-List Power Plays Amidst Studio Stand-Offs
Building your own high-end PC is an incredibly rewarding journey, a testament to your technical prowess and dedication. It’s a venture that offers not just a powerful machine, but a deeper understanding of the technology that drives your digital world. While the path to a perfectly tuned rig is dotted with potential missteps, remembering these expert-shared insights will transform challenges into triumphs. From the delicate application of thermal paste to the meticulous preparation of drivers and the final, satisfying click of every securely seated cable, each step contributes to a symphony of performance and stability. Armed with this knowledge, you’re not just building a computer; you’re crafting a masterpiece, ready to conquer any gaming frontier or creative challenge you set for it. Embrace the journey, trust in the details, and prepare to unleash the full, unadulterated power of your custom-built dream machine.


