

Building a custom classic car is a dream for many automotive enthusiasts, a true labor of love that merges passion with precision. However, this journey, while incredibly rewarding, comes with its own set of unique challenges. One of the most significant hurdles in these intricate projects is ensuring that the painstakingly crafted vehicle meets all necessary inspection standards. These inspections aren’t just bureaucratic red tape; they are absolutely crucial for legal compliance, and more importantly, for guaranteeing the safety and reliability of your prized automotive creation on the open road.
Many builders, often swept up in the excitement of design and assembly, can unfortunately underestimate the complexity of these regulations. This oversight can lead to frustrating delays, unexpected additional costs, and even the heartbreaking prospect of a beautiful build failing to secure its roadworthy certification. Custom builds inherently involve a myriad of modifications that, while enhancing performance or aesthetics, can introduce unforeseen problems ranging from subtle mechanical glitches to complex electrical system issues. It’s vital for every builder to cultivate a keen eye for detail and a robust understanding of automotive systems to skillfully mitigate these risks from the outset.
Ignoring these critical aspects during the build process doesn’t just put your vehicle at risk of failing inspection; it jeopardizes the very driving experience you initially envisioned. The journey of crafting a custom classic car demands thorough planning, an unwavering commitment to quality, and a proactive willingness to confront and solve problems as they emerge. By paying careful attention to detail and diligently preparing for every eventuality, builders can navigate the common challenges inherent in these unique projects, thereby ensuring that their final product not only shines in appearance but also performs flawlessly and reliably where it matters most: on the road. Let’s delve into some of the most common reasons why custom car builds, and indeed any vehicle, might stumble at the inspection hurdle, and arm you with the knowledge to overcome them.
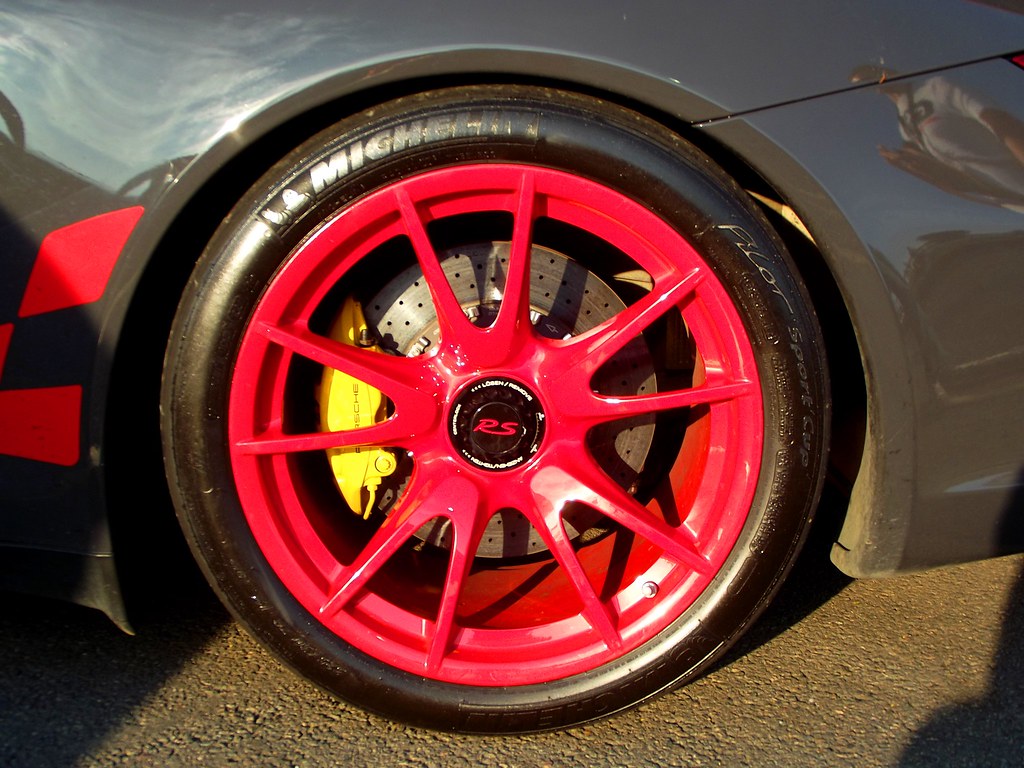
1. **Brake System Issues**
When it comes to vehicle safety, a properly functioning brake system stands as one of the most utterly essential components for passing any inspection. During testing, inspectors meticulously check multiple elements of your braking system to confirm proper operation and adherence to critical safety standards. It’s not just about the car stopping; it’s about stopping safely, predictably, and effectively under all conditions. This area is non-negotiable for roadworthiness, especially in a custom build where components might be upgraded or modified.
Common problems that frequently lead to inspection failure include excessively worn brake pads. Inspectors look for pads that measure less than the required minimum thickness—typically 1/4 inch for drum brakes and 1/8 inch for disc brakes. Such thin pads significantly compromise braking efficiency and can lead to dangerous situations. Beyond the pads, warped rotors are another frequent culprit; these cause noticeable vibration when stopping and can drastically reduce braking effectiveness, indicating a serious issue that will undoubtedly trigger a failure.
Furthermore, any visible leaking brake fluid or damaged brake lines present immediate and severe safety risks, leading to an automatic inspection failure. These leaks compromise the hydraulic pressure necessary for effective braking. Often, these issues don’t appear without warning; they typically show tell-tale signs such as persistent squealing noises, an increase in stopping distances, or a disconcerting spongy feel in the brake pedal. For custom builds, ensuring that all brake lines, whether custom-fitted or standard, are securely routed and free from leaks is paramount.
To proactively avoid brake-related inspection problems, a regular brake safety inspection is absolutely vital. Have a qualified mechanic thoroughly measure pad thickness, meticulously inspect rotors for any signs of wear patterns or warping, and rigorously check the entire brake fluid system for any leaks. This preventive and detail-oriented approach is your best defense, helping you identify potential issues long before they become serious enough to fall short of stringent inspection requirements.
Read more about: Drove it Regretted it: 12 Compact Models That Made Owners Question Their Judgment on the First Commute.

2. **Lighting and Electrical Problems**
Failed lighting tests consistently rank among the top reasons why vehicles, including custom builds, fail inspections across various states. From burnt-out headlights that leave you in the dark to non-functioning taillights that obscure your presence, and faulty turn signals that prevent clear communication with other drivers, these issues are surprisingly common. The importance of a fully operational lighting system cannot be overstated, as it directly impacts visibility for both the driver and others on the road, making it a critical safety feature.
Beyond simply burnt-out bulbs, damaged or cracked light lenses also lead to inspection failures. These physical imperfections can significantly reduce light output, making your signals less effective, and can also allow moisture to infiltrate the housing, leading to further electrical damage. Another frequent and often overlooked problem is headlight misalignment; lights aimed too high can dangerously blind oncoming traffic, while those aimed too low drastically reduce your nighttime visibility, both scenarios posing considerable safety hazards.
This category also extends to other critical illumination, such as reverse lights and license plate illumination. The context explicitly states that a license plate light that doesn’t illuminate your rear license plate when headlights are on can, by itself, be a reason for failure. All these seemingly minor electrical components contribute to the overall visibility and safety profile of your vehicle, making them high-priority checks for inspectors.
Before you even think about taking your custom vehicle for inspection, it’s imperative to test all lights systematically and thoroughly. This includes your headlights (both high and low beams), brake lights, turn signals, reverse lights, and the often-forgotten license plate illumination. Replace any burnt-out bulbs promptly, and immediately address any cracked or foggy lenses. Many auto parts stores offer complimentary lighting checks, which can be invaluable in identifying potential problems before your official inspection, saving you time and the inconvenience of a retest.
Read more about: Drove it Regretted it: 12 Compact Models That Made Owners Question Their Judgment on the First Commute.
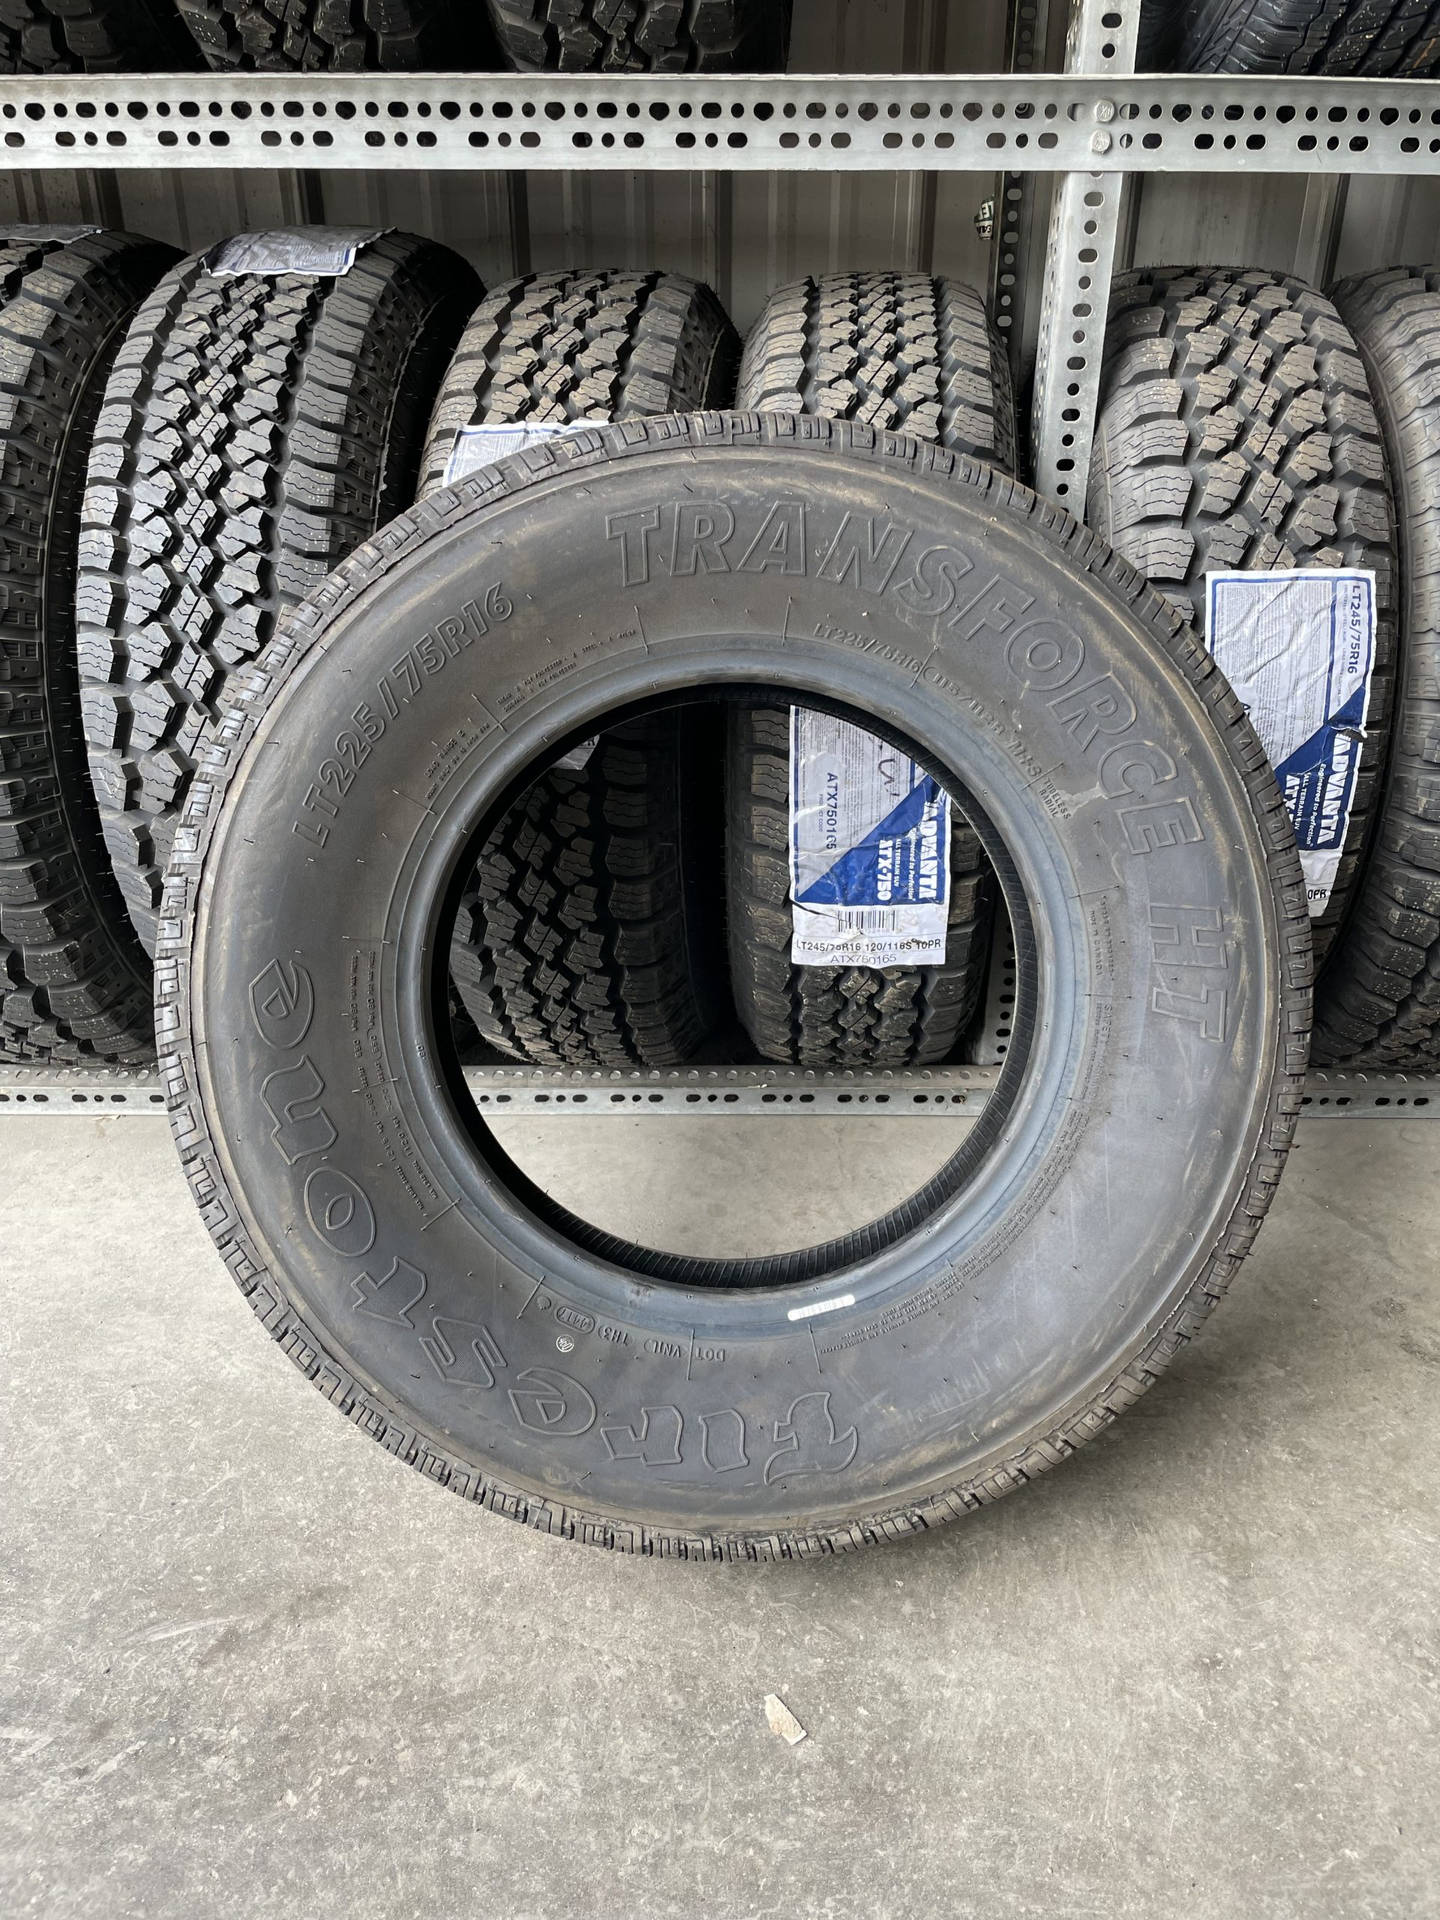
3. **Tire Condition and Alignment Issues**
State inspection stations pay exceptionally close attention to the condition of your tires, and for very good reason: poor tires create major safety risks that can compromise steering, braking, and overall vehicle stability. The primary measurement inspectors will check is tread depth; tires must consistently have at least 2/32 inch of tread remaining across all grooves to pass. This seemingly small measurement is directly correlated with your tire’s ability to maintain traction, especially in adverse weather conditions.
A simple and effective home test for tread depth is the ‘quarter test’: if the tread doesn’t reach Washington’s head when a quarter is inserted, your tires are likely due for replacement. Beyond just tread depth, inspectors are also vigilant for signs of uneven wear patterns, which often serve as clear indicators of underlying alignment problems. Tires showing excessive wear on the edges or in the middle sections typically signify an issue that will result in an inspection failure, as it points to potential instability and premature tire degradation.
Additional red flags that inspectors diligently look for include any visible sidewall damage, bulges, cuts, or exposed cords. These imperfections are not merely cosmetic; they indicate structural weaknesses that can lead to catastrophic tire failure. Furthermore, running mismatched tires (meaning different sizes or types) on the same axle will also unequivocally result in a failure. For custom builds, where wheel and tire choices are often a significant part of the aesthetic, ensuring compliance with these technical specifics is absolutely crucial.
To ensure your tires are inspection-ready and maintain optimal safety, adhering to a regular maintenance schedule is key. This includes rotating tires every 5,000-7,000 miles to promote even wear across all four wheels. It’s also vital to check tire pressure monthly and maintain proper alignment, correcting any issues as they arise. Promptly replacing worn tires, and always installing matching pairs on the same axle, are straightforward steps that can prevent unnecessary inspection failures and ensure your custom car remains safe and reliable.
Read more about: The Essential 12: Ironclad Contract Clauses Every Influencer and Brand Needs to Know

4. **Emissions System Failures**
Failed emissions tests stand as a leading cause of inspection failure across various states, and custom builds are certainly not exempt from these stringent environmental regulations. While an illuminated check engine light often signals potential emissions problems (which we’ll discuss next), the emissions test itself focuses on whether your vehicle is expelling excess pollutants. Passing this test often requires a complex interplay of various components functioning correctly to clean exhaust gases effectively.
Common causes for failing an emissions test specifically due to pollutant levels include a faulty oxygen sensor. This critical component incorrectly measures exhaust gases, leading to an imbalance in the air-fuel mixture that increases harmful emissions. Another significant component is a worn or malfunctioning catalytic converter; if this vital part doesn’t properly clean emissions, your vehicle will not pass an emissions test. Signs of a failing catalytic converter can include reduced engine performance and a distinct smell of sulfur emanating from the exhaust. Even a clogged air filter, while seemingly minor, can impact engine performance and contribute to higher emissions, leading to a failure.
For vehicles manufactured after 1996, the On-Board Diagnostics (OBD) system checks form a key part of emissions testing. Inspectors read the error codes stored when the OBD system detects problems, which can pinpoint specific emissions-related malfunctions. It’s important to ensure your vehicle undergoes regular maintenance, including timely oil changes, filter replacements, and sensor checks, as these all contribute to maintaining proper emissions system function. These preventative steps are particularly important for custom classic car builds, where engine modifications might inadvertently affect emissions performance.
To prevent emissions-related inspection failures, it’s wise to pay close attention to any warning signs, such as decreased fuel efficiency or rough idling, as these can indicate an issue. If your car fails an emissions test, a qualified mechanic can accurately diagnose and fix the underlying problem, whether it’s replacing a faulty oxygen sensor, addressing a malfunctioning catalytic converter, or ensuring clean fuel injectors. Addressing these issues proactively, well before your inspection date, will significantly improve your chances of passing and keep your custom build environmentally compliant.
Read more about: Diesel Durability Unveiled: 10 Engines That Redefine Longevity — And Those That Don’t
5. **Persistent Check Engine Light**
An illuminated check engine light (CEL) is, in many states, an automatic and immediate reason for inspection failure. While the light itself doesn’t necessarily indicate the severity of the problem, its mere presence signals that something is amiss with the emissions system or other essential components of your vehicle. Inspectors are trained to look for this warning light, and if it’s on, the car will not pass, regardless of how beautifully crafted your custom build may be. It’s a red flag that demands immediate attention and resolution.
This persistent light often indicates a diagnostic trouble code (DTC) stored in the vehicle’s onboard computer. Sometimes, the cause can be surprisingly simple, such as a faulty oxygen sensor or even, as mentioned in the context, a loose gas cap, which can trigger the error code due to vapor leaks in the fuel system. However, it can also point to more significant underlying problems, including engine misfires, issues with the transmission, or more severe faults within the catalytic converter system. The light is essentially a messenger, indicating that a professional diagnosis is needed.
The context highlights a case study where a driver failed inspection due to an illuminated check engine light, only to find the issue was a loose gas cap. After tightening the cap and resetting the system, the car passed. This illustrates how even minor issues can trigger this critical warning. For custom builders, integrating modern engine management systems or making modifications to the exhaust and fuel systems can sometimes lead to unexpected CEL activations if not carefully calibrated and tested.
It is absolutely best practice to get a diagnostic scan *before* your inspection. Using an OBD-II scanner can help you identify the specific trouble codes (DTCs) that are causing the light to illuminate. Once the codes are read, you can then take the necessary steps to resolve the underlying issue. If the issue is minor, like a loose gas cap, tightening it might turn off the light. For more serious problems, consulting a qualified mechanic to make the needed repairs and clear the codes is essential to ensure your vehicle is inspection-ready and avoids that immediate, automatic failure.
Read more about: Shocker Alert: These 10 Once-Lauded Models Transform Into Electrical Nightmares After a Decade
6. **Steering and Suspension Issues**
State inspection stations diligently test steering and suspension components, and for excellent reason: these systems directly affect vehicle control, stability, and ultimately, road safety. In a custom classic car, where performance and handling are often key aspects of the build, the integrity of these systems is paramount. Mechanics scrutinize several key parts that commonly lead to inspection failures, identifying any weakness that could compromise safe driving.
Worn ball joints, for example, can create dangerous looseness in wheel movement, which directly impacts steering precision and stability. Similarly, damaged tie rods significantly affect steering responsiveness and can lead to improper wheel alignment. If these components are compromised, your vehicle’s ability to maintain a straight line, respond to steering input, or handle corners safely is severely diminished, posing a considerable hazard on the road.
Faulty shocks or struts also raise immediate red flags during inspection. These critical parts are designed to control bouncing and maintain consistent tire contact with the road. When they fail, the vehicle may exhibit excessive body movement over bumps, or you might notice uneven tire wear patterns, both strong indicators of a suspension system that isn’t performing its job. Power steering fluid leaks are another common issue, leaving telling spots on the ground and often pointing to worn hoses or problems with the power steering pump itself, all of which will result in an inspection failure.
To keep your vehicle inspection-ready and ensure its dynamic safety, it’s crucial to be attentive to any unusual noises, particularly when turning or driving over bumps. Watch for signs like uneven tire wear, a vibrating steering wheel, or the car pulling noticeably to one side. Scheduling regular steering and suspension checks with a qualified mechanic is a proactive step that allows professionals to spot early warning signs before they escalate into significant inspection issues. This vigilance ensures your custom build maintains its precise handling and remains safe for every journey.
Moving beyond the initial foundational checks, we now delve into another six critical areas where custom car builds often falter during inspection. These are the details that, while sometimes overlooked in the excitement of a personalized project, are absolutely vital for a vehicle’s structural integrity, overall safety, and seamless system readiness. Ensuring these elements are in perfect order is not just about passing; it’s about creating a truly roadworthy machine that performs as beautifully as it looks, keeping you and others safe on every journey. This section will unpack some of those less obvious yet equally significant inspection hazards, arming you with the knowledge to fortify your custom build against any potential roadside setbacks.
Read more about: Drove it Regretted it: 12 Compact Models That Made Owners Question Their Judgment on the First Commute.

7. **Windshield and Wipers**
Clear visibility is a non-negotiable aspect of road safety, making your vehicle’s windshield and wiper system a top priority during state inspections. Inspectors meticulously check for any damage that could obstruct the driver’s view, recognizing that even minor flaws can significantly compromise safety. A crack longer than six inches or a chip larger than one inch in diameter will typically result in an automatic inspection failure, as these can severely impair visibility and potentially spread further over time, creating a dangerous distraction or structural weakness.
Beyond severe damage, multiple smaller cracks or chips, especially if they are within the driver’s direct line of sight, can also lead to rejection. It’s not just about the structural integrity of the glass; it’s about ensuring an unobstructed and safe field of vision for the driver under all conditions. Custom builders often focus on engine or bodywork, but neglecting the windshield can be a surprisingly quick route to inspection failure, underscoring the importance of comprehensive attention to detail across the entire vehicle.
The functionality of your windshield wipers is equally critical. Inspectors look for blades that maintain full, consistent contact with the glass and clear it effectively without streaks or chatter. Torn or hardened wiper blades, missing parts, or wipers that skip across the glass will trigger a failure. Furthermore, the washer system must spray fluid effectively to clean the windshield, ensuring clear vision during operation, especially in adverse weather conditions. These seemingly small components play a monumental role in active safety.
To proactively prepare for inspection, take the time to examine your windshield in good lighting, ideally under direct sunlight where imperfections are most visible. Small chips should be repaired quickly, often by professional services, before they have a chance to spread into larger, unfixable cracks. Test your wipers thoroughly with washer fluid; if they leave streaks, chatter, or make excessive noise, it’s a clear sign that the blades need immediate replacement. Filling the washer fluid reservoir before heading to the inspection station is a simple yet often forgotten step that can prevent unnecessary delays.
Read more about: Beyond the Hype: Unpacking 15 Infamous Rides That Earned a ‘Jerk Car’ Reputation Among Enthusiasts
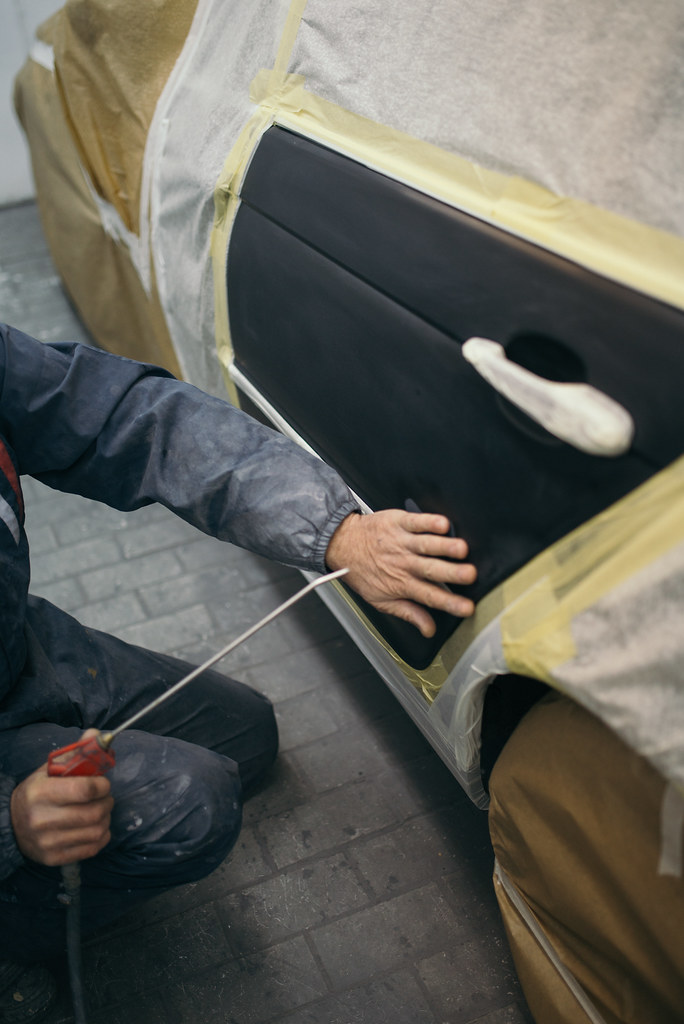
8. **Body and Frame Damage**
Body and frame issues consistently rank high on inspection failure lists, particularly in custom classic car builds where modifications and previous damage history can introduce complex challenges. The integrity of your vehicle’s structure is paramount, directly influencing its crashworthiness and overall safety. Inspectors are especially concerned with rust damage that affects structural components or creates holes in the vehicle’s floor, trunk, or body panels. When rust progresses beyond mere surface-level oxidation, it significantly weakens critical support areas, leading to an automatic inspection rejection due to severe safety concerns.
Beyond rust, inspectors diligently check for any loose or damaged body parts that might detach during operation. This includes common culprits such as loose bumpers, fenders, or hood latches. These components, while seemingly minor, can become hazards if not securely fastened, posing a risk to both the vehicle’s occupants and other road users. A custom build, by its nature, often involves extensive body modifications, making it even more crucial to ensure that all panels and accessories are installed with factory-level precision and security.
Frame damage, often a lingering consequence of previous accidents, also receives intense scrutiny during inspection. Any visible bends, cracks, or signs of improper repair in the frame will unequivocally result in a car safety inspection failure. A compromised chassis or frame severely undermines the vehicle’s structural integrity, affecting its handling, alignment, and ability to protect occupants in a collision. For builders, a thorough assessment of the frame’s history and condition, and professional, documented repairs, are absolute necessities to ensure roadworthiness and prevent this type of critical failure.
To prevent body and frame failures in your custom build, it is essential to regularly inspect your vehicle for any signs of rust formation, particularly in hard-to-reach areas like wheel wells, rocker panels, and under-body sections. Address small rust spots promptly with appropriate treatments, rust converters, and primers to prevent their spread. Ensure all body components are securely attached, using proper mounting hardware and techniques that can withstand the stresses of everyday driving. If your vehicle has a history of accident damage, securing professional repairs from qualified body shops that meticulously document their work is not just recommended, it’s vital for a successful inspection and long-term safety.
Read more about: Diesel Durability Unveiled: 10 Engines That Redefine Longevity — And Those That Don’t
9. **Fluid Leaks**
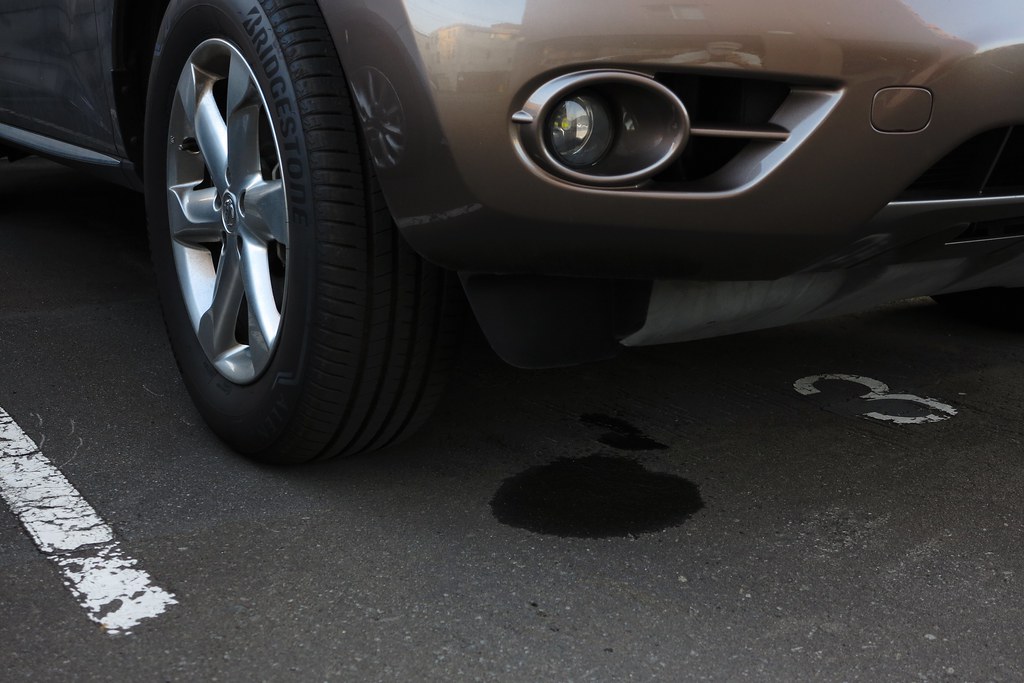
Any active fluid leak beneath your vehicle can raise red flags during an inspection, often signaling underlying mechanical problems that compromise safety and performance. Inspectors pay close attention to any drips or puddles, as these can indicate a range of issues, from minor nuisances to serious safety hazards. While brake fluid leaks were discussed earlier, this category encompasses a broader spectrum of essential automotive fluids, each vital for specific system operations. Engine oil spots on the ground are among the most common fluid leak issues, frequently pointing to worn gaskets or damaged seals that need immediate attention.
Transmission fluid leaks, identifiable by their red or brown stains beneath the vehicle, often indicate worn transmission seals or compromised cooler lines. These leaks can lead to insufficient lubrication, potentially causing severe transmission damage and performance issues, which will certainly lead to an inspection failure. Similarly, coolant leaks, typically appearing as green, orange, or pink puddles, may stem from damaged hoses, a faulty water pump, or a cracked radiator. A leaking cooling system can quickly lead to engine overheating, resulting in catastrophic engine damage and obvious inspection failure.
Perhaps the most critical of all fluid leaks are fuel leaks. The context explicitly highlights that fuel leaks, in particular, are considered serious safety hazards. Even a minor fuel leak presents a significant fire risk and an environmental concern, leading to an immediate and automatic inspection failure. Identifying the source and addressing any fluid leak is paramount, not only to pass inspection but to prevent costly repairs and maintain the vehicle’s safety and operational integrity.
To proactively spot potential problems before your inspection, adopt a habit of parking your custom car overnight on a clean patch of concrete or by placing clean cardboard underneath. The next morning, carefully check for any fluid spots. Note the color and approximate location of any leaks, as this crucial information helps mechanics accurately identify the source of the problem. Regular under-hood checks can help you catch small leaks early, preventing them from escalating. It’s imperative to have a professional repair any leaks promptly, as temporary fixes rarely meet stringent inspection standards and often fail to address the root cause of the issue, jeopardizing both the vehicle and its occupants.
Read more about: Unleash Your Inner Mechanic: 15 Essential DIY Car Hacks to Save a Fortune on Maintenance

10. **Seatbelt and Airbag Issues**
Safety restraint systems are at the absolute forefront of vehicle inspection requirements, embodying a critical aspect of occupant protection. Inspectors meticulously test every seatbelt to verify its proper locking, smooth retraction, and secure mounting. A seatbelt that doesn’t click firmly into place, remains loose when pulled quickly, or shows any signs of fraying, tears, or excessive wear will cause an immediate rejection. It is a fundamental requirement that each and every seating position in your custom build must be equipped with a fully functional and undamaged seatbelt—there are simply no exceptions to this vital safety standard.
Beyond seatbelts, airbag systems also face strict scrutiny during inspection. An illuminated airbag warning light on your dashboard is a clear signal of a system problem and will inevitably lead to inspection failure. This light indicates that one or more components of the complex airbag system are malfunctioning, meaning the airbags may not deploy correctly or at all in the event of a collision. Furthermore, if your vehicle has had previously deployed airbags, and these have not been properly replaced with factory-approved parts, it will not pass. Some states even explicitly require documentation of professional airbag replacement after deployment, emphasizing the importance of correct repair procedures.
For custom car builders, especially those integrating modern safety systems into older chassis or making significant interior modifications, ensuring the full functionality and correct installation of these restraint systems is incredibly important. Any modification that interferes with the wiring, sensors, or physical placement of seatbelts and airbags can lead to system failures that are easily detected during inspection. These systems are designed to work in a precise, integrated manner to protect occupants, and any deviation from their intended function poses a serious safety risk that inspectors will not overlook.
To prepare your vehicle for inspection, it is essential to systematically test each seatbelt. Pull each belt quickly to ensure it locks securely, then check that it retracts smoothly into its housing and that all buckles latch firmly. When you start your vehicle, pay close attention to the dashboard; the airbag warning light should illuminate briefly and then turn off after a few seconds. If it remains illuminated, it’s crucial to have a certified mechanic scan the system for diagnostic trouble codes (DTCs) to pinpoint and repair the underlying issue. Regular, proactive checks of these critical safety features can help prevent unwelcome surprises during your official inspection and ensure peace of mind on the road.
Read more about: Parking Lot Purgatory: 14 Vehicles Owners Deeply Regret After Years of Ownership

11. **Horn and Mirror Problems**
Vehicle horns and mirrors serve essential, though sometimes underestimated, safety functions and thus receive close attention during state inspections. These components are vital for driver awareness, communication with other road users, and maintaining a clear view of surroundings. A non-working horn, for example, is an automatic test failure in all jurisdictions, as it prevents drivers from effectively warning others of impending danger. Inspectors will not only check that the horn produces a clear, audible sound when pressed but also that it is securely mounted to the vehicle, ensuring its reliability when needed most.
Mirrors face similar rigorous scrutiny during testing, as they are fundamental for safe lane changes, parking, and general situational awareness. Most states mandate the presence of both side mirrors and an interior rearview mirror for a vehicle to pass inspection. Common mirror issues that lead to failure include missing or loose side mirrors, which can severely restrict a driver’s field of vision or detach during driving. Damaged mirror glass, whether from cracks that obstruct the view or sections where the reflective coating has worn away, also results in rejection. Additionally, non-adjustable mirror mechanisms or unstable mounting brackets are often flagged, as they prevent the driver from properly positioning their mirrors for optimal visibility.
In custom classic car builds, mirrors are sometimes chosen for aesthetic appeal, but their functionality and compliance with local regulations cannot be overlooked. The size, placement, and condition of all mirrors must meet safety standards to ensure the driver has an adequate view of the road behind and to the sides. Similarly, custom horn installations must ensure proper functionality and decibel levels without being overly abrasive. These components are not merely accessories; they are integral safety tools that must perform reliably.
Before heading to your inspection, make it a point to test your horn to confirm it works consistently and produces a clear sound. Thoroughly check all mirrors for secure mounting and ensure their glass is clear and undamaged, providing an unobstructed reflection. Clean mirror surfaces can also make a difference in visibility. If you spot any problems—be it a non-working horn, a loose mirror, or cracked glass—it is imperative to address them. Many auto parts stores stock replacement horns and universal mirror assemblies, and many mirror repairs can be completed quickly with basic tools, making these simple fixes that prevent unnecessary inspection failures.
Read more about: Diesel Durability Unveiled: 10 Engines That Redefine Longevity — And Those That Don’t
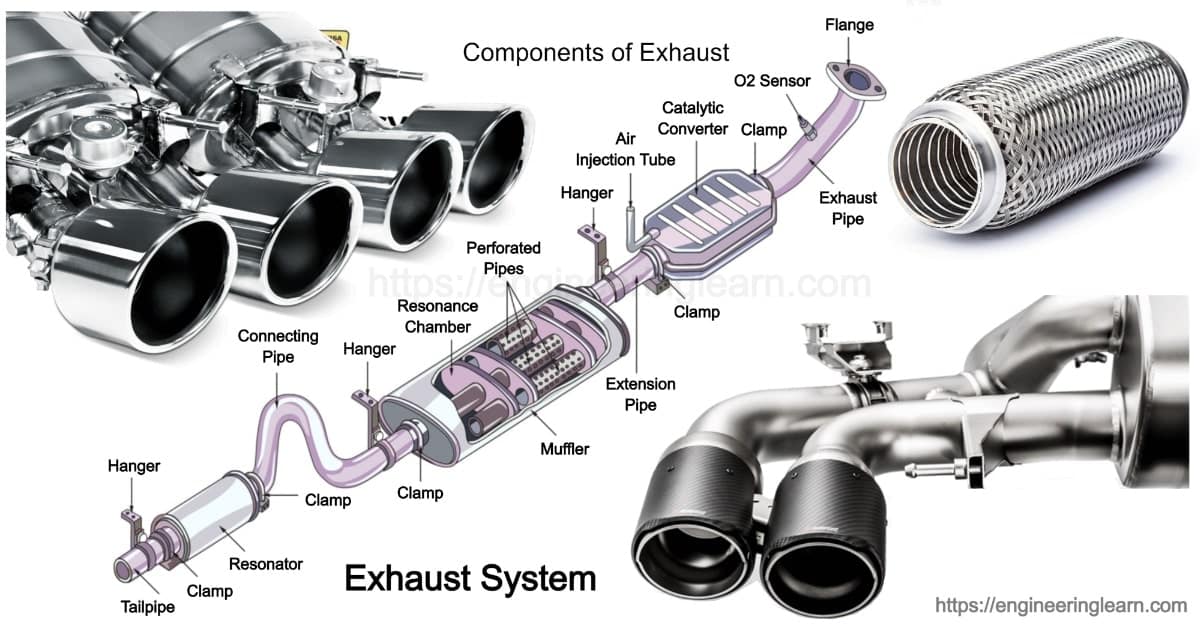
12. **Exhaust System Issues**
Beyond simply passing emissions tests—which focus on the composition of exhaust gases—the physical integrity and mounting of your exhaust system are critically evaluated during inspection. A properly functioning exhaust system is essential for safely channeling harmful fumes away from the passenger compartment and for maintaining acceptable noise levels. Your exhaust system must be entirely leak-free and securely mounted to the vehicle. Inspectors meticulously check for excessive rust, which can lead to holes and compromise the system’s structural integrity, as well as for missing hangers or loose connections that could allow the exhaust system to drag or detach.
Holes or severe rust in the exhaust pipes or muffler are significant concerns because they allow harmful carbon monoxide and other pollutants to escape prematurely, potentially entering the vehicle’s cabin. This not only poses a severe health risk to occupants but also means the exhaust gases are not being properly treated by the catalytic converter before exiting, thus failing environmental standards. Furthermore, such damage can lead to excessively loud engine noise, which is often an immediate reason for inspection failure, as states typically have regulations governing vehicle sound levels.
The secure mounting of the exhaust system is another crucial aspect. Missing or broken hangers can cause the exhaust pipes to vibrate excessively, hit against the vehicle’s undercarriage, or even detach entirely, creating a dangerous road hazard. For custom builds, where exhaust systems might be modified for performance or aesthetic reasons, ensuring that all components are adequately supported and properly routed, far from fuel lines or other sensitive areas, is paramount. An improperly installed custom exhaust, regardless of its performance benefits, will undoubtedly fail inspection if not structurally sound.
To safeguard against exhaust system failures, conduct regular visual inspections of your vehicle’s underside. Look for any signs of rust, cracks, or holes in the pipes, muffler, and catalytic converter. Pay close attention to the hangers and mounting points, ensuring they are all present and securely fastened. Listen for any abnormal noise levels, rattling sounds, or the distinctive smell of exhaust fumes inside the car, as these are strong indicators of a leak or damage. Addressing these issues promptly, whether through minor repairs like replacing hangers or more significant fixes like pipe replacement, will not only ensure your custom build passes inspection but also contributes significantly to a safer, quieter, and more environmentally compliant driving experience.
Successfully navigating a vehicle inspection, especially with a custom build, is ultimately a testament to a builder’s dedication to quality and safety. While the journey of crafting a unique classic car is exhilarating, it demands an unwavering commitment to detail across every system and component. By understanding and proactively addressing these twelve common failure points, you’re not just preparing for an inspection; you’re ensuring your masterpiece is genuinely roadworthy, a harmonious blend of passion, precision, and performance.
Read more about: Rev Up Your Restoration: The Ultimate Guide to the Best Free Online Forums for Classic Car Enthusiasts
This proactive approach, focusing on diligent maintenance and informed preparation, transforms potential headaches into smooth sailing. It empowers you to confidently present your custom creation, knowing it not only gleams with aesthetic brilliance but also stands tall against the most stringent safety and reliability standards. Embrace the checklist, engage with expert advice, and drive your custom dream with the ultimate peace of mind.


