
That heart-sinking moment when you spot a fresh scratch from a runaway shopping cart or a ding from an errant car door can really put a damper on your day. Or perhaps you’ve experienced the frustration of accidentally backing into a post, leaving an unwelcome mark on your vehicle’s otherwise pristine exterior. These minor imperfections, whether paint scratches or small dents, quickly contribute to a worn-out look that no car owner desires for their ride, often making an otherwise well-maintained vehicle appear neglected. But what if we told you that many of these common vehicle flaws don’t require an expensive trip to the auto repair shop?
The good news for every car enthusiast and savvy homeowner is that you absolutely do not need to be a certified auto repair expert or a professional detailing specialist to tackle many of these minor vehicle imperfections. A significant number of everyday dings and scuffs can be effectively rectified right in your own garage or driveway, saving you hundreds of dollars in professional repair costs. With a little know-how, the right tools, and a touch of patience, you can restore your car or truck to its beautiful, showroom-ready condition, allowing you to take pride in your vehicle’s appearance once again.
This comprehensive guide is designed to empower you, the avid DIYer, with the knowledge and techniques to address a range of common exterior car issues. We’re diving deep into the most effective and practical methods for removing both scratches and dents without stepping foot in a body shop. So, roll up your sleeves, gather your supplies, and get ready to transform those unsightly blemishes into distant memories, bringing back that new-car luster you love. Let’s get your vehicle looking its best and back on the road with confidence!

1. The Toothpaste Clear Coat Polish
One of the simplest and most accessible methods for tackling minor, superficial scratches is often found right in your bathroom cabinet. If you’re dealing with a slight scratch that appears to only affect your car’s clear coat—that transparent, glossy top layer protecting the paint and primer—a small amount of standard (non-gel) toothpaste can be your secret weapon. This everyday item contains a tiny amount of grit, which acts as a mild abrasive, perfect for gently buffing away those annoying surface imperfections.
The process begins with ensuring the affected area is spotless. Wash the scratch and its surrounding paintwork thoroughly with soap and water to remove any dirt, dust, or debris. Once clean, lightly dampen a soft microfiber cloth. Apply a pea-sized amount of standard toothpaste to the cloth, ensuring it’s not a gel variety, as the abrasive properties are key here. With careful, gentle, circular motions, rub the toothpaste over the scratch. The goal is to work the toothpaste into the clear coat, gradually diminishing the visibility of the scratch without causing further damage to the surface.
Continue buffing until the scratch is no longer visible to the eye. It’s important to take your time and apply consistent, light pressure to avoid creating new marks. After the scratch has disappeared, thoroughly dry the area with a clean, soft microfiber cloth, revealing a smoother, blemish-free surface. This method is particularly effective for those barely-there scuffs that catch the light but don’t feel deep to the touch, offering a quick and satisfying DIY fix for clear coat imperfections.
Read more about: The Ultimate Guide to Clearing Foggy Headlights: Why It Happens and 13 Powerful DIY Solutions You Can Tackle Today
2. Targeted Polishing Compound Application
When toothpaste isn’t quite enough to make a scratch vanish, or if you’re dealing with slightly more noticeable clear coat damage, a dedicated polishing compound or scratch remover is your next best friend. These specialized products are formulated with more aggressive abrasives than toothpaste, designed to gently remove a very thin layer of the clear coat, effectively leveling the surface and eliminating the scratch. It’s a fundamental step in achieving a professional-grade finish at home, without the hefty price tag of a body shop.
Before diving in, thorough preparation is paramount. “Clean the scratched area using a car-grade soap sold (found at auto parts stores) and cool water,” advises Joe Giranda, director of sales and marketing at CFR Classic. This ensures that no abrasive particles remain on the surface that could potentially inflict further scratches during the repair process. Once clean, dry the area completely with a clean, soft microfiber cloth, leaving a pristine canvas for the compound application.
Next, apply a small amount of polishing compound or scratch remover onto a microfiber cloth. Using gentle, circular motions, work the compound into the scratched area. The key here is consistent, even pressure, allowing the compound’s abrasive particles to do their work. As Joe Giranda recommends, “Using gentle circular motions, buff the area after the scratch is no longer visible.” Continue to buff until the scratch effectively disappears and the treated area blends seamlessly with the surrounding paintwork. For an added layer of protection and shine, finishing with a protective wax after the compound treatment is always a good idea, safeguarding your newly restored surface from future elements.
Read more about: Unlocking the ‘Magical’ Scratch Erasers: Top Car Finish Solutions That Deliver Instant Results, With or Without a Buffing Tool!
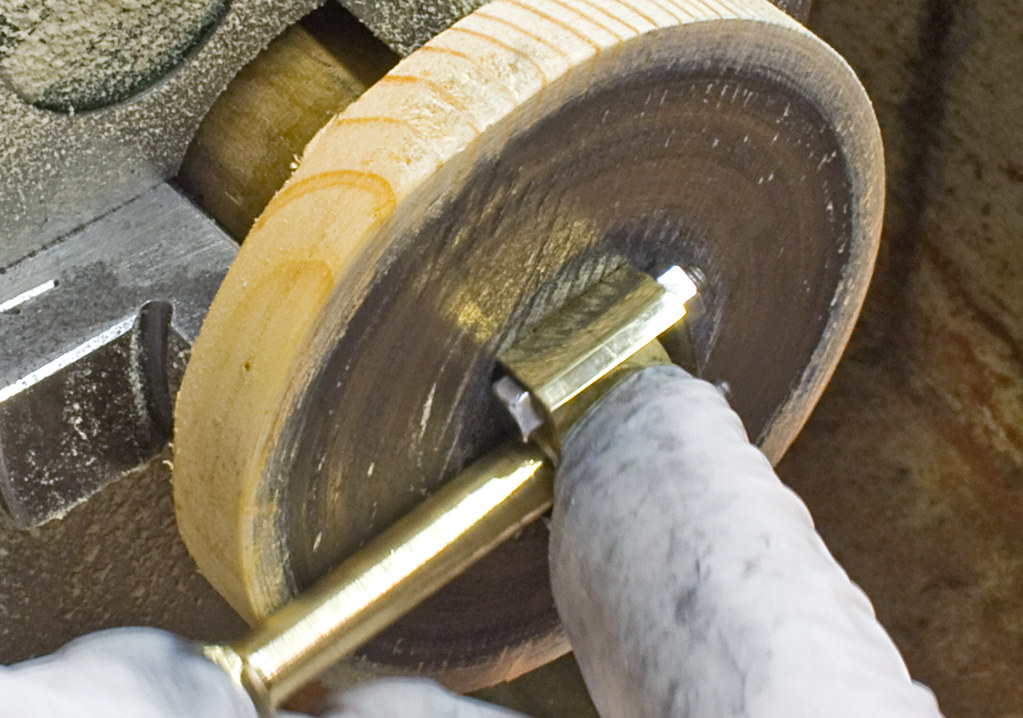
3. DIY Touch-Up Paint for Deeper Scratches
Sometimes, a scratch penetrates beyond the clear coat and reaches the base coat or even the metal underneath, making simple buffing methods insufficient. While these deeper scratches often prompt a visit to a professional auto shop—which can range from around $600 to several hundred dollars or more depending on size and paint type—the determined DIYer can still achieve a remarkable repair at home. This method involves carefully applying touch-up paint to meticulously fill and conceal the deeper gouge, restoring the car’s original color and protecting the exposed layers.
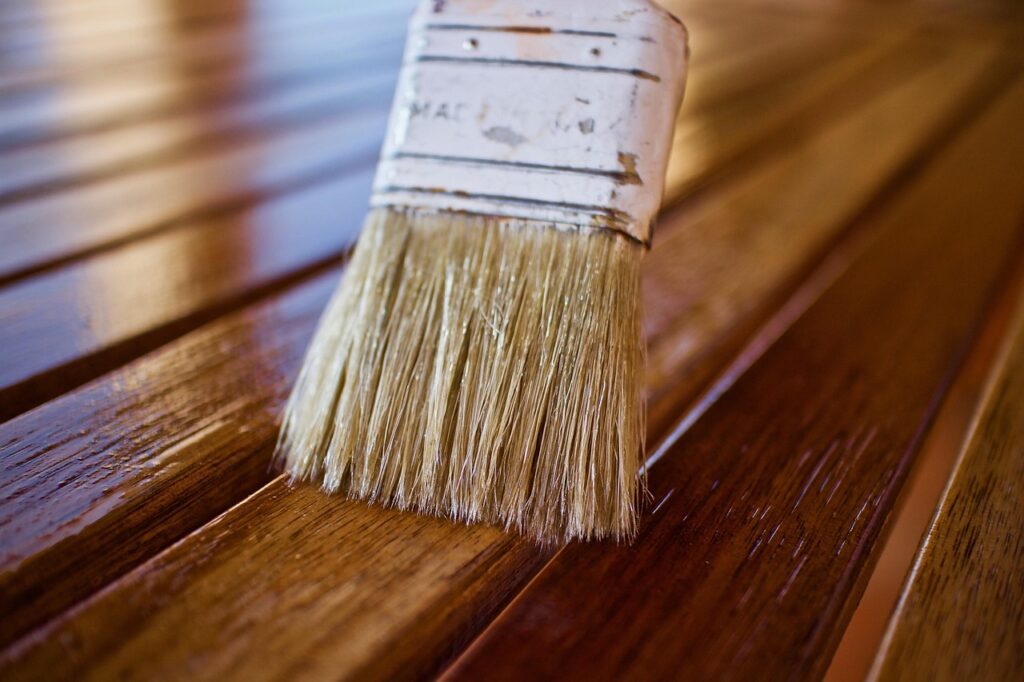
The critical first step is sourcing the correct paint. You’ll need the original equipment manufacturer’s (OEM) recommended color touch-up paint that precisely matches your vehicle’s color code. This code is typically found on a sticker inside your driver’s side door jamb, in your glove compartment, or in your owner’s manual. “Clean the area and apply the original equipment manufacturer’s recommended color touch-up paint in thin layers,” recommends Parham Koukia, lead detailer and operations manager at Panda Hub. Applying multiple thin coats, rather than one thick layer, is crucial for an even, consistent finish and proper drying.
Once the touch-up paint has fully cured—which may take several hours or even overnight, depending on the paint type and environmental conditions—the blending process begins. Koukia advises, “Once cured, lightly wet-sand with 2000-grit sandpaper and finish with a polishing compound to blend the repair with the surrounding paint.” This wet-sanding step carefully levels the new paint with the surrounding factory finish, eliminating any raised edges. Following this with a polishing compound further refines the surface, creating a seamless transition and leaving your car looking as though the scratch was never there. This technique, though more involved, offers significant savings and immense personal satisfaction.
Read more about: Master Your Ride: 14 DIY Car Maintenance Tasks to Save Thousands and Empower Your Inner Mechanic

4. Pushing Dents Out from Behind
For many small to medium-sized dents, especially those that haven’t creased the metal or damaged the paint, the simplest and often most effective solution lies in accessing the dent from the opposite side and gently pushing it back into place. This method capitalizes on the metal’s memory, allowing it to return to its original form with careful pressure. It’s a satisfyingly straightforward fix, particularly if you have clear access to the dent’s underside.
The feasibility of this method largely hinges on whether you can comfortably reach the rear of the dent. If you can get your hands, or a suitable rounded tool like the end of a rubber mallet, behind the indentation, you’re in a prime position for a DIY repair. Sometimes, this might necessitate removing an interior panel or trim piece to gain access, but as the experts suggest, the effort is often worthwhile if it means avoiding a professional body shop visit. However, be mindful that this won’t be possible for all dents; double-walled panels, bracing bars on hoods, roofs, or trunk lids, or non-removable trim panels can obstruct access.
Once you have access, apply steady, even pressure directly behind the deepest part of the dent. You might hear a satisfying ‘pop’ as the metal reforms. It’s important to work slowly and incrementally, feeling the panel return to its original contour. Avoid using sharp tools that could puncture or further crease the metal. For added assistance, particularly with slightly stiffer panels, you can combine this method with gentle heating (as described in later methods) to make the metal more pliable. With patience, this fundamental technique can restore your car’s smooth lines and save you significant repair costs.
Read more about: Beyond the Script: 10 WWE Confrontations Where Real-Life Hatred Fueled Unforgettable Rivalries
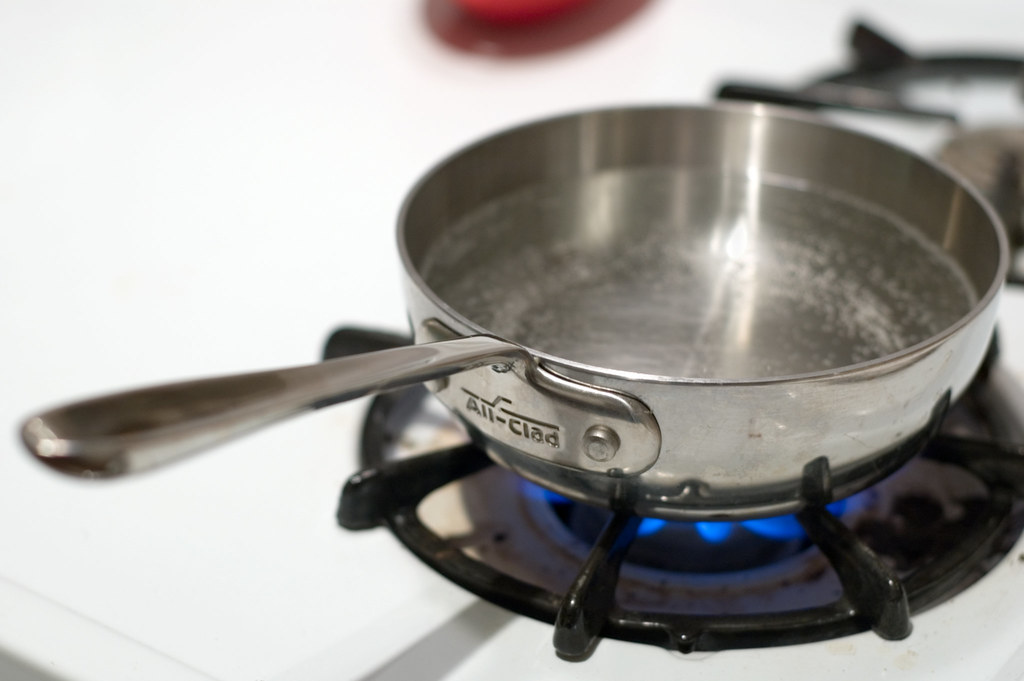
5. Boiling Water for Plastic Panel Reshaping
Plastic bumpers and other plastic car parts are uniquely susceptible to dents but also uniquely responsive to heat-based repair methods. Unlike metal, which can crease and retain its shape, plastic components can often be softened and reshaped with the application of boiling water, making this an incredibly effective and surprisingly simple DIY technique. This method is particularly useful if the paint on the dented plastic area remains intact and undamaged, presenting a clean opportunity for a cost-effective fix.
The process is straightforward: bring a pot of water to a rolling boil. Carefully pour the boiling water directly over the dented area on the plastic bumper or panel. The heat from the water will cause the plastic to become more pliable and flexible, making it easier to manipulate. This softening effect is crucial, as it allows the material to ‘relax’ and become responsive to external pressure, facilitating its return to the original form. It’s important to work quickly but safely to capitalize on the plastic’s softened state.
Immediately after pouring the boiling water, if you can reach behind the dented area, gently push the dent out from the back until it pops back into its original shape. For areas that are difficult to access from behind, you might try using a suction cup or even a household plunger (as discussed in a later method) while the plastic is still hot and flexible. Once the dent is pushed out, quickly pour cold water over the repaired area. This rapid cooling hardens the plastic, setting it firmly back into its desired, dent-free contour. Remember to exercise extreme caution with boiling water to prevent burns during this effective and popular DIY repair.
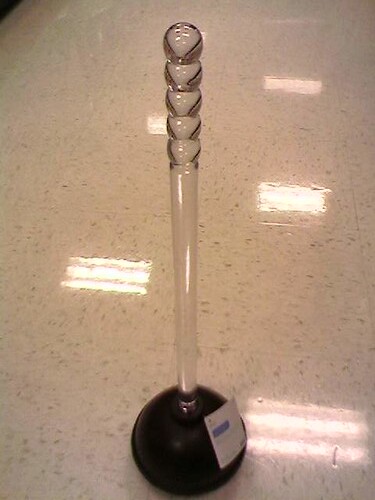
6. The Household Plunger Suction Technique
Who knew that one of the most common tools in your bathroom could be a hero for your car’s exterior? For small to medium-sized, rounded dents on flat pieces of bodywork, a simple cup-style rubber plunger can work wonders. This ingenious method leverages suction to pull the dent outwards, effectively reversing the impact that caused it. It’s an accessible and remarkably effective solution for those annoying door dings or minor impacts, often saving you a trip to the body shop for a job that could cost upwards of $100-$150.
Preparation is key to maximizing the plunger’s effectiveness. Begin by ensuring both the dented area and the rim of your plunger are clean. Then, apply a little soapy water around the edge of the plunger cup and onto the dent. This creates a better seal, preventing air from leaking in and ensuring stronger suction when you apply the plunger. Position the plunger firmly over the center of the dent, pressing down to squeeze out as much air as possible between the rubber cup and the car’s surface. The goal is to create a vacuum seal that can exert significant pulling force.
Once sealed, pull the plunger out with a swift, firm motion. You might need to repeat this process a few times, repositioning the plunger slightly with each attempt, to gradually work the dent out. “You can pour hot water over it while you’re doing this to ease the process and help the metal expand, so the dent pops out more easily,” suggests the context, highlighting how combining methods can amplify results. This expansion makes the metal more pliable, assisting the suction in returning the panel to its original smooth contour. While it may not achieve a factory-perfect finish for every dent, it’s an excellent way to restore presentability to an older vehicle or tackle minor blemishes on your daily driver.
Navigating the unexpected scrapes and dings on your vehicle can often feel like a frustrating game of whack-a-mole, but with the right techniques, you can effectively tackle even more stubborn imperfections right from your own garage. While Section 1 laid the groundwork with essential, easy-to-implement fixes, this section delves into advanced and ingenious methods that leverage specialized tools and creative approaches to achieve a professional-looking finish. Prepare to elevate your DIY repair skills as we unveil further effective strategies for restoring your car’s flawless appearance, helping you save on costly body shop visits while enjoying the satisfaction of a job well done.
Read more about: The Ultimate Guide: 11 Easy, Chemical-Free Ways to Conquer Clogged Drains for a Healthier Home
7. The Vacuum Cleaner and Bucket Suction Method
For those larger, shallower dents that might be too broad for a standard plunger, an inventive application of common household items can provide surprising results. This method, detailed in automotive repair circles, harnesses the power of a strong vacuum cleaner—often a Shop-Vac—to create the necessary suction for pulling out dents. It’s an approach that appeals to the resourceful DIYer, transforming everyday tools into effective automotive repair implements.
The setup requires a strong, bucket-like container large enough to completely cover the dented area. Once you’ve selected an appropriately sized container, position it over the dent and tape it down securely around its edges. The goal here is to create an airtight seal between the container and your car’s panel, preventing any air from leaking in during the suction process. This airtight chamber is crucial for generating the necessary pulling force.
Next, you’ll need to create a small hole in the back or bottom of the container. This hole will serve as the insertion point for your vacuum nozzle. Once the vacuum nozzle is inserted, tape it down securely to ensure no air escapes. With everything sealed, turn on your vacuum cleaner. The powerful suction generated inside the sealed container will begin to pull the dent outwards. It’s important to give the vacuum some time to work, as the dent may slowly pop back into shape as the pressure differential takes effect. While this method might not achieve a perfect finish for every dent, it’s remarkably effective for many larger, shallower imperfections, proving that ingenuity can indeed save you a trip to the body shop.
Read more about: The Ultimate Guide: 11 Easy, Chemical-Free Ways to Conquer Clogged Drains for a Healthier Home
8. The Dry Ice Temperature Shock Technique
Sometimes, the secret to a successful dent removal lies not in brute force or elaborate suction, but in the fascinating physics of temperature change. The dry ice method leverages rapid temperature fluctuations to make metal contract and expand, often causing small, rounded dents to simply pop out. While not universally guaranteed, it’s a popular experimental technique for specific types of damage, particularly those caused by impacts like a baseball.
Before attempting this technique, it’s paramount to prioritize safety. Dry ice is extremely cold and can cause severe burns if it comes into direct contact with skin. Always wear thick protective gloves and use a cloth or a thick paper towel as a barrier when handling it. You may also find that heating the panel first, perhaps with a hairdryer (as discussed in the next method), can enhance the effectiveness of the dry ice by making the metal more responsive to the subsequent rapid cooling.
To apply this method, firmly hold the dry ice, wrapped in your protective cloth, directly against the center of the dent. The extreme cold will cause the metal to rapidly contract. As the metal cools and contracts, the tension can be enough to pull the dent outwards. You might hear a distinct popping sound as the metal reverts to its original form. For dents located on a relatively flat surface like the car’s roof, you can even lay the dry ice directly on the dent and allow it to sit for a while, letting the temperature difference work its magic more gradually. This method is especially suited for small, rounded dents where the paint is still intact and the metal hasn’t been creased.
Read more about: Buyer Beware: 15 Fishing Rods and Mishaps That Will Snag Your Fishing Day Before the First Big Catch

9. Hair Dryer and Compressed Air Temperature Cycling
Building on the principle of thermal expansion and contraction, the combination of a hair dryer and compressed air offers another ingenious way to tackle dents, particularly those that are small and rounded. This method works by rapidly heating the dented area, causing the metal to expand, and then quickly cooling it with compressed air, forcing it to contract. This sudden temperature shock can often encourage the metal to revert to its original, undented state.
To begin, you’ll need a standard hair dryer set to its maximum heat setting. Carefully direct the hot air over the dented area for approximately 30 seconds to a minute, ensuring you keep the dryer about six inches away from the car’s surface to avoid paint damage. The goal is to make the metal warm to the touch, causing it to slightly expand. For more delicate panels or if you possess one, a heat gun can also be used, though with even greater caution to prevent overheating the paintwork.
Once the dented area is thoroughly heated, immediately grab an aerosol can of compressed air. Crucially, you must turn the can upside down before spraying. This allows the very cold propellant, rather than just air, to be released. Spray the cold propellant directly onto the heated dent. The rapid temperature drop will cause the expanded metal to quickly contract. This sudden contraction creates a pulling force that often makes the dent pop out, restoring the panel’s original contour. The dramatic change in temperature is the key to this effective and visually satisfying DIY fix.
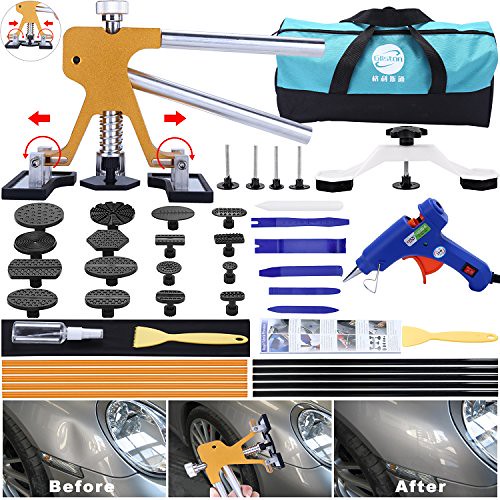
10. Specialized Dent Removal Kits
While many DIY dent removal methods rely on household items, the market also offers a range of specialized dent repair kits designed to provide a more targeted and often more effective solution for various types of small to medium-sized dents. These kits, readily available online or at auto parts stores, equip the home mechanic with tools specifically engineered for pulling dents without damaging the surrounding paintwork. They represent a step up in precision and capability compared to basic household hacks.
These kits typically feature a tool that covers the dent from side-to-side, often resembling a bridge-style puller, and include various suction attachments in different sizes. The suction cups are applied to the dent, and then a pulling mechanism (often a screw-driven device or lever) is used to gradually exert upward force, gently pulling the dent out. This controlled and localized pulling action minimizes the risk of creasing the metal or affecting undamaged areas of the panel, making it a favorite among enthusiasts seeking professional-grade results.
When opting for a specialized dent removal kit, it is absolutely essential to carefully read and follow the manufacturer’s instructions. Each kit may have unique steps or specific recommendations for its tools, and adherence to these guidelines will ensure both safety and efficacy. While the initial investment might be higher than using a plunger, these kits offer a more refined approach to dent repair, often yielding superior results for those tricky, rounded imperfections that frustrate simpler methods. They empower you to restore your car’s smooth lines with confidence and precision.
Read more about: Consumer Alert: Why 14 States Are Cracking Down on Aftermarket Window Tint and What Drivers Need to Know
11. Advanced Wet-Sanding and Polishing for Deeper Scratches
For scratches that have delved beyond the clear coat, perhaps even into the base coat, a more intensive, multi-step approach is required to achieve a truly seamless repair. While initial touch-up paint (as discussed in Section 1) fills the gouge, the real artistry lies in blending that repair with the surrounding factory finish. This advanced technique involves meticulous wet-sanding, compounding, buffing, and waxing, transforming a visible repair into an invisible restoration.
The process begins after any touch-up paint has fully cured. You’ll need fine-grit sandpaper, specifically 2000-grit or even 3000-grit, which is crucial for gently leveling the new paint with the existing clear coat. It’s imperative to keep the sandpaper and the area wet throughout this process; wet sanding acts as a lubricant, minimizing the risk of inflicting further scratches and allowing for a smoother, more controlled abrasion. Gently sand in a consistent motion, focusing on the raised edges of the touch-up paint until it is flush with the original surface.
Following wet-sanding, apply a high-quality rubbing compound to a microfiber cloth. This compound contains fine abrasives that work to remove the sanding marks and further refine the paintwork. Rub the compound over the treated area in firm, circular motions until the surface begins to smooth out and the scratch’s visibility significantly diminishes. Next, use a fresh microfiber cloth or a dedicated buffing pad to buff the area. This step polishes the surface, enhancing the paint’s shine and eliminating any remaining swirl marks from the compound. To complete the repair and protect your meticulous work, finish by applying a high-quality car polish followed by a protective layer of car wax. This final layer not only maximizes the shine but also safeguards the newly restored area from environmental elements, ensuring a long-lasting, factory-like finish.
12. Comprehensive Paint Chip Repair with OEM Pens
Paint chips, often caused by flying road debris or gravel, present a different challenge than linear scratches. They are typically small, isolated areas where paint has been completely removed, often exposing the primer or even bare metal. While a quick nail polish hack might offer an emergency cover-up, a more professional and durable solution involves using an original equipment manufacturer’s (OEM) touch-up paint pen. This method is designed to meticulously fill and seal these chips, preventing rust and restoring your vehicle’s aesthetic integrity.
The first crucial step, as with any paint repair, is to thoroughly clean the chipped area. Use rubbing alcohol to remove any dirt, wax, or oil, ensuring the surface is perfectly clean for paint adhesion. Once clean and dry, select an OEM touch-up paint pen that precisely matches your vehicle’s color code. This code can usually be found on a sticker inside your driver’s side door jamb, in the glove compartment, or in your owner’s manual. Precision in color matching is key to an invisible repair.
Carefully use the pen’s fine brush or applicator to dab a small amount of paint directly into the chip. The goal is to fill the chip without overfilling or creating a raised blob of paint. It’s better to apply multiple thin layers, allowing each layer to dry completely (often several hours or overnight) before applying the next, until the chip is filled and level with the surrounding paint. Many OEM pens also include a clear coat applicator; once the color coat is fully cured, apply the clear coat to seal and protect the repair, mimicking the original factory finish. For an even more seamless result, a light buff with polishing compound can blend the edges of the clear coat into the existing paint, making the chip virtually disappear.
Read more about: Hidden Costs: The 13 Critical Ways You Could Be Voiding Your Car’s Warranty and How to Prevent It
Empowering yourself with these advanced DIY techniques means you’re now equipped to tackle a broader spectrum of automotive imperfections, transforming the once-dreaded sight of a scratch or dent into a satisfying weekend project. From harnessing the power of temperature changes to wielding specialized tools and refining paintwork, each method offers a practical pathway to restoring your vehicle’s pristine condition without ever stepping foot into an expensive body shop. Embrace the challenge, enjoy the process, and take immense pride in maintaining your ride’s showroom appeal with your own two hands. Happy detailing!


