

Embarking on a road trip is one of life’s true joys – the open road, new sights, and the freedom to explore. But nothing can put a wrench in those exciting plans quite like being stranded on the side of the highway, miles from civilization, with an unexpected car problem. The thrill of adventure can quickly turn into a headache if your vehicle isn’t prepared for the journey ahead.
Many of us underestimate the power of a few simple, proactive checks. Spending a little time preparing your car beforehand isn’t just about avoiding a breakdown; it’s about ensuring your safety, maximizing fuel efficiency, and granting you invaluable peace of mind. These straightforward steps can prevent most problems that might otherwise ruin your fun along the way, turning potential disasters into minor inconveniences – or, even better, non-issues.
This guide is designed to empower you with immediate, usable advice. We’ll walk through 12 essential checks, offering practical, step-by-step instructions that you can implement easily. By taking control of your vehicle’s readiness, you’re not just performing maintenance; you’re paving the way for a stress-free, enjoyable, and memorable road trip experience. Let’s dive in and get your car road-trip ready!

1. Inspect Your Tires (Pressure, Tread, Spare)
Your tires are the sole point of contact between your vehicle and the road, making them absolutely critical for both safety and performance. Driving on underinflated tires can significantly increase the chances of a blowout, as it causes undue stress and damage to the tire’s sidewall. Beyond safety, improperly inflated tires also hurt your gas mileage, costing you more at the pump.
To check your tire pressure, first, find the right PSI (pounds per square inch) in your owner’s manual or printed on the side of each tire. It’s best to check pressure during mild weather, ideally in the middle of the day, because temperature fluctuations can affect the reading. Use a reliable tire gauge and inflate or deflate as needed to match the manufacturer’s recommended specifications for even wear patterns and optimal safety.
Equally important is inspecting the tread on your tires. Balding tires are more prone to blowouts and drastically reduce your vehicle’s traction, especially when roads are wet. A quick way to measure the depth of your tires is by using the classic “penny test.” Simply place a penny upside down into the deepest groove of the tire tread with Lincoln’s head facing you.
If you can see all of Lincoln’s head, it means you have very little tread left (less than 2/32nd of an inch), and your tires need to be replaced. Adequate tread depth is crucial for cornering and stopping, particularly on wet surfaces, preventing dangerous hydroplaning. Remember, uneven tire wear can also signal issues with balancing or wheel alignment, so look out for that too.
Finally, don’t overlook your spare tire. It should be in good shape and fully inflated, ready to go at a moment’s notice. Check its pressure and condition regularly, just like your other tires. Make sure you have all the necessary tools to change a flat, including an emergency jack, a tire iron, and a wheel lock key if your car has one. Having these essentials packed securely in your vehicle can be a true lifesaver.
2. Test All Exterior Lights and Horn
Visibility and communication are paramount on the road, especially during long trips that might involve driving at night or in adverse weather. Having properly functioning headlights and taillights is non-negotiable for safe driving after dark. Equally important are your turn signals, which communicate your intentions to other drivers, and your license plate light, which ensures your vehicle is legally identifiable.
Performing this check is straightforward. Turn on your headlights, parking lights, and then activate your turn signals one by one. Either enlist a friend to walk around the car and confirm each light is illuminating like it should, or strategically use reflections in storefront windows or garage doors. Don’t forget to check your brake lights by pressing the brake pedal while your helper observes from behind.
Blown-out lights are not just a safety hazard; they can also lead to getting pulled over by law enforcement, potentially resulting in an expensive ticket. Other drivers won’t be able to anticipate your movements, such as taking a turn or putting on the brakes, increasing the risk of accidents. So, replace any dim or non-working bulbs immediately to maintain clear visibility and adherence to traffic laws.
While you’re checking the lights, take a moment to honk your horn a few times. This simple test ensures that a crucial alerting system is working. Your horn is an essential tool for communicating warnings to other drivers or pedestrians in emergency situations. A functioning horn can prevent accidents by making your presence known when necessary, so confirm it’s loud and clear.
Ensuring all your vehicle’s exterior lights are clear and visible is also important. Clean any dirt or debris that may be covering your lights. This helps other drivers see your signals clearly, enhancing overall road safety. Functional lights and a working horn are small details that make a massive difference in your road trip’s safety and your peace of mind.
Read more about: The 15 Hardy Coupes That Can Easily Reach a Quarter Million Miles Unchallenged

3. Check Windshield Wipers and Fluid
A clear view of the road ahead is absolutely non-negotiable for safe driving, especially during unpredictable weather on a long road trip. Your windshield wipers and washer fluid system are your first line of defense against rain, snow, dirt, and bugs. Like any part of a car, windshield wipers can wear out from frequent use, but they can also simply dry out and crack over time, losing their effectiveness.
To check your wipers, activate them and observe their performance. Do they clear water effectively, or do they leave streaks, missed spots, or chatter across the glass? If they can’t displace water efficiently, or if the rubber looks cracked, torn, or brittle, they’ll need to be replaced. Worn-out wipers can significantly impair your vision during a downpour, creating dangerous driving conditions.
Replacing wiper blades is typically an easy DIY task that can be done quickly and affordably. Don’t wait until you’re caught in a storm to discover your wipers are failing. Proactive replacement ensures that you’ll maintain excellent visibility, no matter what Mother Nature throws your way. This simple check can prevent a lot of stress and greatly enhance your safety on the road.
Alongside your wiper blades, it’s crucial to check your windshield washer fluid level. This fluid works in conjunction with the wipers to clean your windshield, washing away grime, dust, and insect splatters that can obstruct your view. Use your vehicle’s owner’s manual to locate the reservoir, which is usually a translucent plastic tank under the hood with a wiper icon on the cap.
If the fluid level is below the lower mark on the reservoir, indicating its low-fill point, top it off with an appropriate windshield washer fluid. It’s a good habit to periodically inspect oil and coolant levels, and also this fluid, while traveling long distances, perhaps when you stop for gas. A full reservoir ensures you can maintain a crystal-clear windshield throughout your journey, regardless of road conditions.
Read more about: 13 Smart DIY Car Upgrades That Can Skyrocket Your Trade-In Value by Thousands

4. Examine Engine Belts for Wear
The serpentine belt, often referred to as an accessory belt, is a critical component under your hood. It’s responsible for powering essential accessories like your alternator, power steering pump, air conditioning compressor, and sometimes your water pump. A failing belt can lead to a cascade of problems, potentially leaving you stranded with a dead battery, no power steering, or an overheating engine. Therefore, a quick inspection is a must.
Locate the serpentine or accessory belts in your engine compartment; they are usually visible on the front or side of the engine, often appearing as long, ribbed rubber bands. Begin by visually inspecting the entire length of the belt. Look for any signs of wear and tear, such as cracking, fraying, or missing chunks of rubber. These are clear indicators that the belt is deteriorating and needs replacement.
Another crucial sign of wear is glazing, which appears as shiny, slick spots on the ribbed side of the belt. Glazing indicates that the belt is losing its grip and may be slipping, leading to reduced efficiency for the components it powers. If you spot any glazing or cracking, it’s a strong signal that the belt will need to be replaced soon, ideally before your trip.
After your visual inspection, you can check the belt’s tension. Gently pinch the belt with your thumb and forefinger and try to move it up and down. While you don’t need to be an expert, excessive slack or stiffness can indicate a problem. A belt that is too loose might slip, while one that is too tight can put undue stress on the bearings of the accessories it drives.
Don’t let these unsung heroes of your engine go unnoticed. Addressing belt issues before they escalate can save you from a significant roadside breakdown and ensure all your vehicle’s accessories function correctly throughout your journey. This simple check helps keep everything running smoothly and reliably.
Read more about: Seriously Where Did They Go? 15 Automotive Features That Vanished (Or Should) From Our Dashboards

5. Verify Your Air Filter’s Condition
While often overlooked, your car’s air filter plays a vital role in both engine performance and the quality of air inside your cabin. It acts as the engine’s lungs, filtering out dust, dirt, pollen, and other airborne contaminants before they can enter and damage the engine. A clogged air filter can restrict airflow, leading to reduced engine power, decreased fuel efficiency, and potentially even engine misfires. Most vehicles can go tens of thousands of miles without needing an air filter replacement, but it’s always good to check before a trip.
The air filter is usually located in the air box, which is attached to the end of an accordion-looking plastic pipe, often called the intake, under the hood. Most air boxes are held shut with simple clips or sometimes a few screws. Remove these fasteners to open the box and expose the air filter. This is typically a flat, rectangular pleated paper or synthetic element.
Once exposed, remove the filter and hold it up to a light source. A clean air filter should generally appear white or light in color and be free of significant debris. If it looks particularly dirty, dark, clogged with leaves, insects, or excessive dust, it’s a clear sign it needs to be replaced. A dirty filter will struggle to let sufficient air pass through, effectively suffocating your engine and hindering its performance.
If you frequently travel with pets, especially furry friends, regularly checking your air filter becomes even more crucial. Pet dander can easily block up vehicle air filters, exacerbating the issues of reduced airflow. Replacing a dirty air filter is an inexpensive and straightforward maintenance task that can instantly improve your engine’s health, its responsiveness, and even the air quality circulating through your AC system. Don’t close that airbox up again without ensuring your filter is clean or new.
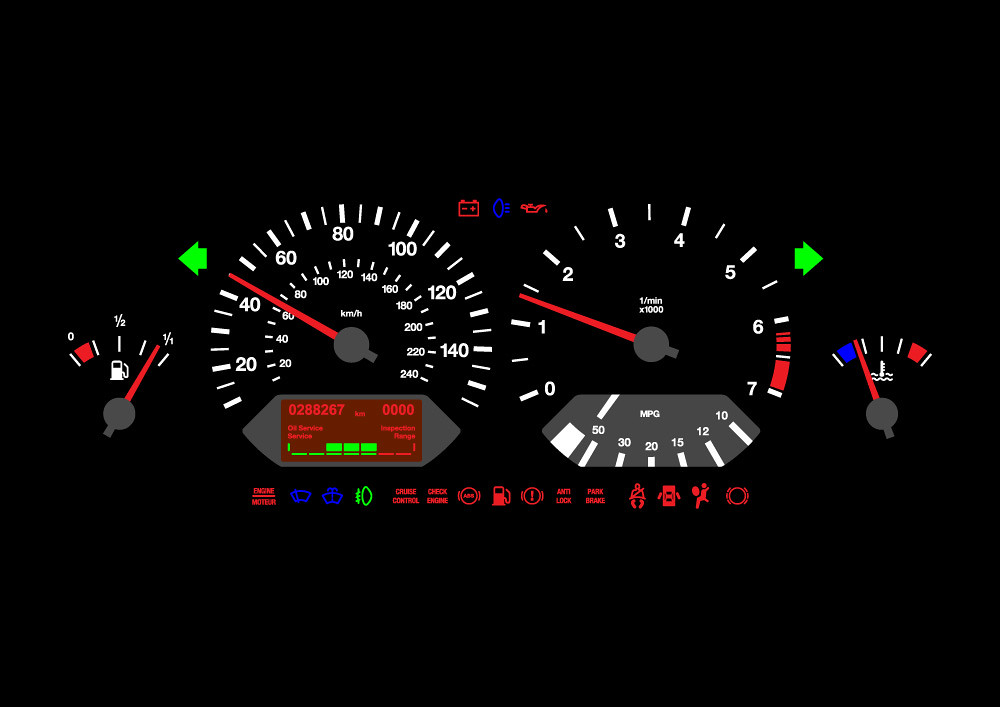
6. Address Dashboard Warning Lights
Your dashboard is your vehicle’s primary communication hub, and those illuminated warning lights are not just decorative; they are crucial indicators that something needs attention. Ignoring a warning light, especially the dreaded ‘Check Engine’ light, is akin to ignoring a doctor’s warning about a health symptom – it might seem minor now, but it could lead to more serious, and costly, problems down the road. Resolving any warning lights before your trip is essential for avoiding unexpected issues and breakdowns.
If your check engine light is lit up, the first step is to find out what specific error code has prompted it. You can do this by using an OBDII (On-Board Diagnostics II) scanner. These devices are readily available for purchase or can often be used for free at many auto parts stores. To use it, simply plug the scanner into the open plastic connector port, which is typically located beneath the dashboard on the driver’s side.
Once plugged in, the scanner will read the error code or codes stored in your vehicle’s computer system. If the scanner doesn’t provide a clear English description along with the numerical error code, you can find the corresponding description in a vehicle-specific repair manual or often on the manufacturer’s website. Knowing the specific problem is the first and most critical step towards making an informed plan to fix it.
It’s important not to dismiss other warning lights either. Lights for low tire pressure, ABS, battery, or oil pressure all indicate immediate concerns that need to be addressed. While some might seem minor, like a tire pressure light that simply needs a quick inflation, others, like an oil pressure warning, demand immediate attention and could signal serious engine trouble if ignored. Before hitting the road, make sure your dashboard is a clear canvas, free of any illuminated warnings.
By taking the time to resolve these issues proactively, you not only prevent potential mechanical failures that could disrupt your trip but also ensure your car is operating safely and efficiently. Your car is constantly monitoring its systems and trying to tell you something important; listening to these warnings is a fundamental part of responsible vehicle ownership and crucial for a smooth journey.
Now that we’ve covered the foundational exterior and initial engine checks, it’s time to delve deeper into your vehicle’s core systems. This second section focuses on the vital fluids that keep your engine running smoothly, the electrical system that powers your journey, and the crucial braking components that ensure your safety. We’ll also tackle final preparations, from organizing your interior to assembling an emergency kit, ensuring every aspect of your vehicle is primed for a worry-free adventure.
Read more about: Read This First: 14 Popular Trucks and SUVs That Become Costly Money Pits Once They Hit 80,000 Miles
7. Check Engine Oil Level and Quality
Your engine oil is often referred to as the lifeblood of your vehicle, and for good reason. It lubricates moving parts, significantly reduces friction, and plays a crucial role in keeping the engine cool, preventing a mechanical breakdown. Your vehicle’s optimal performance and longevity depend heavily on having the proper level and quality of oil, so this check is absolutely non-negotiable before a long road trip.
To check your oil, begin by parking your car on a level surface and allowing the engine to cool down completely. Once cool, remove the dipstick, wipe it clean with a cloth, and then reinsert it fully. Pull it out again and observe the oil level against the bottom notch (low limit) and top notch (high limit) on the stick. If the oil level is low, it’s a clear indication that you’ll need to either add more or consider a full oil change.
Beyond just the level, assessing the oil’s quality is equally important. Oil that’s in good condition should appear translucent and have a slightly yellow or even greenish hue. If, however, your dipstick reveals dark or gritty oil, it’s a strong signal that it’s time for a change. Fresh oil not only cleans moving parts but also effectively dissipates heat, which is vital for preventing overheating during long drives.
While you can tackle an oil change yourself by sliding a container under the oil pan, unscrewing the drain plug, and replacing the filter, many auto repair shops offer this service with a complimentary inspection. Remember to consult your owner’s manual for the correct type and amount of oil specific to your vehicle. As a general guideline, conventional oil typically needs changing every 3,500 to 5,000 miles, while synthetic oil can last anywhere from 7,500 to 10,000 miles.
Read more about: The Top 14 Vehicles Built to Go the Distance: Your Guide to 350,000+ Mile Reliability

8. Top Off Essential Vehicle Fluids (Coolant, Brake, Transmission, Washer)
Beyond engine oil, your vehicle relies on a host of other critical fluids and lubricants to function safely and efficiently. These range from coolant, which prevents your engine from overheating during extended periods of driving, to windshield washer fluid, which helps clear your view from bugs and grime. Ensuring all these vital reservoirs are at their optimal levels is paramount for peak performance and safety on your road trip.
According to the National Highway Traffic Safety Administration (NHTSA), checking and topping off coolant, windshield washer fluid, power steering fluid, brake fluid, transaxle, and differential oils are essential steps for getting your vehicle road trip ready. Your owner’s manual is your best friend here, as it will guide you to the precise location of each reservoir under the hood, often marked with clear icons or labels.
For fluids like windshield washer and brake fluid, locate the translucent reservoir and simply add more if the level falls below the lower mark, indicating its low-fill point. Brake fluid, in particular, operates within a sealed hydraulic system and must be kept free from moisture and contaminants to ensure every component, from pedal to pads, works effectively. Always use the specific type of brake fluid recommended in your car’s manual.
Coolant is another major player in preventing your engine from reaching dangerously high temperatures. Check its reservoir and ensure the fluid is filled to the car manufacturer’s recommended level. While you’re at it, inspect the fluid itself for any floating debris that might suggest it’s very old or for any corrosion on the tank, which can occur if the coolant has become acidic over time. Making sure your radiator is topped off as well, comparing its fill line to the lower limit line on the reservoir, completes this crucial check. For automatic transmission fluid, locate its dipstick using your owner’s manual and check it just as you would your engine oil.
9. Assess Your Battery’s Health and Terminals
Your car’s battery is the heart of its electrical system, providing the necessary jolt to start your engine every single time. While it can sometimes be tough to predict when a battery might suddenly fail, taking proactive steps to ensure it has a strong, clean connection to your car’s electrical system can prevent unexpected starting issues far from home. A robust battery ensures a stress-free start to any journey.
Begin by checking the battery charge before you plan your trip. You can do this using a voltmeter: turn off the engine, connect the voltmeter’s red lead to the positive terminal, and the black lead to the negative terminal. A reading of 12.6 volts or above generally indicates a full charge. If the charge is significantly low, it might be time to consider recharging or even replacing the battery to avoid being stranded.
Next, carefully inspect the battery terminals themselves. Look for any visible signs of corrosion, which often appears as a white or bluish powdery buildup, or any other damage or wear. Secure connections are absolutely crucial for reliable starts, as corrosion can impede the flow of electricity, weakening your battery’s ability to power your car.
If you spot corrosion, you’ll need to clean it. A simple yet effective method involves a mixture of 1 tablespoon (15 ml) of baking soda and 1 cup (250 ml) of water. Mix these in a bowl, then use an old toothbrush to gently scrub the combination into the corroded terminals. After scrubbing, rinse with clean water and dry thoroughly. For added protection against future buildup, you can apply an anti-corrosion gel to the terminals. Always remember to wear safety gloves and goggles when performing battery maintenance to protect yourself.
Read more about: Buyer Beware! Is Your Fitness Tracker Refusing to Charge? 15 Fixes Before You Toss It!
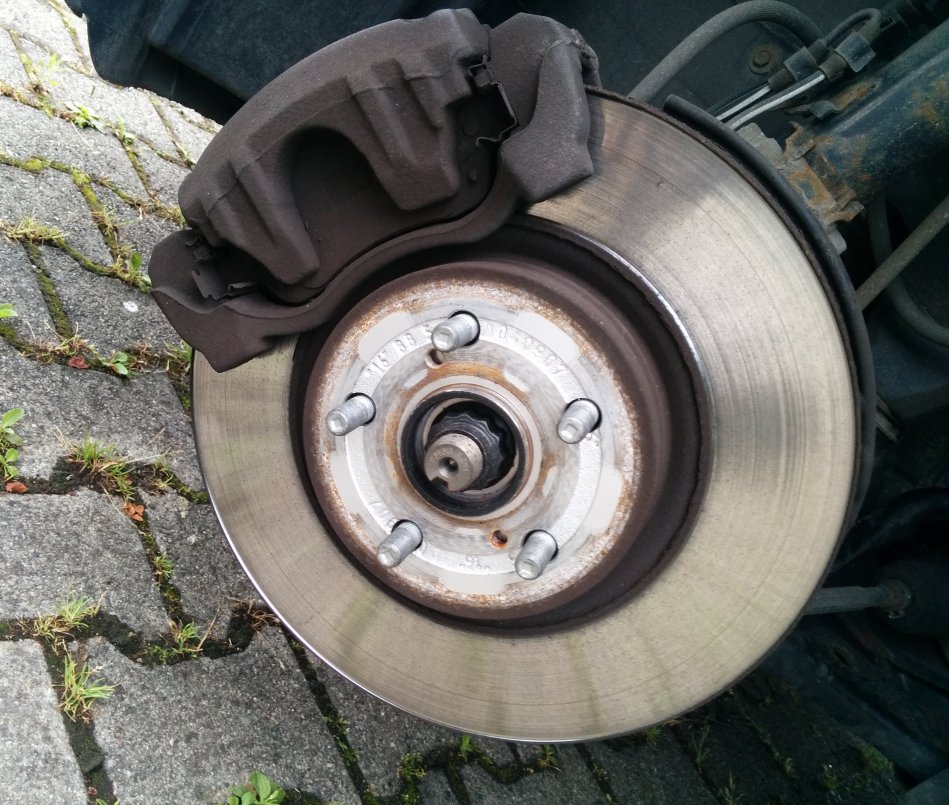
10. Inspect Brake Pads for Wear
When it comes to vehicle safety, your brakes are at the very top of the list. Reliable brakes are absolutely crucial for safe stopping, allowing you to react quickly and effectively in emergency situations. Before embarking on a long road trip, a thorough inspection of your brake pads is essential to ensure they provide the necessary stopping power and peace of mind throughout your journey.
Brake pads are vital components that, over time, naturally wear down from use and will eventually need checking and replacement. Thin brake pads are not just inefficient; they can lead to significant brake damage and, more importantly, create extremely unsafe driving conditions. Addressing this proactively prevents potential failures at critical moments.
There are a few key ways to inspect your brake pads. One simple method is to look through the wheel spokes; you might be able to see the outside pad against the brake rotor. Visually estimate the pad thickness. If it appears to be less than 1/4 inch, it’s a strong indicator that replacement is due. Another tell-tale sign is auditory: if you’ve been hearing a high-pitched screeching sound when you apply the brakes, this noise often signals that it’s time for new brake pads.
For a more direct inspection, you would need to access the brake pads by removing the wheels, then the two bolts that secure the brake calipers to the vehicle. This allows you to slide the brake caliper off the rotor and then remove the brake pads for a closer look. While this is a task many can do themselves, if you’re unsure or uncomfortable, it’s always best to have a professional technician check them. Don’t let worn brakes put a damper on your road trip; ensure they are in optimal condition before you hit the highway.
Read more about: Read This First: 14 Popular Trucks and SUVs That Become Costly Money Pits Once They Hit 80,000 Miles
11. Organize Your Vehicle’s Interior
Preparing for a long road trip isn’t just about what’s under the hood; it’s also about creating a comfortable and functional environment inside your car. Spending extended periods in your vehicle means you’ll need space for everything from luggage and snacks to maps and devices. Cleaning out and organizing your car’s interior isn’t merely about aesthetics; it profoundly impacts your comfort, reduces stress, and enhances accessibility to important items throughout your journey.
Start by giving your vehicle a thorough decluttering. Remove any accumulated trash, unnecessary items, or anything that could slide around and become a distraction. A clean space reduces visual noise and makes the car feel more spacious and inviting, transforming your driving experience from chaotic to calm. This simple step sets the foundation for a more enjoyable trip.
Once the clutter is gone, focus on organization. Think about what you’ll need easy access to while driving versus what can be stored away. Items like snacks, drinks, navigation tools, and charging cables should be within arm’s reach. Use organizers, console inserts, or seat-back pockets to keep small items neatly stowed and prevent them from becoming loose projectiles during sudden stops.
A crucial tip for organization is to avoid packing things directly over your spare tire or emergency kit. Imagine trying to access these vital tools on the side of the road with a trunk full of luggage piled on top! Keeping these areas clear ensures you can quickly retrieve essential equipment in an emergency. Setting off with a clean and organized car can truly give you added peace of mind, allowing you to focus on the adventure ahead.
Read more about: 13 Smart DIY Car Upgrades That Can Skyrocket Your Trade-In Value by Thousands

12. Prepare Your Emergency Kit and Documentation
No matter how thoroughly you prepare your vehicle, unforeseen circumstances can always arise on the road. This is precisely why assembling a comprehensive emergency kit and ensuring all your vital documentation is up to date and accessible is absolutely critical. Being prepared for the unexpected can turn a potentially stressful roadside incident into a manageable inconvenience, keeping you safe and on track.
At a minimum, your emergency kit should include the tools necessary to change a flat tire: an emergency jack, a tire iron, and, of course, a fully inflated spare tire. Beyond the basics, consider adding items that can address a wider range of potential emergencies. Jumper cables, road flares or reflective triangles, extra blankets for cold nights, bottled water, non-perishable food, rain gear, and a reliable flashlight are all excellent additions. It’s also highly recommended to carry a well-stocked first-aid kit.
You can even tailor your emergency supplies to your family’s specific needs or the time of year. For instance, if you’re traveling in winter conditions, carrying cat litter can provide much-needed traction on slippery roads. Make sure all these essentials are packed securely in your vehicle, but more importantly, in a spot where they are easily accessible, especially the spare tire tool kit and jumper cables.
Equally important is ensuring your vehicle’s documentation is current and readily available. To legally drive in the United States, you’ll need a valid driver’s license and an up-to-date vehicle registration. Most states also require proof of insurance. Take the time to confirm the specific requirements for where you’ll be traveling. Driving without the appropriate documentation can lead to fines, delays, or even having your car impounded, which is the last thing you want on a road trip.
Keep these crucial documents, along with your cell phone and charger, somewhere you can easily access them, such as the glove compartment or a dedicated folder in your console. This quick accessibility is especially helpful if you get pulled over or need to provide information in an emergency. Proactive preparation of both your emergency kit and documentation ensures you’re ready for anything the open road might throw your way, transforming potential worries into genuine peace of mind.
Read more about: The 2025 TSA Packing Bans Have Arrived: What’s Now Off-Limits in Your Luggage and How to Avoid Travel Headaches
With all these essential checks performed, from the rubber meeting the road to the fluids flowing within, and your interior organized with emergency preparedness in mind, you’re not just ready for a road trip – you’re ready for a fantastic, stress-free adventure. By taking these proactive steps, you’ve empowered yourself to tackle the open road with confidence, ensuring that your journey is filled with memorable moments, not mechanical mishaps. So, buckle up, hit the road, and enjoy the ride, knowing your vehicle is in top-notch condition for whatever lies ahead.


