

Ever find yourself scrolling through old recipe books or watching vintage commercials and thinking, “Wait, people actually ATE that?” It’s wild how our culinary landscape transforms, isn’t it? Just like fashion trends that come and go, food trends also ebb and flow, depending on our ever-changing tastes, interests, and even technological advancements. Some dishes enjoy a glorious moment in the spotlight, only to fade into obscurity, while others, like the humble cottage cheese, manage to make a triumphant comeback thanks to viral TikTok hacks and social media influencers.
But then there are those foods that were once absolute staples, gracing dinner tables, school cafeterias, and lunchboxes across America, that have either dramatically dimmed in popularity or, in some cases, disappeared entirely. We’re talking about dishes that, at one point, were considered the height of convenience, luxury, or even served as a perceived health remedy, only to be cast aside as our collective palates evolved. This shift often leaned towards simpler, more natural flavors, and a growing health consciousness led to a preference for less processed foods.
It’s not just about changing tastes, though; the story of disappearing foods is woven into broader societal changes. Factors like changes in grocery store offerings, significant restaurant cultural shifts (seriously, why visit a soda parlor when you’ve got a McDonald’s on every corner?), the availability of specific ingredients, and even surprising things like migrant bird laws have all played a crucial role in these particular foods losing their luster amongst Americans. So, grab your virtual fork and spoon, and let’s take a fascinating, sometimes humorous, trip down memory lane! We’re about to explore six once-popular American eats that, let’s be honest, most of us wouldn’t touch with a ten-foot pole today. Prepare for some serious nostalgia, a few “what were they thinking?!” moments, and maybe even a chuckle or two!

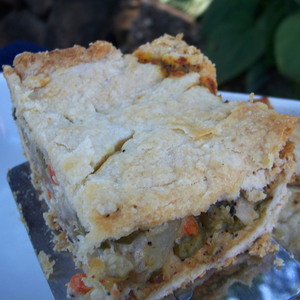
1. **Robin Pie**Imagine yourself transported back to 19th-century America, settling in for a hearty dinner. The evening’s specialty might just have been… robin pie. Yes, you read that right, a pie made with actual robins! This culinary practice sounds absolutely wild and almost unthinkable to our modern sensibilities, but before the Migratory Bird Treaty Act of 1918 stepped in to protect these songbirds, preparing robins in a pie was a recognized and surprisingly popular dinner tradition.
The construction of this unusual pie was often quite elaborate, reflecting the culinary norms of the era. A typical recipe would involve layering a pie crust with ingredients like beef, rich fat bacon, and, of course, the chopped meat of robins. It was a substantial meal, designed to be filling and make the most of available resources, which was a common necessity in households of the time. This wasn’t some isolated, eccentric dish; it held a place on many tables, illustrating a vastly different relationship with nature and food sourcing than we have today.
The passage of the Migratory Bird Treaty Act in 1918, a landmark piece of legislation, brought an abrupt end to the practice of consuming robins. This legal protection swiftly and justifiably removed robin pie from American menus. It stands as a powerful example of how environmental policy and evolving ethical considerations can drastically reshape our diets and culinary traditions. Today, the mere mention of robin pie serves more as a historical anecdote than a tempting recipe, a vivid illustration of how much our food landscape and values have transformed over the past century. You certainly won’t be finding this unusual dish in any modern American cookbook!
This pie, while bizarre to us, highlights a period when food preparation was often driven by practicality and local availability, rather than the vast global supply chains we enjoy today. It’s a culinary relic that reminds us of the diverse and sometimes surprising origins of what constituted “dinner” for our ancestors. What a difference a century makes, right?
Product on Amazon: Casafina Ceramic Stoneware 11″ Pie Dish – Cook & Host Collection, Robin’s Egg Blue | Microwave & Dishwasher Safe Dinnerware | Food Safe Glazing | Restaurant Quality Serveware
Brand: Casafina
Binding: Kitchen Product Group: Kitchen
Price: 61 USD
Rating: 5.0 Total reviews: 4
Material: Fine Stoneware
Color: Cook & Host Robin’s Egg Blue
Shape: Round
Special Feature: Oven Safe
Features:
1. STONEWARE PIE DISH – Coated with a reactive glaze, this dinnerware is safe to use in the oven, microwave and dishwasher, but hand washing is advised for those larger and more delicate pieces
2. ELEGANT TABLEWARE – The robin’s egg blue pie dish measures 10.75″ in diameter and 2.25″ deep, all while being scratch resistant with wonderful workmanship and great color
3. NATURALLY MADE – Each piece of bakeware is made from the best natural resources in Portugal and is created through a single firing system to create a special bond between the clay and glazed surface
4. COOK & HOST COLLECTION – The ideal collection for the gifted host. From a charming array of bakeware pieces, to diversified serveware and also a ruffled-shaped dinnerware, the collection is the perfect choice for every hostess and party lover.
Shopping on Amazon >>
Perfect Pie Crust (No Fail)
Ingredients
Equipment
Method
- In a large mixing bowl, combine the flour and salt.
- Add the cold Crisco to the flour mixture. Using a pastry blender or two forks, cut the shortening into the flour until the mixture resembles coarse crumbs with some pea-sized pieces of Crisco remaining.
- In a separate small bowl, whisk together the cold egg, cold water, and white vinegar.
- Gradually add the wet ingredients to the dry ingredients, mixing gently with a fork until just combined and the dough barely comes together.
- Be careful not to overmix; the dough should still be a bit shaggy.
- Divide the dough into two equal portions (for a double-crust pie) or keep as one, then flatten each portion into a disk.
- Wrap each disk tightly in plastic wrap and refrigerate for at least 30 minutes, or up to 2 days, to allow the gluten to relax and the fat to firm.
- When ready to use, lightly flour a clean surface and roll out the chilled dough from the center outwards to your desired thickness for your pie pan.
- Carefully transfer the rolled-out crust to your pie pan, trim and crimp the edges as desired, then fill and bake according to your pie recipe’s instructions.
Notes
Read more about: You Won’t Believe How These 12 Supporting Characters Stole The ENTIRE Movie!

2. **Olive Loaf**If you’ve ever found yourself exploring the more vintage sections of a deli meat counter, or perhaps seen a faded advertisement from yesteryear, you might have, on a rare occasion, caught a glimpse of an olive loaf. This once-beloved American favorite was a staple deli meat, cherished for its distinctive appearance and flavor. It’s essentially a processed meat mixture, typically combining pork, chicken, and beef, generously studded throughout with whole, vibrant green olives, creating an eye-catching speckled pattern.
Conceptually, it shares some similarities with Italian mortadella, which is known for its sliced sausage meat dotted with cubes of pork fat. However, olive loaf carved out its own unique niche with that unmistakable briny kick from the olives. It used to be a very common sight in grocery stores, a quick and easy choice for making sandwiches for school lunches, picnic spreads, or simply a convenient addition to a cold cut platter. For many, it conjures up strong memories of childhood and simpler times, a cornerstone of everyday meals.
The unique flavor profile — a blend of savory processed meats punctuated by the sharp, salty burst of the olives — was incredibly popular for decades. It offered a certain novelty and convenience that appealed to a broad demographic, fitting perfectly into the fast-paced American lifestyle that began to take hold in the mid-20th century. It was a practical, affordable, and readily available option for countless households, embodying the spirit of accessible convenience food.
However, in more recent years, olive loaf has found itself increasingly overshadowed. As culinary tastes have evolved towards fresher, less processed alternatives, and as the popularity of other deli meats like bologna and turkey has soared, this once-prominent deli staple has gradually faded into the background. It’s now quite uncommon to find it on mainstream grocery store shelves, signaling its decline from an American favorite to a nostalgic curiosity. It truly embodies how even the most convenient of foods can lose their market appeal when consumer preferences shift dramatically!
Product on Amazon: Koegel Olive Loaf 5-8oz packs
Brand: Koegel Meats Inc
Binding: Product Group: Grocery
Price: 48.99 USD
Rating: 4.3 Total reviews: 34
Flavor: Olive
Item Weight: 8 Ounces
Number of Pieces: 5
Item Form: Loaf
Shopping on Amazon >>

Asparagus, sundried tomato & olive loaf
Ingredients
Equipment
Method
- Preheat your oven to 180°C (350°F) and grease a 900g/2lb loaf tin, then line it with baking parchment.
- Cut each asparagus spear into 3 pieces.
- In a large mixing bowl, whisk together the self-raising flour and thyme leaves.
- In a separate medium bowl, lightly beat the eggs, then whisk in the milk and 100ml olive oil until well combined.
- Pour the wet mixture into the dry ingredients and gently fold with a spatula until just combined. Be careful not to overmix.
- Fold in the prepared asparagus pieces, pitted black olives, chopped sundried tomatoes, and grated Gruyère cheese.
- Pour the batter evenly into the prepared loaf tin, spreading it out gently.
- Bake for 45-50 minutes, or until the loaf is golden brown and a skewer inserted into the center comes out clean.
- Let the loaf cool in the tin for 10-15 minutes before carefully turning it out onto a wire rack to cool completely.
- Slice and serve warm or at room temperature.
Notes
Read more about: Stop Hiding Your Style: 14 Empowering Fall Fashion Trends for Women Over 50 to Embrace with Confidence This Season

3. **Pickled Herring**For many Americans with strong Northern European heritage, particularly those whose families settled in the Midwest, pickled herring still evokes a sense of tradition and fond memories. This preserved fish dish was originally a true staple in countries like Sweden, Norway, and Denmark, primarily because it offered an incredibly effective way to store and transport fish without spoilage in an era before widespread refrigeration. When European migrants began settling in the United States, they brought their cherished culinary traditions, and their love for this tangy, briny delicacy quickly established it as a popular, if somewhat regional, item in many American households.
Pickled herring became a fixture, especially around holidays, cultural celebrations, and family gatherings. It offered a distinctive flavor profile that was both rich and sharp, often served with onions and cream, or in a clear vinegar solution. It was more than just food; it was a testament to the diverse culinary tapestry that immigrants wove into the United States, enriching the national palate and introducing new tastes and preservation methods. Its longevity was also due to its practicality, providing a reliable source of protein and flavor when fresh seafood might have been less accessible.
The dish’s popularity, while never universally widespread across all American demographics, was significant within specific communities for decades. It represented a connection to heritage, a taste of the “old country” adapted for a new land. Its preparation often involved family recipes passed down through generations, making it a truly personal and cherished food item.
However, as we fast forward a century, the culinary landscape has transformed dramatically. With the widespread availability of fresh fish in nearly every grocery store, and the surging popularity of other preserved fish products like canned tuna, or more recently, trendy tinned sardines, pickled herring just doesn’t hold the same popular appeal. While you might still stumble upon it in specialty European markets or some well-stocked deli counters, it has largely fallen out of favor with the broader American public. It’s a compelling story of how modern convenience and evolving palates can ultimately diminish the widespread appeal of even deeply traditional foods.
Product on Amazon: Blue Hill Bay, Herring in Dill Marinade, 12 oz
Brand: Blue Hill Bay
Binding: Grocery Product Group: Grocery
Price: 36.99 USD
Rating: 4.4 Total reviews: 566
Item Weight: 0.75 Pounds
Specialty: Wild Caught
Allergen Information: Fish
Item Form: Slice
Features:
1. Responsibly Farmed or sustainable wild-caught
2. Certain preservatives prohibited, including sodium bisulfite and STPP
3. Traceable to farm or fishery
Shopping on Amazon >>
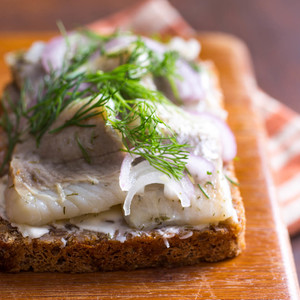
Pickled Herring Smørrebrød (Danish Open-Faced Sandwich) Recipe
Ingredients
Equipment
Method
- Ensure all ingredients are prepared: rugbrød sliced, butter softened, pickled herring drained, red onion thinly sliced, and dill roughly chopped.
- Take one slice of rugbrød and generously spread the softened unsalted butter evenly across its surface.
- Carefully arrange the 5 pieces of pickled herring on top of the buttered rugbrød, ensuring even distribution.
- Garnish the sandwich by scattering a generous amount of thinly sliced red onion over the herring.
- Finish by sprinkling the roughly chopped fresh dill over the red onion and herring.
- Serve immediately as a traditional Danish open-faced sandwich.
Notes
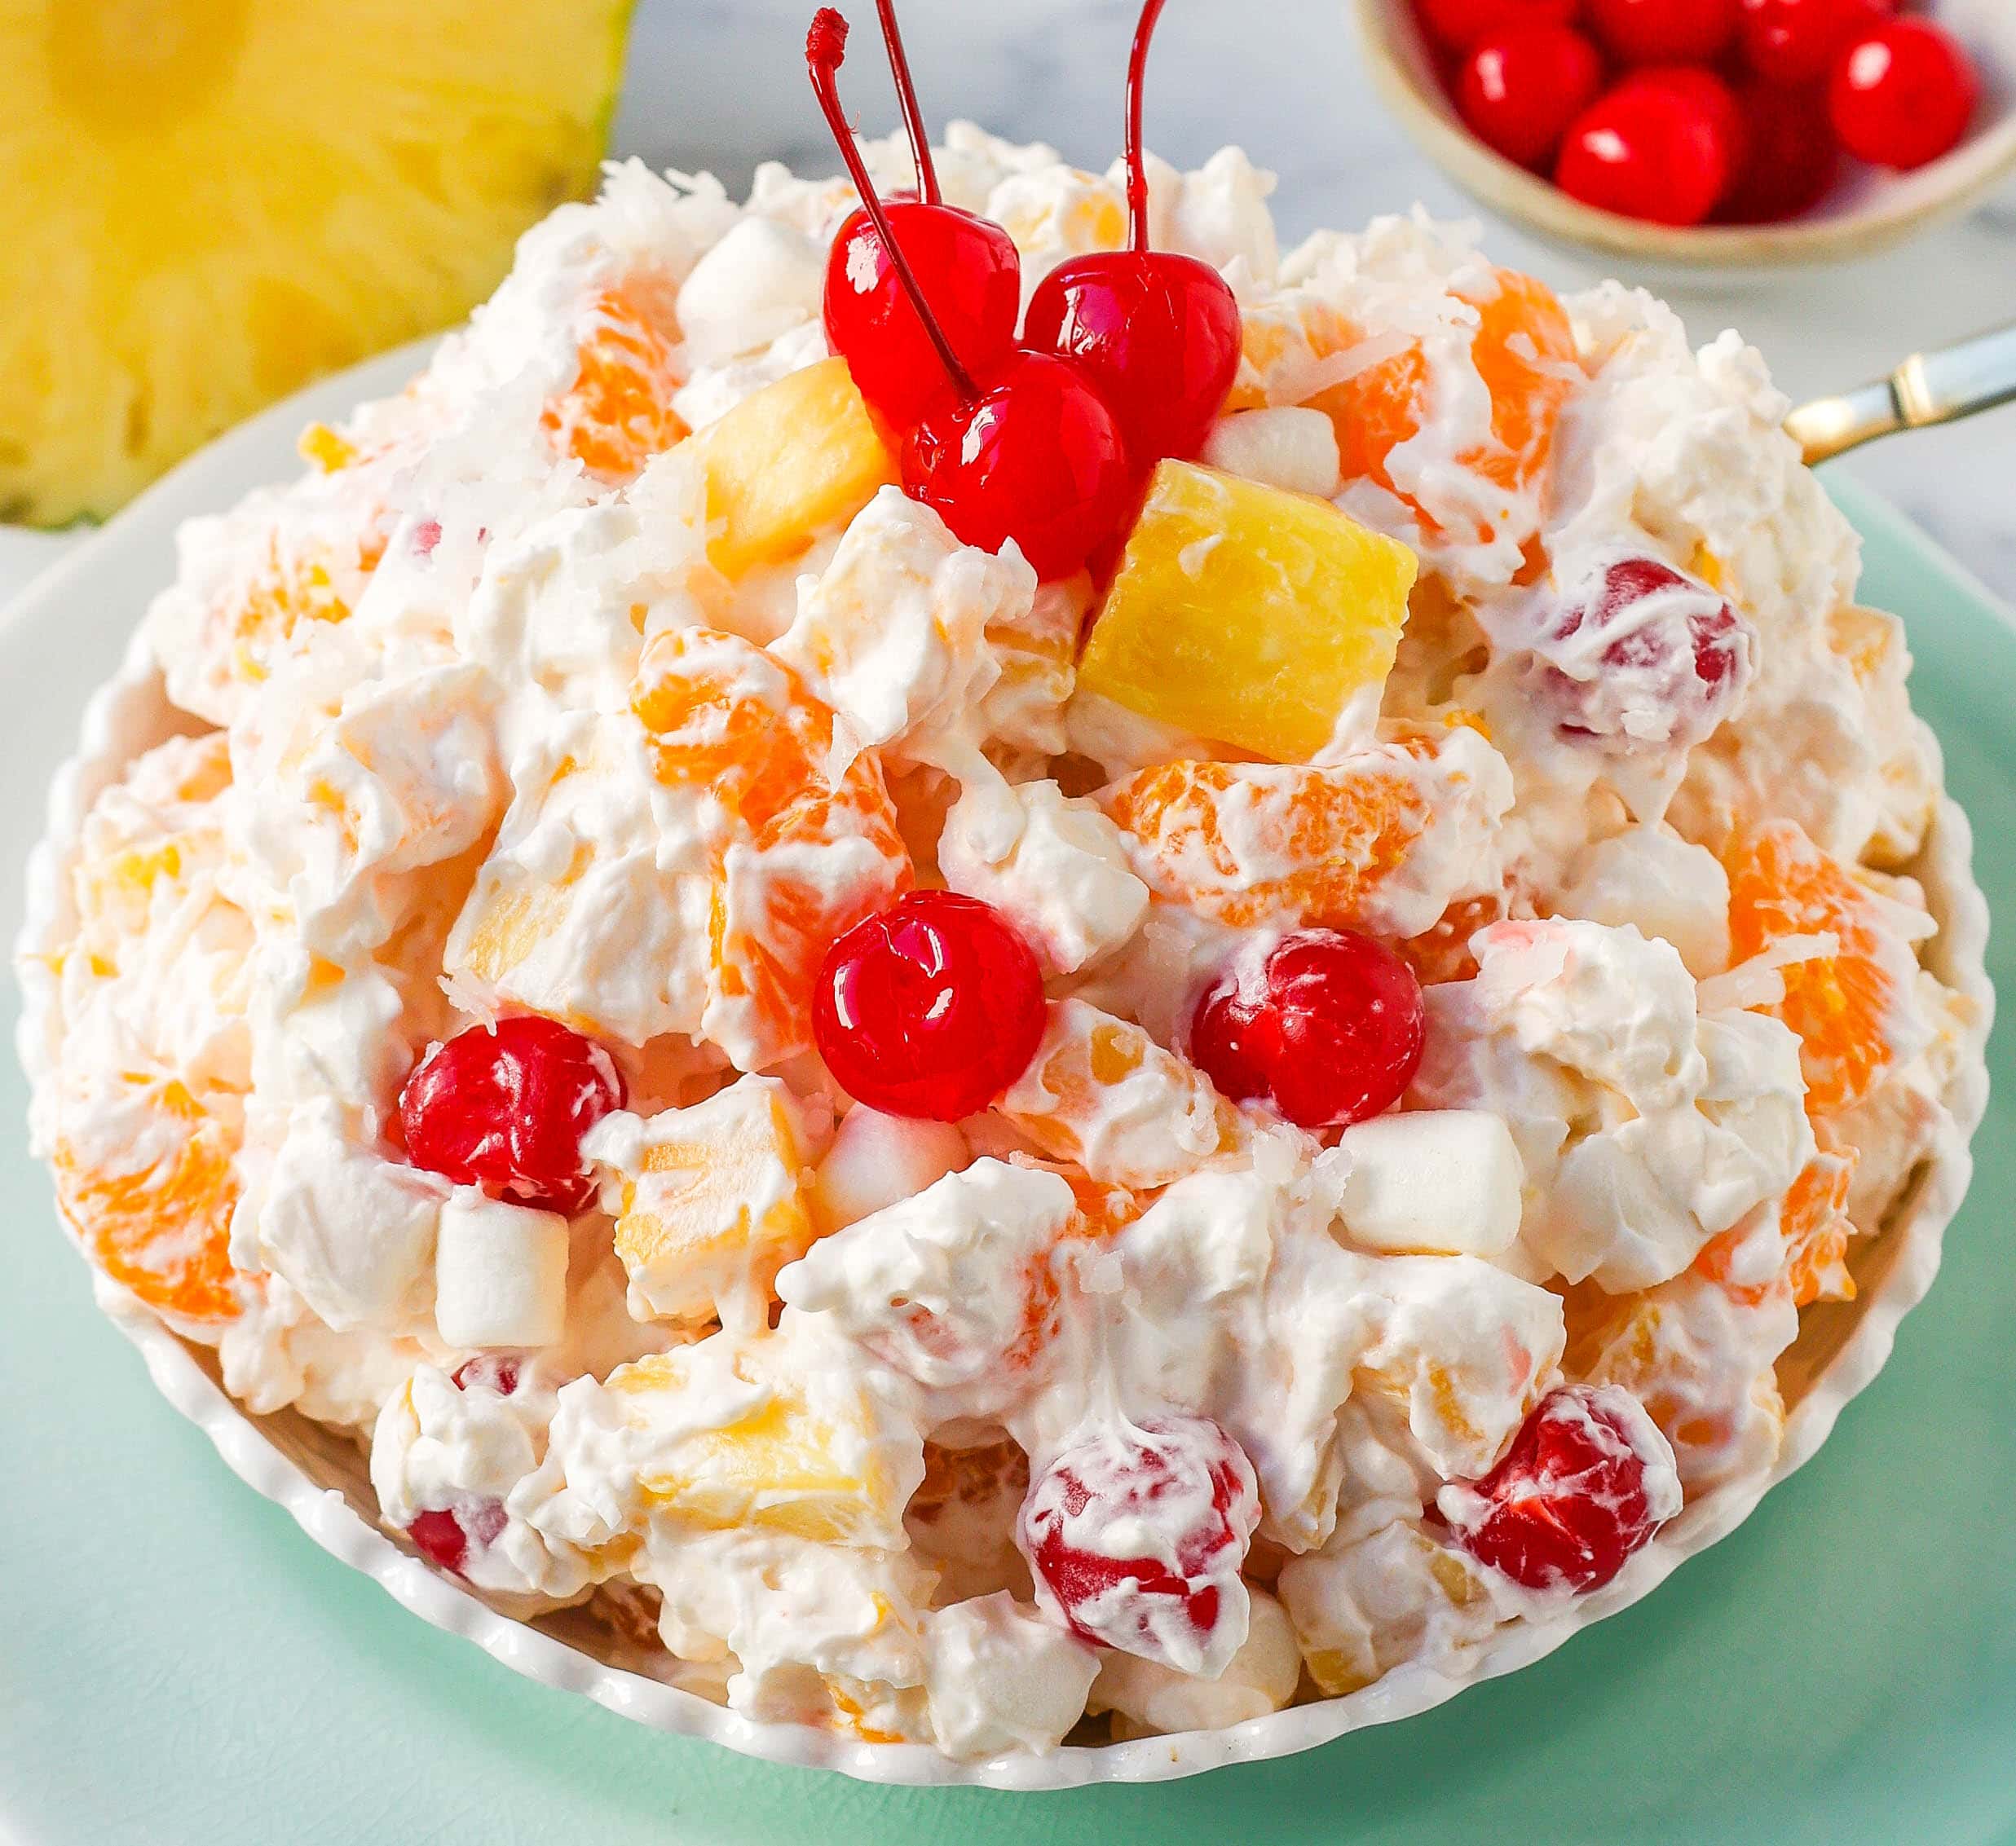
4. **Ambrosia Salad**Ah, ambrosia salad! Just the name alone, with its Greek origins meaning “food of the gods,” promises something divine, doesn’t it? This sweet, creamy, and undeniably colorful salad has a surprisingly long history in America, first appearing in cookbooks in the 1800s. Its rise to popularity was closely tied to the increasing accessibility of citrus fruits, which were once considered luxuries. By the 20th century, ambrosia salad had firmly cemented its place as an American staple, particularly shining as a potluck and holiday centerpiece across Southern states.
So, what exactly made up this seemingly “heavenly” dish? Typically, it was a vibrant (and sometimes bewildering) mix of canned pineapple, canned mandarin oranges (though fresh oranges were also a welcome addition), miniature marshmallows, and shredded coconut. Often, a creamy binder of sour cream, whipped cream, or even mayonnaise was used to hold all these disparate, yet somehow harmonious, ingredients together. It was considered an impressive treat, a festive and visually appealing dish that brought a burst of sweetness and color to any gathering, especially during Thanksgiving and Christmas.
The appeal of ambrosia salad stemmed from its perceived exoticness and the combination of ingredients that, for a time, felt luxurious. Coconut and citrus were not always readily available to all Americans, making the dish a special indulgence. Its sweet, playful flavors and soft, creamy texture offered a comforting and unique side dish or dessert option that stood out on crowded tables. It perfectly encapsulated a certain mid-century aesthetic of mixing convenience with a touch of flair.
However, as dining preferences continued to evolve, leaning heavily towards healthier, fresher, and less sweet options, ambrosia salad began its gradual fade from the spotlight. While it still makes a nostalgic and often anticipated appearance at holiday feasts in some traditional Southern households, it’s certainly not the ubiquitous dish it once was in the 21st century. Its charm remains, but modern palates often gravitate towards simpler, lighter fare, leaving this whimsical, marshmallow-laden creation as a delightful, if rare, throwback. It’s a dish that truly sparks conversation, often dividing people into “love it” or “can’t even imagine it” camps!
Product on Amazon: Whole Foods Market, Salad Chicken Sonoma Fresh Pack
Brand: Whole Foods Market
Binding: Grocery Product Group: Amazon Fresh Perishables
Price: 12.99 USD
Rating: 4.4 Total reviews: 2814
Number of Items: 1
Flavor: Chicken
Cuisine: American
Size: 6.56 Ounce (Pack of 1)
Shopping on Amazon >>

Ambrosia Salad
Ingredients
Equipment
Method
- Thoroughly drain the 11-ounce can of mandarin oranges in a colander, pressing gently to remove all excess liquid.
- Similarly, thoroughly drain the 8-ounce can of pineapple chunks in the colander, ensuring no residual juice remains.
- In a large mixing bowl, combine the drained mandarin oranges, drained pineapple chunks, 1 cup of miniature marshmallows, and 1 cup of flaked coconut.
- Add 1 cup of sour cream to the bowl with the fruit and marshmallow mixture.
- Using a rubber spatula or large spoon, gently fold all ingredients together until they are evenly distributed and coated with the sour cream. Be careful not to overmix, which can break down the fruit.
- Cover the mixing bowl tightly with plastic wrap to prevent any air exposure.
- Refrigerate the ambrosia salad for at least 1 hour, or preferably 2-4 hours, to allow the flavors to meld and the marshmallows to soften slightly, achieving the optimal texture.
- Before serving, give the salad another gentle stir.
- Transfer the chilled ambrosia salad to a decorative serving bowl.
- Serve cold as a refreshing dessert or a sweet side dish.
Notes
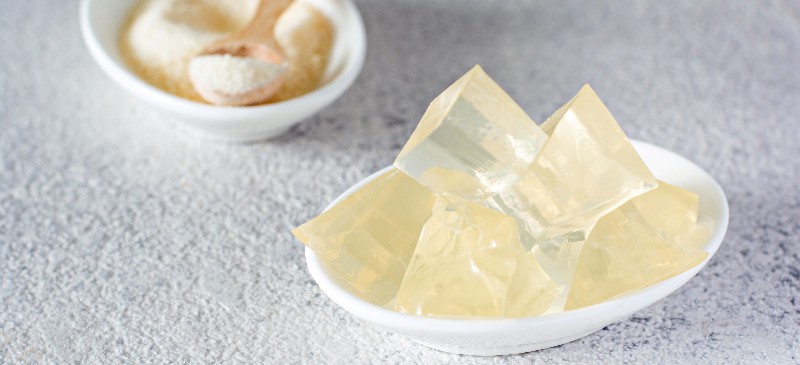
5. **Gelatin Molds & Savory Aspic**Prepare yourselves for a captivating, and perhaps slightly unsettling, journey into the shimmering, jiggling world of gelatin creations! The late 1800s brought us the invention of Jell-O, which revolutionized home cooking by making it incredibly easy to create gelatin-based foods. This led to the emergence of the first jello mold in Pennsylvania in 1904, and what followed was a veritable explosion of gelatinous dishes, extending far beyond simple fruity desserts. We’re talking about elaborate gelatin molds, often referred to as jello salads or gelatin salads, that became traditional *savory* sides on American tables.
Imagine, if you dare, a clear, quivering mold—a culinary work of art, perhaps—containing a wild mix of savory and sweet ingredients. You might find chunks of fruit nestled alongside grated carrots, other cooked vegetables, dollops of cottage and cream cheese, miniature marshmallows, and even crunchy fillings like pretzels or nuts. Even more dramatically, in the first half of the 20th century, the ability to serve shimmering towers of aspic, a savory gelatin often suspending meats, vegetables, or even seafood, was a huge status symbol at dinner parties. These dishes weren’t just food; they were a display of one’s sophistication and access to modern conveniences like refrigerators and freezers.
The jello salad craze reached its zenith in the 1950s, embodying an era of experimental home cooking and showcasing new kitchen technologies. They were the ultimate conversation starter, a visual spectacle as much as a meal component. Housewives delighted in crafting these intricate, often architecturally ambitious, gelatin masterpieces, which became synonymous with elegant entertaining and modern culinary prowess. It truly was a unique period in American gastronomic history, where the wobbly, shimmering form reigned supreme.
However, the reign of the gelatin mold was not to last. Its popularity began a sharp decline in the 1960s and 70s. As modern tastes shifted dramatically toward fresh, whole, and less processed foods, the unique, often polarizing textures and the bizarre combinations found in savory aspics and jello salads lost their allure. Today, these dishes are a genuinely rare find, mostly resurrected for retro-themed parties or as a subject of bewildered fascination. Would you be adventurous enough to try a spoonful of this culinary time capsule on a plate? It’s a dish that guarantees to spark vigorous discussion, if not universal enjoyment!
Product on Amazon: The Great Gelatin Revival: Savory Aspics, Jiggly Shots, and Outrageous Desserts
Binding: Kindle Edition Product Group: Digital Ebook Purchas
Price: 9.99 USD
Rating: 4.3 Total reviews: 20
Shopping on Amazon >>

California Waldorf Salad Gelatin Mold
Ingredients
Equipment
Method
- Lightly grease a 7-cup gelatin mold with a neutral oil or non-stick spray, then set aside.
- For the first layer, in a small bowl, sprinkle 1 envelope of unflavored gelatin over 3 tablespoons of fresh lemon juice; let bloom for 5 minutes.
- In a small saucepan, gently heat 1/2 cup of water. Stir in the bloomed gelatin, 1/4 cup sugar, and 1/2 teaspoon kosher salt until fully dissolved; remove from heat and cool slightly.
- Whisk the prepared 1/2 cup onion dip into the cooled gelatin mixture until smooth and well combined.
- Pour the onion dip mixture into the prepared gelatin mold. Chill in the refrigerator for 30-45 minutes, or until just firm but not completely solid.
- For the second layer, in a separate small bowl, sprinkle 2 envelopes of unflavored gelatin over 6 tablespoons of fresh lemon juice; let bloom for 5 minutes.
- In another small saucepan, gently heat 1 cup of water. Stir in the bloomed gelatin, 1/2 cup sugar, and 1 teaspoon kosher salt until fully dissolved; remove from heat and cool completely to room temperature.
- Once cooled, gently fold in the 1 cup chopped apples, 1/2 cup chopped walnuts, and 1/2 cup chopped celery into the second gelatin mixture.
- Carefully pour the apple-walnut-celery mixture over the set first layer in the mold.
- Chill the entire mold in the refrigerator for at least 4 hours, or preferably overnight, until completely firm. To serve, briefly dip the mold in warm water, then invert onto a serving platter.
Notes
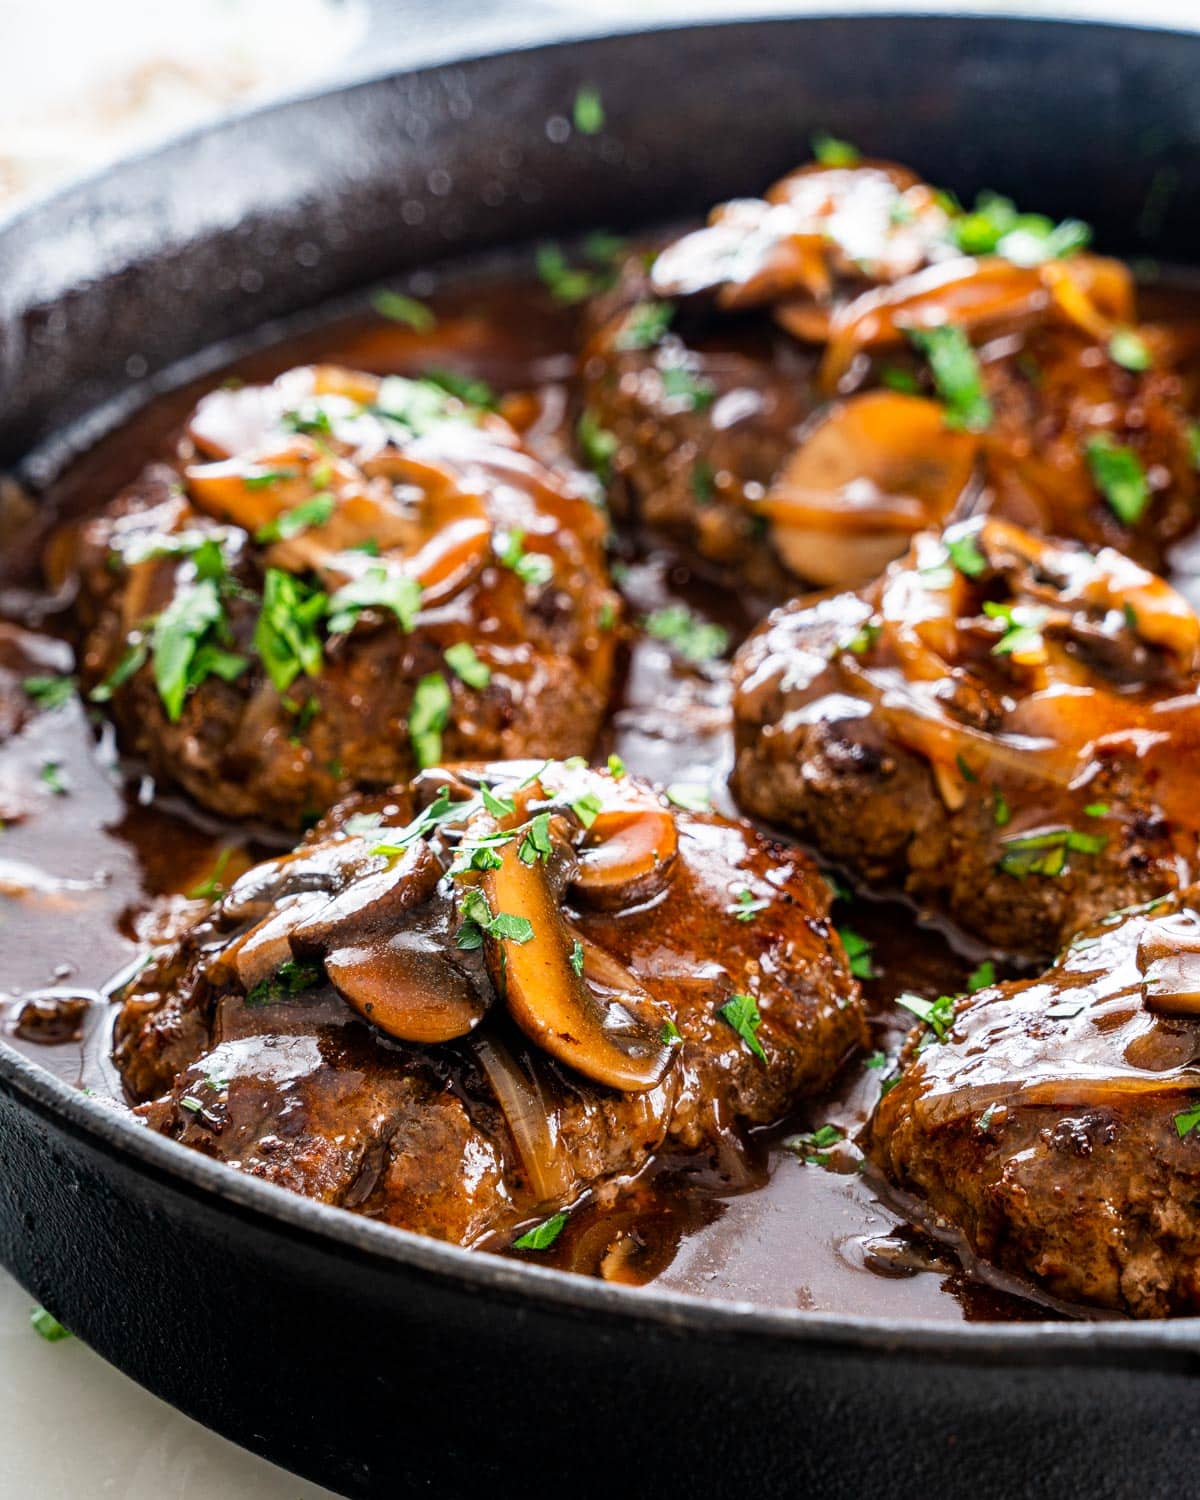
6. **Salisbury Steak**Moving from the wonderfully wobbly to the wonderfully meaty, let’s talk about Salisbury steak! This isn’t just a nostalgic favorite from the frozen dinner aisle; it actually boasts a surprisingly earnest origin story. Dr. James Henry Salisbury, an early pioneer of germ theory, introduced this dish during the American Civil War, believing it could serve as a dietary cure for digestive illnesses plaguing troops. His rather unconventional claim was that a diet high in beefsteak and coffee could aid digestion, as he theorized that beef was easier to digest compared to root vegetables. Talk about a doctor’s orders!
The dish itself, at its core, consists of ground beef patties, shaped and often pan-fried, then generously smothered in a rich, savory brown gravy sauce. It gained significant traction, becoming a common and comforting meal served to troops during World War I. Post-war, Salisbury steak cemented its place as a staple on American tables for many decades, particularly soaring in popularity as a key, foundational component of the burgeoning frozen “TV dinner” industry that boomed in the mid-20th century. It was widely perceived as a nutritious, convenient, and satisfying meal solution, providing a familiar and comforting entree for countless families across the nation.
For generations, Salisbury steak was the epitome of easy weeknight dinners, a go-to for busy parents, and a comforting presence in school lunchrooms. Its simple preparation and hearty nature made it incredibly appealing in an era that valued convenience and affordability. It became an ingrained part of the American comfort food lexicon, a dish that promised a substantial, no-fuss meal every time.
However, the venerable Salisbury steak has experienced a significant downturn in recent times. Over the past decade, sales have seen a noticeable decline. This shift is largely attributed to evolving consumer preferences; modern Americans are increasingly gravitating toward fresh, organic, and health-conscious alternatives. The broader frozen meal category, where Salisbury steak often resided, has seen a considerable downturn as tastes moved away from processed foods and towards more gourmet, internationally inspired, or simply lighter meal options. While some restaurants in the United States still feature it on their menus, Salisbury steak is, regrettably, becoming a relic of a bygone era, its reign as a dinner table king slowly but surely fading into history. It serves as a compelling case study of how changing health trends and a demand for different culinary experiences can fundamentally redefine even the most established and beloved comfort foods!
Okay, so we’ve already taken a wild ride through some truly head-scratching culinary relics in the first part of our journey, haven’t we? From robins in pies (yes, really!) to jiggling gelatin concoctions, it’s clear that American palates have seen some serious shifts. But hold onto your hats, because we’re not done yet! Get ready for another fascinating dive into the disappearing act of American eats, where we explore how everything from our quest for ultimate convenience to, dare we say, outright fear, helped push these once-popular foods right off our dinner tables. Prepare for more “OMG, people actually ate that?!” moments and maybe even a few nostalgic pangs for simpler times. Let’s dig in!

Salisbury Steak with Mushroom Gravy
Ingredients
Equipment
Method
- In a mixing bowl, gently combine ground beef, breadcrumbs, egg, salt, and black pepper until just mixed. Do not overmix.
- Divide the mixture into four equal portions and shape them into oval or round patties, about 1/2-inch thick.
- Heat the cooking oil in a large skillet over medium-high heat until shimmering.
- Carefully place the patties in the hot skillet and sear for 4-5 minutes per side, until deeply browned and cooked through. Remove patties to a plate and set aside, reserving the pan drippings.
- Slice mushrooms and add to the same skillet. Sauté until softened and browned, about 5-7 minutes.
- Sprinkle flour over the mushrooms and pan drippings, stirring constantly for 1 minute to cook the raw flour taste.
- Gradually whisk in beef broth, scraping up any browned bits from the bottom of the pan.
- Bring the gravy to a simmer, whisking frequently, until it thickens to your desired consistency. Season with additional salt and pepper to taste.
- Return the seared Salisbury steak patties to the skillet, nestling them into the mushroom gravy.
- Allow the steaks to gently warm through in the gravy for a few minutes before serving hot.
Notes
Read more about: You’re Not Alone: Some Everyday Things That Become Surprisingly Annoying As You Get Older

7. **Succotash**Before we had our fancy seasonal produce sections and Instagram-worthy farm-to-table dishes, there was succotash, a hearty staple tracing its roots all the way back to the 17th century. The very name “succotash” is a nod to its origins, evolving from “msíckquatash,” a Narragansett tribe word meaning “boiled corn kernels.” This humble dish was a masterclass in utilizing available ingredients, offering a comforting and substantial meal long before convenience was king.
What made up this historical wonder? Typically, succotash was a vibrant medley of ingredients including corn, of course, but also onions, ripe tomatoes, and often lima beans or other legumes. Sometimes, bell peppers and turnips would join the party, and for an extra dose of heartiness, cubed meats like corned beef or pork might even be thrown into the mix. It was a dish that celebrated the bounty of the land, providing sustenance and flavor, especially crucial in eras when food scarcity was a real concern for many.
Fast forward to today, and succotash isn’t exactly making waves on the average American dinner table. While it once held a proud place as a popular side dish, particularly in New England, modern culinary tastes have largely moved on to different, perhaps flashier, flavors. It’s a prime example of how even deeply entrenched regional favorites can eventually fade from widespread appeal as the nation’s palate diversifies and global cuisines become more accessible.
However, it’s not entirely gone from our culinary consciousness! In a delightful twist, this New England staple continues to be a popular fixture in some traditional Southern households. For these communities, succotash isn’t just a side dish; it’s a cherished connection to heritage, a taste of home, and a reminder that some culinary classics, even if forgotten by the masses, can still hold a special, comforting place at the family table. It’s a beautiful testament to the enduring power of food memory, don’t you think?

Seared Trout over Succotash
Ingredients
Equipment
Method
- Pat the trout fillets thoroughly dry with paper towels; this is crucial for achieving crispy skin.
- Season both sides of the trout fillets generously with kosher salt, freshly ground black pepper, and paprika.
- Heat the vegetable oil in a large skillet, preferably cast iron, over medium-high heat until shimmering.
- Carefully place the trout fillets, skin-side down, into the hot skillet. Do not overcrowd the pan; cook in batches if necessary.
- Sear the trout for 3-5 minutes on the skin side, pressing gently with a spatula to ensure full contact with the pan, until the skin is golden brown and crispy.
- Flip the fillets and cook on the flesh side for another 1-2 minutes, or until the fish is cooked through and flakes easily with a fork.
- Remove the trout from the skillet and let it rest for a minute or two on a clean plate.
- While the trout rests, quickly prepare or warm your succotash according to its recipe (if not already done).
- To serve, place a generous portion of warm succotash onto serving plates.
- Carefully place a seared trout fillet on top of the succotash and serve immediately.
Notes
Read more about: A Head-to-Head Comparison of 14 Frozen Vegetable Brands Worth Stocking Up On

8. **TV Dinners**Ah, the TV dinner! This was the ultimate symbol of convenience culture, perfectly capturing the spirit of a burgeoning new era in American households. When television sets became a staple in U.S. homes in the late 1950s, a new culinary star was born, promising a fully cooked meal with minimal effort. Imagine the sheer wonder of simply popping a dinner into the oven for less than 20 minutes and having a complete, ready-to-eat feast! It was revolutionary, truly a game-changer for busy families.
These delightful trays typically featured a main course, often a classic like meat in a savory gravy sauce, alongside familiar side dishes such as peas, carrots, or corn. And for the ultimate indulgence? Sometimes, a sweet dessert like a miniature chocolate cake would even be included, making it a truly all-in-one meal experience. It was the epitome of efficiency, allowing families to gather around their brand-new television sets and enjoy a meal without the fuss of extensive cooking or cleanup.
For decades, TV dinners were a regular purchase for grocery shoppers, synonymous with an easy weeknight meal or a quick fix after a long day. They represented a promise of convenience and a slice of the American dream, making dinner accessible and straightforward for countless households. It was a time when processed foods were seen less as a health concern and more as a marvel of modern innovation, a testament to how technology could simplify daily life.
However, the once-unquestioned reign of the TV dinner has significantly dimmed. While today’s frozen dinner selection has certainly evolved, the classic TV dinner, in its original form, isn’t a regular purchase for many anymore. The broader frozen meal category has seen a considerable downturn, largely because consumers are increasingly gravitating toward fresh, organic, and health-conscious alternatives. Our tastes have shifted away from heavily processed foods, favoring more gourmet, internationally inspired, or simply lighter meal options, leaving the traditional TV dinner largely in the past. It’s a bittersweet farewell to a true icon of mid-century American convenience!

Janette’s Healthy TV Dinners
Ingredients
Equipment
Method
- Prepare Portobello Ragout: Heat olive oil spray, sauté chopped onions and garlic until softened. Add chopped portobello mushrooms and 1 tbsp kosher salt; cook until mushrooms are tender and liquid has evaporated. Stir in 2 tablespoons grated Parmesan, 2 tablespoons dry nonfat milk, and 1/4 cup chopped parsley leaves. Set aside.
- Cook Lasagna Noodles: Boil 8 whole wheat lasagna noodles in salted water until al dente. Drain, rinse with cold water to prevent sticking, and lay flat on a clean surface.
- Make Ricotta Filling: In a mixing bowl, combine 1 cup lowfat ricotta, 1 teaspoon kosher salt, freshly ground black pepper, 1/8 teaspoon cayenne pepper, 1/8 teaspoon freshly ground nutmeg, 1 tablespoon grated Parmesan, and 1 (10-ounce) box chopped defrosted and thoroughly drained spinach. Mix well.
- Assemble Lasagna Roll-Ups: Spread a thin layer of Portobello Ragout over each cooked lasagna noodle. Top with an even layer of the ricotta-spinach mixture. Carefully roll up each noodle tightly.
- Prepare Meatless Meatball Mixture: In another mixing bowl, combine 1 cup whole wheat bread crumbs, 1 tablespoon Parmesan cheese, 1 1/2 cups Portobello Ragout, 2 tablespoons ground toasted almonds, 1 egg white, and 1 teaspoon garlic salt. Mix until just combined.
- Form and Bake Meatless Meatballs: Shape the mixture into approximately 16 small meatballs. Place them on a nonstick cooking-sprayed baking sheet. Bake at 375°F (190°C) for 15-20 minutes, or until lightly browned and firm.
- Prepare Peas: Cook 1 (10-ounce) box frozen peas according to package directions. Season lightly with butter-flavor cooking spray.
- Prepare Peaches: Arrange 8 drained canned peach halves in individual containers. Sprinkle each with lowfat granola, ground cloves, and ground cinnamon.
- Assemble Healthy TV Dinners: In each of four individual oven-safe containers, place 2 lasagna roll-ups and a portion of the meatless meatballs. Top the lasagna roll-ups with a generous amount of fat-free pasta sauce and sprinkle with the remaining 5 teaspoons of grated Parmesan. Add a serving of seasoned peas and a prepared peach half to each container.
- Serve or Store: Heat assembled dinners in the oven or microwave until warmed through, or cool completely, cover, and refrigerate for up to 3-4 days or freeze for longer storage.
Notes
Read more about: From Cabo Sunsets to Vegas Lights: A Deep Dive into Selena Gomez’s ‘Fun But Chill’ Bachelorette & Benny Blanco’s Bachelor Parties!

9. **Malted Milkshakes**Let’s stir up some nostalgia with the malted milkshake, a creamy, dreamy concoction that once held a coveted spot in American hearts. The story of “malt” began in the 1870s when the Horlick brothers pioneered malted milk powder. This versatile ingredient even played a crucial role during the Great Depression, where malted milk, often in dried tablet form mixed with water, was a relied-upon food source, showcasing its importance beyond just a tasty treat.
Beyond its nutritional benefits, malt found a new calling in the vibrant world of soda fountains. These bustling establishments, which aimed to lure customers away from the allure of saloons, embraced malt as a key ingredient, elevating simple milkshakes into something truly special. The distinctive, slightly nutty, and sweet flavor of malt added a layer of complexity and richness that made these milkshakes an instant hit, becoming a beloved indulgence and a symbol of wholesome fun.
For generations, the ice cream parlor and soda fountain were quintessential American social hubs, and the malted milkshake was often the star attraction. It was a refreshing treat, a delightful escape, and a fixture in popular culture, from Hollywood movies to casual meet-ups. The unique texture and flavor of a perfectly blended malted milkshake were an experience in themselves, promising a moment of pure, unadulterated enjoyment with every sip.
Alas, as with many beloved institutions, the interest in traditional ice cream parlors and soda fountains began to decline. This cultural shift inevitably led to a decline in the once-ubiquitous malted milkshake. While you might still find them at some retro diners or specialty shops, malted milk options are not regularly seen on abundant grocery shelves anymore, signaling their retreat from mainstream popularity. It’s a poignant reminder of how changing social habits and dining landscapes can quietly diminish even the most cherished of treats.

Bittersweet Chocolate Malted Milkshakes recipes
Ingredients
Equipment
Method
- In a small saucepan, gently heat 1/3 cup heavy whipping cream over medium-low heat until it just begins to simmer.
- Remove the saucepan from the heat and immediately add 4 oz. chopped bittersweet chocolate and 1 shot espresso.
- Let it sit for 1-2 minutes to allow the chocolate to melt, then whisk until completely smooth and glossy to form the ganache.
- Allow the ganache to cool slightly, ensuring it’s not hot when added to the ice cream.
- In a high-speed blender, combine 1 pint vanilla ice cream, 2 tablespoons malted milk powder, a small pinch of kosher salt, and the cooled chocolate ganache.
- Blend on high speed until the mixture is thoroughly smooth and creamy, scraping down the sides as needed.
- If the milkshake is too thick, add a small splash of milk (not provided, but common) and blend again to reach your desired consistency.
- Pour the blended milkshakes evenly into two serving glasses.
- Garnish generously with 2-3 tablespoons of finely chopped Whoppers candies.
- Serve immediately to enjoy the cold, creamy, and crunchy texture.
Notes
Read more about: Unlocking the Five Guys Universe: How Digital Innovation Transforms Your Custom Burger Experience

10. **Ovaltine**Speaking of comforting beverages, who remembers Ovaltine? This iconic chocolate powder, originally founded in Switzerland in 1904, made its way to the U.S. market as early as 1915, quickly becoming a household staple across America. It wasn’t just a delicious drink; it was marketed as a powerhouse of nutrition, a win-win for parents and kids alike!
Ovaltine’s recipe was a carefully crafted blend of whey, malt, cocoa, and sugar (often corn syrup), designed to be mixed with either hot or cold milk. This made it an incredibly versatile beverage, perfect for a cozy evening treat or a refreshing cold drink on a warm day. The appeal wasn’t solely in its delightful chocolatey flavor, but also in its impressive nutritional profile. It proudly boasted 12 vitamins and minerals, and when mixed with eight ounces of milk, it provided a whopping 40% of the recommended daily intake of calcium. Talk about a super drink!
For decades, Ovaltine held a prominent place in American pantries, a trusted name synonymous with both taste and health. It was the kind of drink that evoked feelings of warmth, comfort, and well-being, often a cherished part of childhood memories. Its widespread availability and consistent marketing as a nutritious option helped solidify its position as a go-to beverage for many families seeking a wholesome and tasty treat.
However, even the most established brands can face shifting tides in consumer preferences. After being acquired by Nestle in 2007, Ovaltine hasn’t maintained the same level of widespread popularity it once enjoyed in American kitchens. While still available in stores, it’s no longer the ubiquitous pantry item it once was, largely overshadowed by a vast array of new, trendy, and often more specialized health drinks or gourmet cocoa options. It’s a testament to how even strong brand loyalty can be challenged by an ever-evolving market!

Ovaltine Pudding With Honeyed Rice Krispies
Ingredients
Equipment
Method
- In a small bowl, sprinkle the unflavored powdered gelatin over 1 cup of milk and let it sit for 5-10 minutes to bloom.
- In a medium saucepan, combine the heavy cream, Ovaltine powder, vanilla bean (split with seeds scraped and added), and kosher salt. Heat over medium heat, stirring occasionally, until just simmering and the Ovaltine is dissolved. Remove the vanilla pod.
- Add the bloomed gelatin mixture to the warm cream mixture, whisking constantly until the gelatin is fully dissolved and no lumps remain.
- Place the finely chopped bittersweet chocolate in a heatproof bowl. Pour the hot cream mixture over the chocolate, let it sit for a minute, then whisk gently from the center outwards until the chocolate is fully melted and the mixture is smooth and glossy.
- Pour the pudding mixture into individual serving ramekins or glasses. Chill in the refrigerator for at least 4 hours, or preferably overnight, until set.
- In a small saucepan, combine the sugar, honey, and unsalted butter. Cook over medium heat, stirring until the butter is melted and the mixture comes to a gentle boil.
- Remove from heat, add the crisped rice cereal, and stir quickly to coat evenly. Spread the coated cereal onto a piece of parchment paper to cool and crisp up.
- Once the pudding is set and the honeyed Rice Krispies are cooled and crunchy, top each pudding with a generous spoonful of the cereal mixture.
- Serve immediately, optionally with a dollop of whipped cream.
Notes
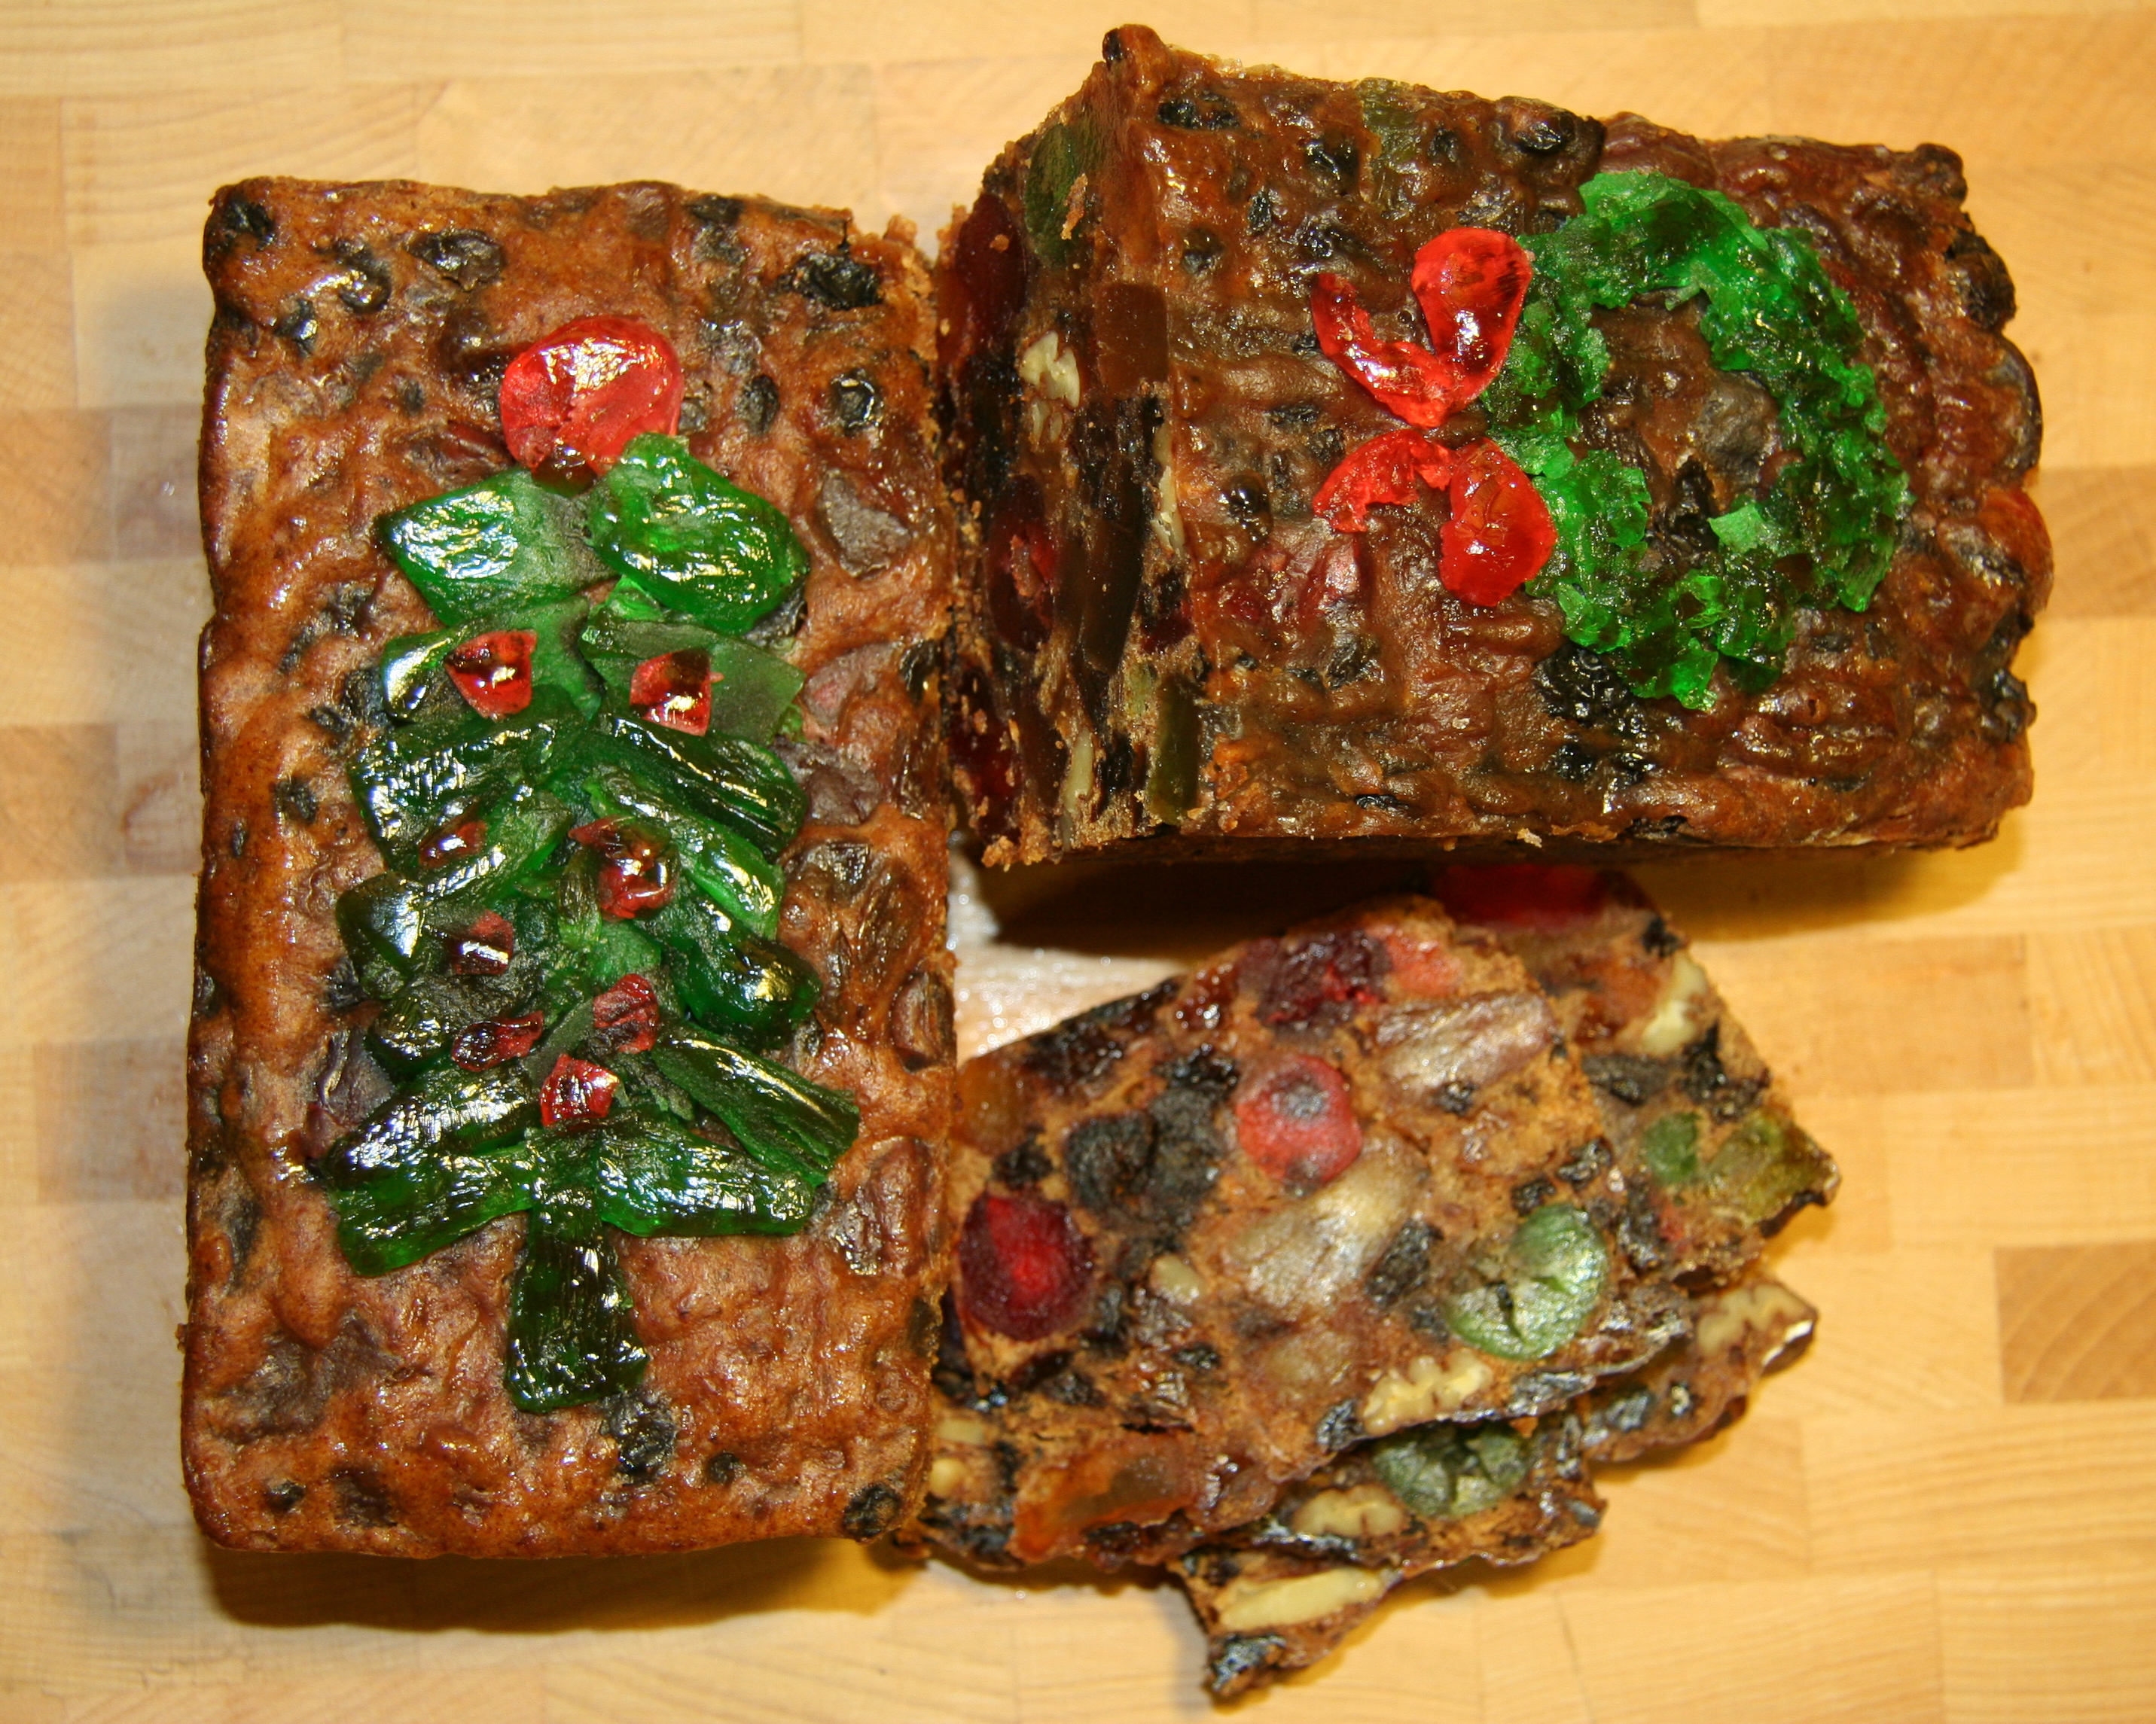
11. **Fruitcake**Let’s address the elephant in the room, or rather, the heavily debated, much-maligned, yet undeniably classic fruitcake. This festive treat has a truly ancient lineage, with versions dating back to Roman times, where it began as a sweet energy bar packed with barley, honey, pomegranate seeds, wine, and dried fruit. Throughout history, different cultures and countries developed their own unique takes, solidifying its role as a ubiquitous sweet treat, especially during the holidays, and famously even served at royal weddings!
For many generations in America, fruitcake was a cherished holiday tradition. Families would devote entire afternoons to the meticulous process of assembling and baking these dense, often boozy, cakes, studded generously with candied fruits and nuts. Others, perhaps less culinarily inclined, would place orders with specialty bakeries months in advance, eagerly anticipating their arrival. It was a labor of love, a centerpiece of holiday cheer, and for some, the true taste of Christmas.
So, what happened to this once-celebrated delicacy? Oh, how the mighty have fallen! The decline in fruitcake’s popularity can be attributed to a confluence of factors. As consumer tastes evolved, the home-baked allure of fruitcakes fell victim to dry, often bland, mass-produced versions. These industrially produced cakes, lacking the rich moisture and nuanced flavors of their homemade counterparts, sadly earned fruitcake a rather unfortunate reputation.
This reputation quickly spiraled, leading to fruitcakes becoming the quintessential unwanted gift, often regifted for years and the subject of countless jokes and memes. In a recent Mashed survey, a staggering 43% of participants chose fruitcake as the holiday dessert they’d *least* like to see at a Christmas party, officially making it the most disliked dessert in the ranking. While some traditionalists still champion its unique charm, for the majority of modern Americans, the fruitcake remains a nostalgic curiosity, more famous for its longevity than its deliciousness. It’s a classic example of how a once-loved staple can become a culinary punchline!

Fruitcake Parfaits
Ingredients
Equipment
Method
- Thaw the frozen blueberries in a bowl and drain any excess liquid to prevent a watery parfait.
- Using a chef’s knife and cutting board, carefully cut the fruitcake into small, bite-sized pieces or crumble it into a bowl.
- If desired, lightly sweeten the plain yogurt with a touch of honey or maple syrup and stir until well combined.
- Take your chosen parfait glasses or serving dishes and prepare them for layering.
- Begin by placing an even layer of crumbled fruitcake at the bottom of each glass.
- Follow with a generous layer of the prepared plain yogurt.
- Next, add a layer of the thawed blueberries over the yogurt.
- Repeat the layers: fruitcake, then yogurt, then blueberries, until the glasses are full.
- Ensure the top layer is aesthetically pleasing, typically ending with blueberries for color.
- For best results, chill the parfaits for at least 15-20 minutes before serving to allow flavors to meld. Serve immediately.
Notes

12. **Necco Wafers**Finally, let’s talk about a candy that truly takes us back: Necco Wafers! These small, colorful, sugar-coated candy discs were named for the New England Confectionery Company, the sweet empire where they originated. The story goes that in 1847, Oliver R. Chase, one of Necco’s founding owners, created a machine that could press and print candy, revolutionizing confectionery production and paving the way for these iconic wafers.
For a long time, Necco Wafers weren’t just a casual candy; they were a significant part of American history. Imagine this: the wafer was so incredibly popular and practical that the U.S. government actually bought an entire year’s production worth of the candy to pack away for soldiers fighting in World War I! Their durability and simple sweetness made them an ideal, morale-boosting treat for troops far from home, cementing their place in the hearts of many Americans.
These unassuming discs, with their subtle fruit and spice flavors – from wintergreen to chocolate – offered a unique, slightly chalky texture that was distinct from other candies. For generations, they were a familiar presence in candy aisles and corner stores, a simple, affordable pleasure that brought a moment of sweet satisfaction. They were a taste of Americana, a confectionery classic that seemed destined to last forever.
However, the candy landscape, much like our food tables, has undergone an immense transformation. With shelves now overflowing with an dizzying array of chocolate bars, gummy delights, sour sensations, and innovative new treats, the humble Necco wafer has found itself increasingly overshadowed and, sadly, long forgotten by many. Yet, despite its diminished presence, it remains deeply beloved by those who grew up snacking on this sugary sweet treat, holding a special place in the pantheon of nostalgic candies. It’s a heartwarming reminder that while new trends emerge, the classics, even if rare, never truly lose their charm for those who remember them fondly.
Marvelous Valentine’s Recipe: Strawberry Milk Cake
Ingredients
Equipment
Method
- Preheat your oven to 350°F (175°C) and prepare two 9-inch round cake pans by greasing and flouring them.
- Scald the strawberry milk in a small saucepan over medium heat until small bubbles form around the edges; set aside to cool slightly.
- In a large mixing bowl, cream together the 1/4 cup butter and 1 3/4 cups sugar until light and fluffy.
- Beat in the two eggs one at a time, ensuring each is fully incorporated before adding the next, then stir in 1 teaspoon vanilla.
- In a separate bowl, whisk together the 2 1/2 cups flour, 2 teaspoons baking powder, and 1/2 teaspoon salt.
- Gradually add the dry ingredients to the creamed mixture alternately with the cooled scalded strawberry milk, beginning and ending with the dry ingredients, mixing until just combined.
- Divide the batter evenly between the prepared cake pans and bake for 25-30 minutes, or until a wooden skewer inserted into the center comes out clean. Let cool in pans for 10 minutes, then invert onto a wire rack to cool completely.
- For the frosting, beat the room temperature cream cheese, 1/3 cup sugar, 1 teaspoon vanilla extract, and 1/2 teaspoon almond extract in a bowl until smooth and creamy.
- In a separate chilled bowl, whip the 2 cups heavy cream until stiff peaks form. Gently fold the whipped cream into the cream cheese mixture until combined; add food coloring if desired for a pink hue.
- Once the cake layers are completely cool, frost the cake generously with the cream cheese frosting and decorate with optional Necco wafers or fresh strawberries.
Notes
2. When scalding the strawberry milk, heat it until small bubbles form around the edges, but do not boil. Let it cool slightly before incorporating into the batter to avoid cooking the eggs.
3. Do not overmix the cake batter once the flour is added; mix only until just combined to ensure a tender crumb. Overmixing develops gluten, leading to a tough cake.
4. For a natural strawberry flavor and color, consider steeping fresh or frozen strawberry puree in the milk before scalding, then straining, or use a high-quality strawberry extract.
And there you have it, folks! Another deep dive into the fascinating, sometimes bewildering, world of America’s forgotten foods. From historic culinary staples to nostalgic candy store favorites, it’s clear that our tastes are always evolving, shaped by everything from convenience and health trends to cultural shifts and even historical events. So, the next time you’re browsing the grocery aisles, take a moment to consider the culinary history around you – who knows what once-beloved dish might make a comeback, or what new trend might someday become a forgotten relic? Until next time, keep those palates curious!


