

There is a common scenario that unfolds in kitchens everywhere: the initial excitement of purchasing a fresh bunch of vibrant herbs, intended for a single recipe, swiftly gives way to the familiar sight of those delicate leaves wilting in the crisper drawer. Whether you are a seasoned home cook or just embarking on your culinary journey, that moment of gazing at unused herbs, knowing they will eventually go to waste, can be truly frustrating. It is not merely about the monetary cost; it pertains to the lost potential for flavor and the unsettling feeling of contributing to food waste.
This widespread inconvenience is exacerbated by the remarkable accessibility of fresh produce today, ranging from convenient meal – kit services to effortless online grocery shopping. While this convenience is a boon for busy lives, it often results in our acquiring larger quantities of herbs than a single dish might necessitate. The problem of food waste, as emphasized by the United States Department of Agriculture (USDA), is indeed significant, with an alarming one – third of all food produced in the United States going uneaten. This is not just an abstract statistic; it equates to an estimated $1,500 worth of food per year for the average American family, a tangible financial drain and an unnecessary burden on our environment.
But here is the wonderful news: this does not have to be the ongoing saga in your kitchen. The possibilities for transforming those leftover herbs into something delicious, useful, and waste – reducing are truly limitless. By embracing a bit of creativity and adopting some practical tips and tricks, you can unlock a world of flavor, stretch your grocery budget further, and make a tangible positive impact on minimizing food waste. Let us delve into some of the most effective and imaginative ways to give those forgotten herbs a vibrant new lease on life.

1. **Freezing Herbs for Later** When it comes to effortlessly preserving the fleeting freshness of herbs, freezing emerges as a wonderfully simple yet remarkably effective method. This approach enables you to capture the vibrant essence of your herbs at their peak, thereby making them available for use long after their initial purchase. The process is straightforward: simply chop your desired herbs and then transfer them into an airtight container or a reliable freezer bag. Ensuring that the container is truly airtight is of crucial importance, as this prevents moisture from entering and safeguards the herbs against freezer burn, which can impair their texture and flavor. Once properly sealed, they can be stored in your freezer, ready for use when inspiration strikes. While frozen herbs might lose a bit of their crispness, they retain their aromatic qualities exquisitely, making them ideal additions to simmering soups, hearty stews, or rich sauces, where their flavor can fully permeate into the dish. They are also perfectly suitable for subsequent use in creating herb – infused oils and vinegars, enhancing their versatility.
For an even more creative and convenient freezing technique, consider preparing herb ice cubes. This method streamlines the cooking process by pre – portioning your herbs, enabling you to simply drop a cube into your dish for an instant burst of fresh flavor without any additional chopping. To prepare these, finely chop your herbs and then evenly distribute them into the compartments of an ice cube tray. You can then fill each well with water, or for an added layer of flavor and utility, use olive oil. Once frozen solid, these herb – packed cubes can be removed and transferred into a larger freezer bag for more compact storage. This ingenious trick is particularly beneficial for dishes such as soups, stews, and sauces, providing a quick and hassle – free way to incorporate a fresh element.
The beauty of freezing herbs, whether chopped or in convenient ice cube form, resides in its ability to significantly reduce food waste by offering a practical solution for those surplus bunches. It ensures that the delightful flavors of fresh herbs are always within reach, ready to elevate your culinary creations throughout the year. This simple act of preservation not only maximizes your grocery investment but also adds a touch of spontaneous gourmet flair to your everyday cooking, making it a truly invaluable tip for any home kitchen aiming for efficiency and flavor.

Vietnamese Chicken Curry
Ingredients
Equipment
Method
- Pat chicken thighs and/or drumsticks dry and season lightly with salt and pepper.
- Heat vegetable oil in a large stock pot or Dutch oven over medium-high heat. Brown chicken pieces on all sides until golden, then remove and set aside.
- Reduce heat to medium. Add minced garlic, curry powder, and onion wedges to the pot, sautéing until fragrant, about 2-3 minutes.
- Stir in tomato paste or sauce, lemongrass, ginger, and bay leaves, cooking for another 2 minutes.
- Return the browned chicken to the pot. Add water, sugar, and 2 tablespoons of fish sauce. Bring to a simmer.
- Add the peeled and large-chunked potatoes, taro, and carrots to the pot. Ensure vegetables are submerged.
- Cover and simmer for 30-40 minutes, or until chicken is tender and vegetables are cooked through.
- Stir in the can of coconut milk. Simmer gently for another 5-10 minutes, allowing flavors to meld and the curry to thicken slightly.
- Remove lemongrass stalks and bay leaves. Taste and adjust seasoning with additional fish sauce, salt, or sugar as needed.
- Serve hot, garnished generously with fresh herbs (cilantro, scallions, Asian basil) and a lemon wedge on the side.
Notes
2. **Dehydrating Your Herbs** Dehydrating herbs presents another highly effective strategy for long – term preservation, enabling you to substantially prolong their usable life well beyond their fresh state. This method fundamentally operates by eliminating the moisture content from the herbs, which, in turn, inhibits spoilage and allows you to store them for extended durations, far exceeding the lifespan of fresh herbs. Once dehydrated, these herbs are transformed into concentrated flavor powerhouses, rendering them ideal for a wide range of culinary applications, ranging from creating aromatic teas to enhancing the depth of flavor in soups and stews, or even acting as the basis for custom spice blends that mirror your unique taste.
The process of dehydrating herbs is relatively accessible, even in the absence of specialized equipment. While a food dehydrator provides the most controlled and efficient method, your standard kitchen oven can function as a suitable alternative. When utilizing the oven, it is crucial to set it to the absolute lowest temperature to prevent the herbs from burning rather than drying gently. Simply spread the herbs on a baking sheet in a single layer and permit them to dry for several hours, inspecting them periodically to ensure they are not scorching. Another appealing, more traditional method involves binding small bunches of herbs with kitchen twine and hanging them upside down in a well – ventilated area, although warmth and humidity can hinder this process. Once fully dehydrated and brittle enough to crumble easily, they can be stored in airtight containers, where they will retain their potency for up to six months.
One particularly creative application for your dehydrated herbs is to concoct bespoke herb tea blends. By amalgamating these dried herbs with other complementary herbs and spices, you can create unique and delectable infusions that are far more personalized than store – bought varieties. Envision a soothing blend of dried mint and chamomile, or a warming mix of dried thyme and ginger. Beyond beverages, these dehydrated herbs can be seamlessly incorporated into your slow – cooked dishes, infusing them with a profound, earthy flavor that fresh herbs might not be able to deliver in the same manner. This method not only combats food waste but also opens up exciting prospects for culinary experimentation and self – sufficiency in your kitchen.
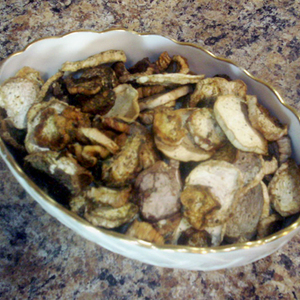
Dehydrated King Oyster Mushrooms
Ingredients
Equipment
Method
- Gently clean the king oyster mushrooms with a dry brush or a damp cloth, avoiding rinsing them under water to prevent them from absorbing excess moisture.
- Trim the very ends of the mushroom stems and then slice the mushrooms uniformly into approximately 1/4-inch thick rounds or planks to ensure even drying.
- Arrange the sliced mushrooms in a single layer on the trays of your food dehydrator, ensuring there is no overlapping to allow for proper air circulation.
- Lightly mist the arranged mushroom slices with garlic spray, ensuring even coverage without oversaturating them.
- Evenly sprinkle your chosen mixed herbs over the garlic-sprayed mushroom slices.
- Set the food dehydrator to the recommended temperature for mushrooms (typically 125-135°F or 52-57°C) and begin the drying process.
- Dehydrate the mushrooms for approximately 7 to 8 hours, or until they are completely dry, brittle, and snap easily when bent.
- Once dried, turn off the dehydrator and allow the mushrooms to cool completely to room temperature on the trays.
- Transfer the fully cooled and dried king oyster mushrooms into a clean, airtight container or jar for long-term storage in a cool, dark place.
Notes

3. **Crafting Herb Butters and Oils** Elevating your dishes while simultaneously preserving your surplus herbs is delightfully straightforward when you transform them into herb butters and oils. These versatile concoctions are not only exceptional for prolonging the lifespan of your fresh greens but also impart a concentrated burst of flavor to a wide array of meals. The process itself is remarkably uncomplicated: for herb butter, start with softened butter, then thoroughly blend in your finely chopped herbs. Once combined, this mixture can be molded into a log or roll, tightly wrapped in plastic wrap or wax paper, and subsequently stored in the refrigerator. It will remain in excellent condition for up to two weeks, offering a ready – to – use flavor enhancer. Similarly, for herb – infused oils, simply combine your chopped herbs with your selected oil in a jar, allowing the flavors to meld.
The culinary applications for these herb – infused creations are virtually limitless, turning ordinary ingredients into something truly extraordinary. Herb butters are ideal for spreading over warm, crusty breads, melting over grilled vegetables, or finishing a perfectly seared piece of meat, adding a rich, aromatic depth. Envision a garlic – herb butter melting over a fresh – off – the – grill steak, or a dill – infused butter enhancing steamed new potatoes. Herb – infused oils, on the other hand, can be drizzled over salads for an instant flavor boost, used as a base for marinades, or applied as a sophisticated finishing touch for soups and sauces, bestowing a delicate, nuanced flavor. They enable you to add that gourmet touch with minimal effort, making your home – cooked meals feel exceptionally refined and flavorful.
Beyond their immediate palatability, crafting herb butters and oils is an ingenious approach to addressing the common issue of leftover herbs. Instead of observing them wilt away, you transform them into valuable pantry essentials that are both practical and extremely flavorful. This method not only helps you save money by minimizing waste but also ensures you have access to vibrant, herb – laden flavors whenever you require them. They represent a smart, sustainable, and utterly delectable solution for making the most of every last leaf from your fresh herb harvest.
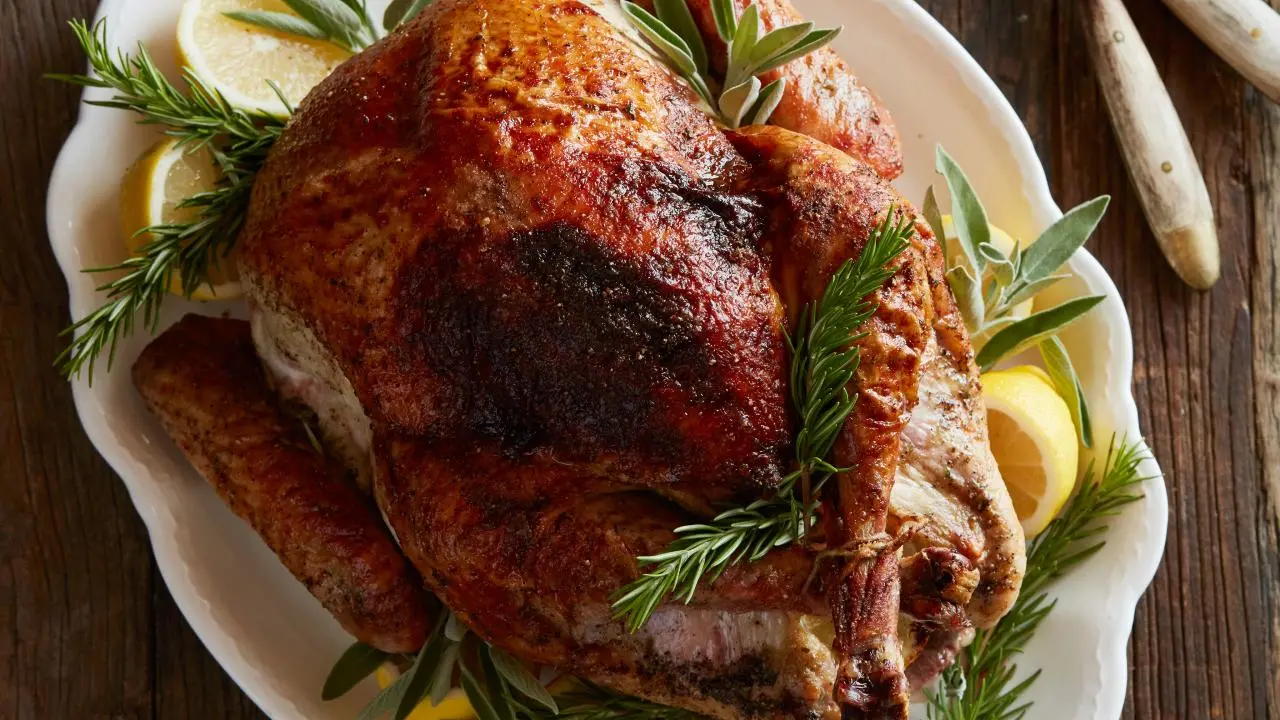
Roasted Butter Herb Turkey
Ingredients
Equipment
Method
- In a small bowl, combine softened butter, poultry seasoning, garlic herb sauce mix, and crushed garlic. Use a fork to mix together until well combined. Cover and put in the refrigerator for 15 to 30 minutes, until firm but not hard.
- Preheat the oven to 450 degrees F.
- Arrange celery, carrots, and half of the diced onions in the bottom of a roasting pan. Add chicken broth and set aside.
- Rinse the thawed turkey and pat dry. Use your finger to carefully loosen the skin around the entire bird. Take the butter mixture and cut into large pieces. Place the butter pieces under the skin of the entire turkey. Rub the remaining butter pieces on the outside of the skin and season with salt and pepper. Stuff the inside of turkey cavity with remaining onions, fresh herb poultry blend, and lemon slices. (Truss if necessary.) Insert the pop-up thermometer at an angle about 3-inches down from the neck cavity and 2-inches from the breast bone, in the thickest part of the breast.
- Place turkey on the bed of vegetables in roasting pan. Place in the oven and reduce temperature to 325 degrees F. Roast for 1 hour, then baste with pan juices every 20 minutes until thermometer pops up or until an instant-read thermometer inserted into the thigh registers 180 degrees F, about 3 hours.
Notes
4. **Creating Herb-Infused Vinegars** Dipping into the world of herb-infused vinegars is a delightful and highly effective way to utilize those lingering leftover herbs, transforming them into a sophisticated and flavorful pantry staple. This method not only prevents good herbs from going to waste but also allows you to create unique flavor profiles that can elevate a wide array of dishes. The beauty of crafting herb-infused vinegars lies in its simplicity: all you need are your fresh, chopped herbs and a good quality vinegar, such as white wine vinegar, apple cider vinegar, or even a milder rice vinegar. Simply combine the chopped herbs with your chosen vinegar in a clean jar, ensuring the herbs are fully submerged. Once sealed, the mixture is stored in the refrigerator, allowing the flavors to meld beautifully over approximately two weeks.
The versatility of these homemade herb-infused vinegars in the kitchen is truly impressive. They are absolutely perfect for bringing a bright, zesty, and herbaceous note to your salads, acting as the star component in vibrant vinaigrettes. Imagine a basil-infused vinegar adding a sweet and peppery kick to a caprese salad, or a dill-infused vinegar brightening a potato salad. Beyond salads, they can be a secret ingredient in your soups and sauces, lending an unexpected depth and tang. You’re also encouraged to experiment further by adding other complementary ingredients directly into the jar, such as whole garlic cloves, peppercorns, or even a slice of lemon or chili, to craft truly unique and multi-layered flavor combinations that cater to your palate.
By turning your surplus herbs into these exquisite infused vinegars, you’re not just saving food; you’re cultivating a more resourceful and creative approach to cooking. This method epitomizes the joy of making something special from what might otherwise be discarded, allowing you to enjoy the fresh, nuanced flavors of herbs long after their initial harvest. It’s a testament to how simple kitchen techniques can lead to profound culinary rewards, ensuring that every sprig of your fresh herbs finds its purpose, adding a delightful zest to your daily meals and reducing your kitchen’s carbon footprint.
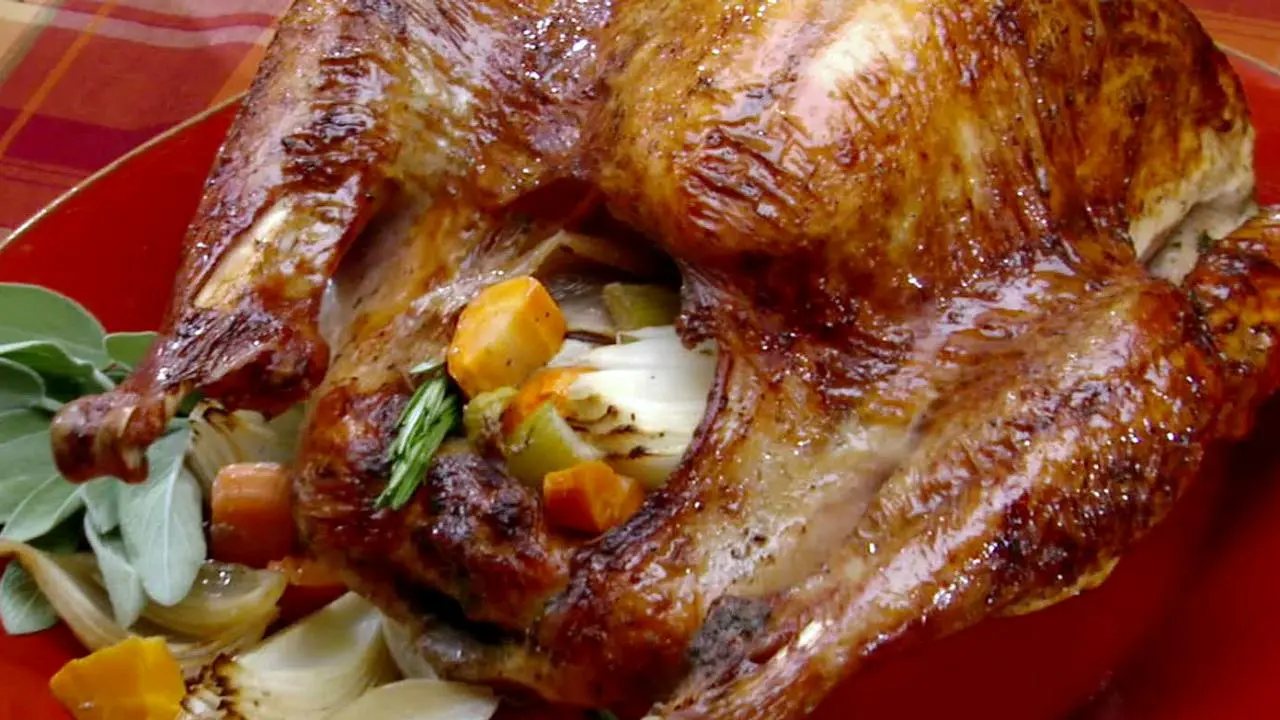
Thanksgiving Pioneer-Style Herb Roasted Turkey
Ingredients
Equipment
Method
- For the turkey: Remove the turkey from the refrigerator 1 hour before roasting.
- Combine the butter, sage, rosemary, thyme, and parsley in a food processor and process until smooth. Season with salt and pepper.
- Preheat the oven to 450 degrees F.
- Season the cavity of the turkey with salt and pepper and fill the cavity with half of the carrots, celery, and onion. Rub the entire turkey with herb butter and season liberally with salt and pepper.
- Put 4 cups of the chicken stock in a medium saucepan and keep warm over low heat.
- Place the remaining vegetables on the bottom of a large roasting pan. Put the turkey on top of the vegetables, put in the oven, and roast in the oven until lightly golden brown, 45 minutes. Reduce the heat to 350 degrees F and continue roasting, basting with the warm chicken stock every 15 minutes, until an instant-read thermometer inserted in the thigh registers 160 degrees F, about 2 to 2 1/4 hours longer. Remove the turkey from the oven, transfer to baking sheet and tent loosely with foil, and let rest 20 minutes before slicing.
- For the sage gravy:
- Strain the cooking liquid from the roasting pan into a medium saucepan (should be about 4 cups, if not, add more stock to make 4 cups). Add the neck, bring to a boil, add the sage leaves, remove from the heat, and let steep for 15 minutes. Remove the sage leaves.
- Melt the butter in a medium saucepan over medium-high heat. Add the flour and cook for 1 minute. Add the wine and cook until reduced. Whisk in the stock and cook until thickened and smooth, about 5 minutes. Season with the salt and pepper and chopped sage.
Notes
5. **Boosting Soups and Stews** One of the most intuitive and gratifying ways to ensure that no fresh herb goes unappreciated is by incorporating them directly into your comforting soups and hearty stews. This method is not only incredibly straightforward but also remarkably efficacious in infusing your slow – cooked dishes with a profound depth of flavor and a delightful aroma. The process is as simple as it can be: simply chop your desired herbs—whether it is robust rosemary, earthy thyme, bright parsley, or aromatic bay leaves—and add them to the pot along with your other ingredients as your soup or stew gently simmers. As the liquids bubble and the flavors meld, the herbs will gradually release their essence, imbuing the entire dish with their distinctive character.
For optimal flavor development in your soups and stews, consider employing a thoughtful assortment of herbs to create a balanced and harmonious profile. For instance, a combination of parsley, thyme, and bay leaf forms a classic aromatic base, while a touch of fresh dill or cilantro added towards the end can impart a burst of freshness. This approach also pairs exquisitely with previously preserved herbs; if you have made those convenient herb ice cubes, they are an absolute game – changer here, enabling you to drop a frozen cube directly into the pot for an instant dose of flavor without any fresh chopping required. Similarly, frozen chopped herbs or even your homemade dried herbs can be equally efficacious, offering flexibility depending on what you have available.
Taking this concept a step further, you can also craft dedicated herb – infused soups, where the herbs assume a more central, starring role rather than just a supporting one. Envision a light, aromatic broth infused predominantly with fresh basil and mint, or a rich, savory soup highlighting sage and rosemary. To create these, simply combine a generous amount of chopped herbs with your chosen broth and other foundational ingredients, then allow the mixture to gently simmer. This slow infusion process allows the full character of the herbs to develop, resulting in a soup that is truly defined by their fresh, vibrant notes. These herb – infused soups are ideal for adding unique and comforting flavors to any meal, transforming everyday ingredients into something truly unforgettable.
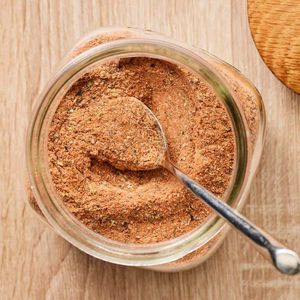
Creole Seasoning Blend
Ingredients
Equipment
Method
- Gather and accurately measure all specified dried spices: paprika, salt, onion powder, garlic powder, dried oregano, dried basil, dried thyme, black pepper, white pepper, and cayenne pepper.
- Transfer all measured spices into a medium-sized mixing bowl, ensuring all ingredients are added.
- Using a whisk or a fork, thoroughly combine the spices in the bowl. Whisk vigorously for 1-2 minutes to ensure an even distribution of all ingredients and to break up any potential clumps.
- Once fully blended, carefully transfer the homemade Creole seasoning into a clean, airtight container. A funnel can be helpful for this step if using a container with a small opening.
- Securely seal the container and store it in a cool, dark pantry or cupboard away from direct sunlight and heat to maintain its freshness and potency for up to 6 months.
Notes

6. **Elevating Dishes with Herb Garnish** Beyond their role as a fundamental ingredient, fresh herbs possess an incredible capacity to transform a dish when employed as a garnish, providing both a vibrant burst of color and an immediate infusion of fresh flavor. It is a simple act that can elevate the entire presentation and taste experience of your meal, rendering it more thoughtful and complete. The technique is straightforward: once your dish is prepared, simply chop the herbs—perhaps a delicate chiffonade of basil, a finely minced sprinkle of parsley, or a few whole, pristine mint leaves—and artfully sprinkle them over the top. This finishing touch works wonders on an array of dishes, from a steaming bowl of pasta to a crisp green salad, or even a rich, creamy sauce, instantly brightening its appearance and adding a fresh aromatic layer.
When selecting herbs for garnishing, the key is to choose varieties that not only add visual appeal but also complement and enhance the existing flavors of your dish. Consider it as the final note in a symphony of tastes. For instance, the clean, slightly peppery taste of fresh parsley renders it an ideal garnish for almost any savory dish, including robust soups, roasted vegetables, and simple salads. On the other hand, the sweet, aromatic essence of basil is indispensable for Italian – inspired pasta dishes and vibrant caprese salads, while cilantro offers a bright, citrusy counterpoint to many Mexican and Asian cuisines. The right herb can round out the flavor profile, adding that crucial element of freshness that balances the richness of other ingredients.
Do not be misled into thinking that garnishing is a skill reserved solely for professional chefs or fancy restaurant meals; it is a practice that can be easily adopted in any home kitchen. Finishing a home – cooked meal with a thoughtfully placed sprinkle of fresh herbs adds a light, fresh flavor note that can truly impress your family and friends. To ensure the best results, it is always advisable to finely chop your chosen herbs just before you are ready to garnish, as this prevents bruising and wilting, especially for more tender varieties like basil, parsley, and cilantro. Also, remember to add your garnish just before serving and keep it away from intense heat sources, which can cause the delicate leaves to wilt prematurely and lose their vibrant appeal. This simple step can turn an everyday meal into a culinary showstopper.
Beyond the foundational methods of preserving and cooking with herbs we have just explored, the journey towards a zero – waste, flavor – packed kitchen continues with even more ingenious and sometimes unexpected uses for your leftover greens. It is about cultivating a resourceful mindset, pushing the boundaries of traditional cooking, and even extending the benefits of herbs beyond the plate, nurturing both your pantry and your well – being. These next methods delve deeper into creative culinary applications and even surprising self – care rituals, ensuring every precious leaf finds its purpose.

Parmigiano and Herb Chicken Breast Tenders
Ingredients
Equipment
Method
- Preheat oven to 350 degrees F. Place a nonstick cookie sheet in oven with a tin foil liner.
- Heat 1/2-inch oil in a large nonstick skillet or frying pan over medium to medium high heat.
- Season chicken tenders with salt and pepper. Wash hands. Place flour in a shallow dish. Beat eggs with water in a second dish along side the flour. In a third dish, combine the breading ingredients. Coat chicken in flour, then egg, then bread and cheese mixture. To keep your hands clean, ask for plastic gloves at the butcher counter. To ease your clean up, try using disposable tin pie tins for the flour, egg and bread crumbs.
- Cook chicken until deeply golden on each side, 3 to 4 minutes. Transfer to cookie sheet in preheated oven and finish off for another 5 minutes cooking time. Cook chicken 5 or 6 tenders at a time in a single layer, adding additional oil if necessary. If the chicken begins to brown too quickly lower heat slightly. Serve chicken hot or cold with green salad or, complete as a Parmigiano.
Notes
7. **Making a Kitchen Scrap Stock** Embracing the philosophy of “no waste” in the kitchen frequently results in delightful discoveries, and one of the most gratifying aspects is creating your own kitchen scrap stock. This method serves as an absolute game – changer for reducing food waste, transforming what might typically be discarded into a profoundly flavorful foundation for numerous dishes. It involves recognizing the latent potential in everyday discards, ranging from onion skins and celery ends to, of course, those surplus herbs. Woody varieties such as rosemary, sage, and thyme, along with the versatile parsley, are particularly outstanding additions, imparting a robust and aromatic depth to your homemade stock.
The process itself could not be simpler, epitomizing the practical and accessible approach that characterizes truly intelligent cooking. You can keep a designated plastic ziplock bag in your freezer, a convenient repository for all your suitable kitchen scraps. Once the bag is sufficiently full, the magic commences: simply transfer its contents into a large stock pot, cover it generously with water, and allow it to simmer gently for a few hours on the stove. This slow, steady infusion extracts every bit of flavor from the ingredients, yielding a rich, savory stock that far outstrips store – bought versions in terms of taste and nutritional value.
The true charm of homemade stock, beyond its superior flavor, resides in its incredible versatility and contribution to minimizing waste. Once your aromatic liquid has cooled, it can be strained and then frozen in convenient 1 – cup portions, ensuring that you always have a natural flavor enhancer at your disposal for any recipe that requires it. Whether it serves as the base for a comforting soup, a simmering sauce, or a flavorful grain, this method stands as a testament to how simple kitchen techniques can lead to profound culinary and environmental benefits, guaranteeing that no flavorful scrap or herb sprig ever goes to waste.
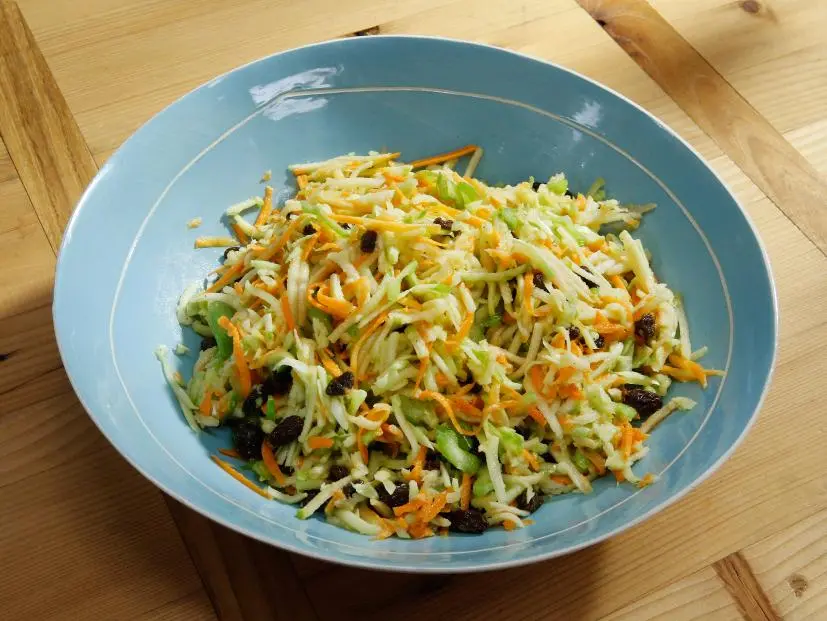
Scrap Salad
Ingredients
Equipment
Method
- Grate the carrots, apples and broccoli stems into a medium bowl. Add the raisins and celery and toss to combine.
- In a separate bowl, whisk together the apple cider vinegar, olive oil, mustard, salt and some pepper. Pour the dressing into the scrap salad to coat, adding as little or as much as you like.
Notes
2. When grating, vary the pressure to get a mix of finer and coarser shreds, which adds complexity to the salad's texture. For apples, grate just before mixing to minimize browning.
3. The dressing is simple but effective. For a richer, more emulsified vinaigrette, slowly drizzle the olive oil into the vinegar and mustard while continuously whisking. Taste and adjust seasoning; a touch of maple syrup or honey can balance the acidity if desired.
4. This salad is highly adaptable. Consider adding toasted nuts (walnuts, pecans) or seeds (sunflower, pumpkin) for extra crunch and healthy fats. Fresh herbs like parsley or cilantro can also brighten the flavor profile.
8. **Whipping Up a Pesto** When confronted with an abundance of tender herbs such as basil, parsley, cilantro, mint, or dill, one of the most dynamic and versatile solutions is to blend them into a fresh, homemade pesto. Far from being restricted solely to basil, the realm of pesto is extensive, encouraging you to experiment with any combination of your preferred green leaves. This creation serves as a testament to the potency of simple ingredients, converting surplus herbs into a concentrated flavor powerhouse that can enhance a wide array of meals with remarkable ease and swiftness.
The charm of crafting your own pesto lies in its inherent adaptability; a rigid recipe is not truly essential. At its essence, pesto merely necessitates combining your selected herbs with a nut or seed for texture, a high – quality oil to bind everything together, and optional Parmesan cheese for a savory depth. A straightforward seasoning of salt and pepper is all that is required to harmonize the flavors. This flexible formula implies that you can customize your pesto according to your specific tastes and the herbs available to you, generating unique and delectable variations each time you prepare it.
Once made, homemade pesto becomes an invaluable asset to your culinary repertoire. To extend its shelf life and guarantee that you always have a burst of fresh flavor at your disposal, consider freezing it in 1 – tablespoon portions within an ice cube tray. Once frozen solid, these convenient flavor enhancers can be transferred to a freezer bag, making them readily accessible for quick pasta dinners, as a spread for sandwiches, or even as a vibrant topping for roasted vegetables. It is an absolutely delicious and practical method of preserving freshness and minimizing waste, transforming your herb surplus into a year – round gourmet staple.
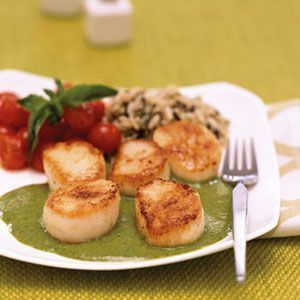
Scallops with Creamy Pesto
Ingredients
Equipment
Method
- Thoroughly pat dry the sea scallops with paper towels to remove excess moisture; this is crucial for achieving a good sear.
- Heat olive oil in a large skillet (preferably cast iron or heavy-bottomed) over medium-high heat until shimmering.
- Add scallops to the hot skillet in a single layer, ensuring not to overcrowd the pan. Cook in batches if necessary.
- Sear scallops for 1 1/2 to 2 minutes per side, until they develop a beautiful golden-brown crust and are opaque throughout.
- Remove cooked scallops from the skillet and set aside on a plate.
- Reduce heat to low. Add the prepared pesto to the same skillet, stirring to scrape up any browned bits from the bottom.
- Pour in the heavy cream and whisk constantly until the sauce is well combined and gently warmed through, about 1 minute. Do not boil.
- Return the seared scallops to the skillet with the creamy pesto sauce.
- Gently toss the scallops to coat them evenly with the sauce.
- Serve immediately, perhaps garnished with a sprinkle of fresh parsley or a lemon wedge.
Notes
9. **Infusing Drinking Water** For those instances when you have merely a few sprigs of herbs remaining, or simply desire a refreshing and naturally – flavored beverage, infusing your drinking water is an ingenious and effortless solution. This refined method not only aids in utilizing those smaller quantities of herbs but also promotes greater hydration by transforming plain water into a subtly aromatic and invigorating drink. It represents a simple act of culinary creativity that brings a spa – like refreshment directly into your home, rendering staying hydrated a genuinely enjoyable experience.
The possibilities for flavor combinations are as boundless as your imagination, enabling you to customize your infused water to your personal taste. The delightful synergy between citrus and herbs is especially noteworthy, producing wonderfully bright and uplifting concoctions. Envision the zesty punch of lime paired with the fresh earthiness of cilantro, or the soothing fragrance of lemon blending with fragrant rosemary. Even the unexpected pairing of orange with thyme can create a surprisingly harmonious and invigorating blend, demonstrating that even the simplest additions can result in truly remarkable taste experiences.
While any pitcher will suffice, the pleasure of creating these refreshing infusions is heightened by vessels specifically designed for this purpose, such as glass pitchers with cork lids that facilitate elegant display and practical storage. Beyond simple flavored water, the concept of herbal infusion can be extended to crafting more complex and potent beverages like homemade digestive bitters or fire cider for those with a bit more patience and a propensity for wellness. This innovative approach ensures that even the tiniest amount of leftover herbs can make a substantial contribution to your daily well – being and culinary pleasure, making every drop count.

Raspberry Lemon Infused Water
Ingredients
Equipment
Method
- Thoroughly wash the lemon and raspberries under cold running water.
- Slice the lemon into thin rounds. You may remove the seeds if desired.
- Gently bruise or lightly press the raspberries to help release their flavor, being careful not to crush them entirely.
- Place the lemon slices and prepared raspberries into a large pitcher or jar.
- Pour the filtered water into the pitcher, ensuring all the fruit is submerged.
- Stir the mixture gently with a long spoon to combine.
- Cover the pitcher and refrigerate for at least 2 to 4 hours to allow the flavors to infuse.
- Taste after 2 hours and adjust infusion time based on desired strength. For longer storage, remove lemon slices after 4-6 hours to prevent bitterness.
- Serve chilled, with or without the fruit in the glass.
- For a clearer drink, optionally strain the infused water through a fine-mesh sieve before serving.
Notes
10. **Adding Herbs Directly to Salads** While garnishing provides a final embellishment, incorporating fresh herbs directly into your salads elevates their flavor and nutritional value to an entirely new dimension. This is not merely about a decorative sprinkle; it is about transforming a basic green salad into a vibrant, herbaceous masterpiece, in which the herbs assume a central, textural, and aromatic role. This simple yet profound change in approach optimizes the utilization of larger quantities of leftover herbs, ensuring they are fully savored rather than simply admired.
The effect of adding whole leaves of herbs such as mint, basil, parsley, cilantro, or dill directly to your favorite greens is revolutionary. Each bite becomes an explosion of fresh flavor, enhanced by the herbs’ distinctive textures and nutritional advantages. Envision a classic Caprese salad, where basil leaves are not just a garnish but an essential element, their sweet, peppery undertones interweaving through ripe tomatoes and mozzarella. Similarly, the clean, slightly peppery taste of parsley or the bright, citrusy notes of cilantro can elevate simple spring greens into a truly unforgettable dish, offering an additional supply of vital nutrients.
This method extends beyond leafy greens to include more substantial grain salads, where large bunches of herbs can be effortlessly integrated, adding depth and freshness. Imagine a vibrant grain bowl imbued with a generous amount of fresh mint and parsley, transforming it into a complete and gratifying meal. Moreover, for a subtle yet significant enhancement, finely chopped herbs like thyme, dill, rosemary, and oregano can be stirred into homemade vinaigrettes or even commercially available dressings, providing them with a rapid and flavorful boost. This approach truly advocates the concept of utilizing every last bit of your herb harvest to create richly flavored, nutritious meals.
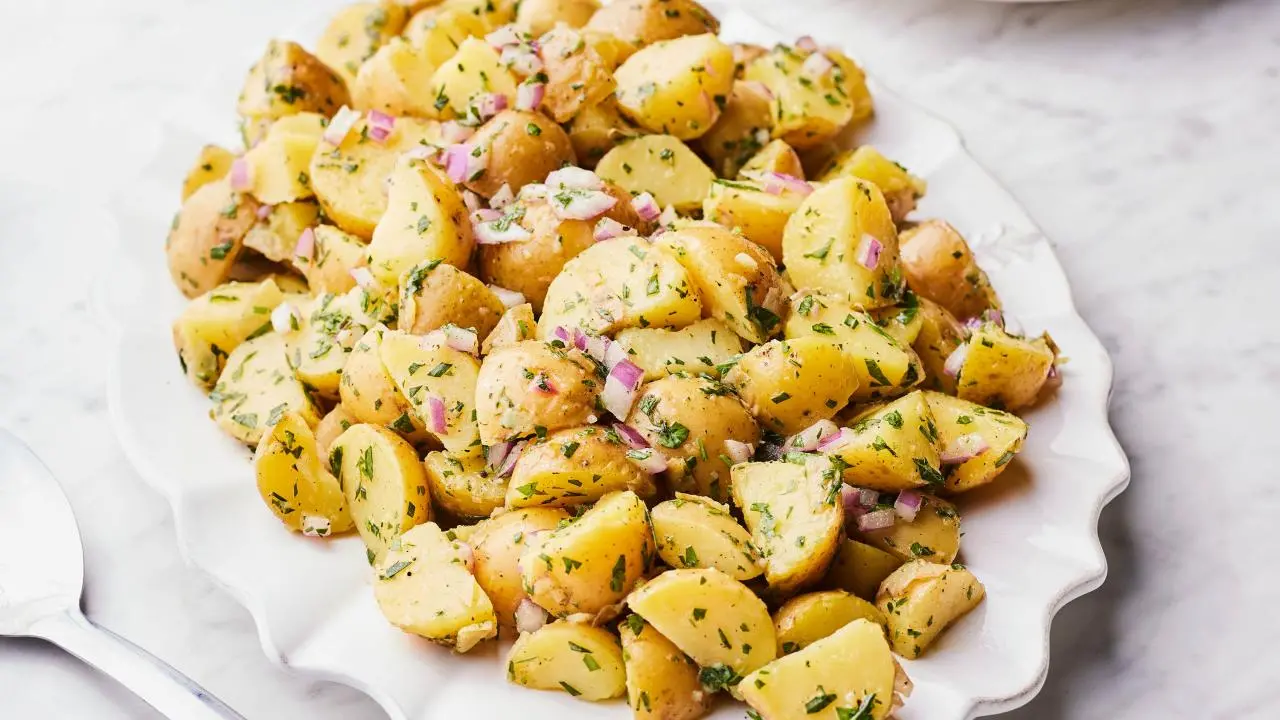
Herb Potato Salad
Ingredients
Equipment
Method
- Place the potatoes and 2 tablespoons salt in a large pot of water. Bring the water to a boil, then lower the heat and simmer for 10 to 15 minutes, until the potatoes are barely tender when pierced with a knife. Drain the potatoes in a colander, then place the colander with the potatoes over the empty pot off the heat and cover with a clean, dry kitchen towel. Leave the potatoes to steam for 15 to 20 minutes, until tender but firm.
- Meanwhile, in a small bowl, whisk together the wine, chicken stock, lemon juice, garlic, mustard, 2 teaspoons salt and 3/4 teaspoon pepper. Slowly whisk in the olive oil to make an emulsion. Set aside.
- When the potatoes are cool enough to handle, cut them into quarters or halves, depending on their size. Place the cut potatoes in a large bowl and pour enough dressing over them to moisten. (As the salad sits, you may need to add more dressing.) Add the onion, tarragon and parsley, and salt and pepper to taste. Toss well, cover, and refrigerate for a few hours to allow the flavors to blend. Serve cold or at room temperature.
Notes
11. **Making Herbal Simple Syrups** For those with a predilection for delectable beverages or a sweet inclination, transforming leftover herbs into aromatic simple syrups presents a remarkably inventive and astonishingly versatile solution. This approach encapsulates the essence of your herbs in a concentrated, sweet liquid, poised to imbue a diverse array of drinks and desserts with their distinctive character. It constitutes an exceptionally astute method to employ those herbs that may be marginally beyond their optimal state for fresh culinary uses yet still retain their delightful aroma.
The assortment of herbs suitable for simple syrups is extensive, providing boundless opportunities for experimentation. Basil, with its sweet and peppery undertones, crafts an intriguing syrup that is ideal for cocktails or lemonade. Thyme, mint, and rosemary also excel, each contributing its unique aromatic profile to the syrup. These homemade herbal syrups are not only outstanding for enhancing cocktails and mocktails but also superb for sweetening homemade sodas or even serving as a distinctive glaze for baked goods.
Beyond beverages, a simple syrup can also serve as a delightful substitute for traditional sweeteners in various applications. The context indicates that it is “the best way to sweeten homemade lemonade,” which attests to its capacity to elevate a simple drink into something truly extraordinary. Furthermore, the concept can be expanded to infusing honey, offering another delectable and natural sweetener with an herbal twist. This sweet strategy for herb utilization ensures that even the most plentiful harvests discover a delicious and unexpected purpose, adding a gourmet flair to your sips and treats.

Simple Syrup
Ingredients
Equipment
Method
- Combine all 3 ingredients in a nonreactive 2-quart heavy-bottomed saucepan over medium-high heat and bring to a boil. All the sugar crystals should completely dissolve. Remove from the heat and pour into a clean medium-size bowl. Let cool completely before using. If you are short on time, you can cool the syrup over an ice bath. Simple syrup can be stored in the refrigerator, indefinitely, if kept in an airtight container.
Notes
12. **Indulging in a Home Spa Day** Venturing beyond the confines of the kitchen, fresh herbs provide an unforeseen avenue to self-care and well-being, metamorphosing your home into a tranquil spa sanctuary. This ingenious utilization perfectly corresponds with the notion of fostering a holistic approach to home and well-being, demonstrating that the utility of herbs extends well beyond culinary pleasures. It represents a truly inventive method to ensure that no herb is squandered, particularly those delicate leaves that may be overly bruised for culinary purposes but still retain their beneficial properties and soothing fragrances.
The realm of DIY beauty treatments embraces the natural efficacy of fresh herbs for a variety of skin and relaxation requirements. For instance, if you are struggling with persistent dark circles, the context recommends a parsley eye mask as a rejuvenating remedy. When your face yearns for a thorough cleanse and rejuvenation, fresh herbs can be integrated into a DIY facial steam, enabling their aromatic compounds to open pores and soothe the skin. Sage, renowned for its purifying properties, is underscored as an essential component of a comprehensive three-step spring facial, showcasing its versatility within a holistic beauty regimen.
Engaging in these self-care rituals with herbs is not solely about their practical advantages; it is an act of intentional delight and a means of infusing positivity into your life, akin to creating art. It permits a sense of control and creativity during moments of stress, offering a much-needed respite from daily pressures. By allocating a portion of your leftover herbs to these calming and revitalizing practices, you not only reduce waste but also invest in your own well-being, experiencing the profound connection between nature’s abundance and personal serenity.
Read more about: Stop Throwing Away Hundreds: The Surprising Truth About Grocery Bills and Food Waste
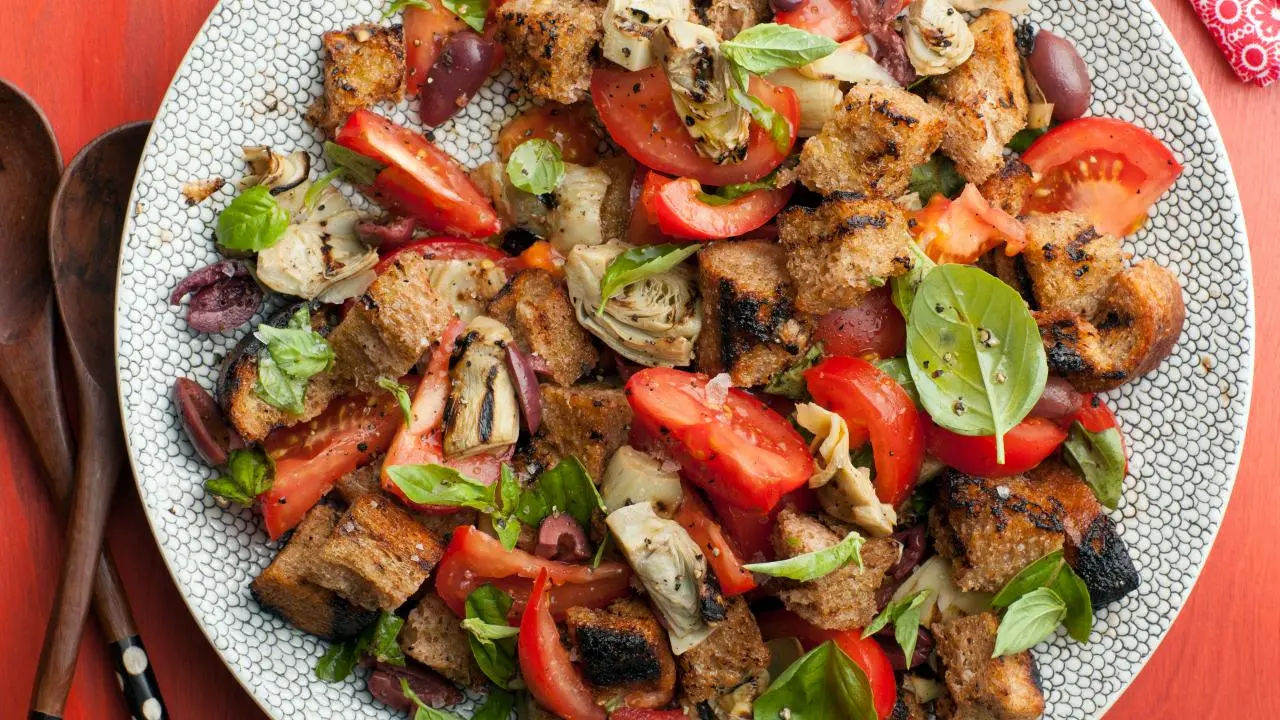
Artichoke and Tomato Panzanella
Ingredients
Equipment
Method
- Place a grill pan over medium-high heat or preheat a gas or charcoal grill. Drizzle the bread and artichoke hearts with olive oil and season with salt and pepper. Grill the bread and artichokes until golden brown at the edges, about 6 minutes total, turning every 2 to 3 minutes. Remove the bread and artichokes from the grill and transfer to a large bowl.
- Add the tomatoes, olives and basil to the bowl and toss to combine. In a small bowl, stir together the olive oil, white wine vinegar, 1/2 teaspoon salt and 1/2 teaspoon pepper. Drizzle the dressing over the salad. Toss to combine and serve immediately.
Notes
2. Ensure your grill or grill pan is adequately hot to achieve a beautiful golden-brown exterior and slight char on the bread and artichokes without drying them out. High heat, short cooking time is key.
3. The quality of your extra-virgin olive oil is paramount here, as it's a primary flavor component. Choose a robust, fruity oil for best results.
4. Don't skip the fresh basil; its aromatic qualities are essential to the vibrant Mediterranean profile of this dish.
5. If fresh tomatoes aren't perfectly ripe, consider briefly roasting them to intensify their flavor before adding to the salad.


