

Imagine a world where you can whip up dazzling, seemingly complex desserts in mere minutes, impressing friends and family without breaking a sweat. It sounds like a dream, right? Well, get ready to turn that dream into a delicious reality, because we’re about to dive into an exciting collection of iconic global desserts that prove gourmet doesn’t have to mean hours in the kitchen!
For too long, the idea of indulging in exquisite sweets from across the globe has been associated with lengthy preparation times, obscure ingredients, and advanced baking skills. But what if we told you that some of the most beloved and celebrated desserts, from the sophisticated streets of Paris to the bustling cafes of Rome, can be yours to savor with astonishing speed and simplicity? This article is your passport to a dessert-making revolution!
Get ready to embark on a mouth-watering journey that celebrates practicality, efficiency, and incredible flavor. These recipes are designed to be clear, concise, and action-oriented, guiding you through each step with a friendly and enthusiastic tone. We’re talking visually focused delights, accessible language, and results that will have everyone asking for seconds. So, grab your apron, because it’s time to discover seven extraordinary desserts that bring the world’s sweet treasures right to your table, all in 30 minutes or less!
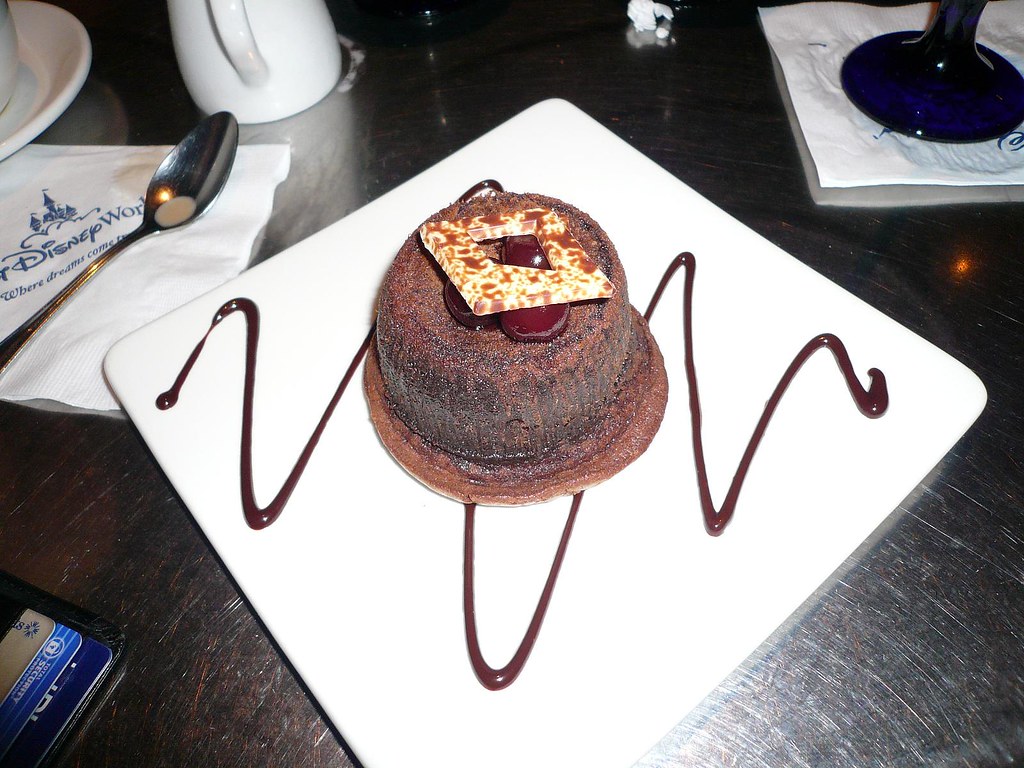
1. **Quick Chocolate Lava Cakes**: There’s something truly magical about cutting into a warm chocolate cake and watching a luscious, molten river of chocolate ooze out. It’s the ultimate dessert indulgence, often reserved for fancy restaurants or special occasions. But what if we told you that this decadent delight, a true star of the dessert world, is surprisingly simple and incredibly quick to create in your own home? Prepare to be amazed by the sheer ease of these quick chocolate lava cakes!
The secret to their speedy success lies in a few straightforward steps and, crucially, using high-quality chocolate. Opt for a chocolate you genuinely love to eat on its own, as its flavor will be the undeniable star of your cake. The key to achieving that signature liquid center is knowing exactly when to pull them from the oven – a fine balance that takes minimal practice but yields maximum reward. You’re aiming for set edges and a delightfully wobbly middle.
The beauty of this recipe is its direct approach, cutting out unnecessary complexities while preserving all the rich, intense chocolate goodness. It’s a dessert that speaks volumes with its deep cocoa notes and luxurious texture, making it feel far more elaborate than its actual preparation time suggests. Just a handful of ingredients come together to form a truly spectacular treat that’s perfect for satisfying that intense chocolate craving.
Once baked to perfection, these individual lava cakes are ready to be adorned. A simple dusting of powdered sugar adds an elegant touch, creating a beautiful contrast against the dark chocolate. For an even more indulgent experience, consider a scoop of creamy vanilla ice cream, which melts slightly into the warm cake, or a dollop of fresh whipped cream. This rich, satisfying dessert is the perfect grand finale after a wonderful meal, leaving everyone utterly content.
They are not just desserts; they are an experience, a moment of pure, unadulterated chocolate bliss. The contrast of the slightly crisp exterior and the warm, gooey interior is simply irresistible. This quick version brings all that iconic joy right to your fingertips, proving that you don’t need a pastry chef title to create patisserie-worthy confections. Get ready for an eruption of flavor that’s both impressive and effortlessly achievable.
Quick Molten Lava Cakes recipes
Ingredients
Equipment
Method
- Preheat your oven to 400°F (200°C). Thoroughly butter and flour two 6-ounce ramekins, tapping out any excess flour.
- In a small saucepan over low heat, or using a double boiler, melt the unsalted butter and bittersweet chocolate together, stirring until smooth. Remove from heat and allow to cool slightly.
- In a medium mixing bowl, whisk together the granulated sugar and large eggs until the mixture is light in color and slightly frothy, which should take about 2-3 minutes.
- Gradually pour the slightly cooled chocolate mixture into the egg and sugar mixture, whisking constantly until just combined.
- Gently fold in the all-purpose flour using a rubber spatula until no streaks of flour remain in the batter. Be careful not to overmix.
- Divide the prepared batter evenly between the two buttered and floured ramekins.
- Place the filled ramekins on a small baking sheet and bake for 12-14 minutes, or until the edges of the cakes are set and the centers still appear slightly jiggly.
- Carefully remove the ramekins from the oven and let them cool on a wire rack for 1-2 minutes.
- Run a thin knife around the edge of each cake if necessary, then invert each cake onto a small serving plate.
- Serve immediately, optionally dusted with powdered sugar, fresh berries, or a scoop of vanilla ice cream.
Notes
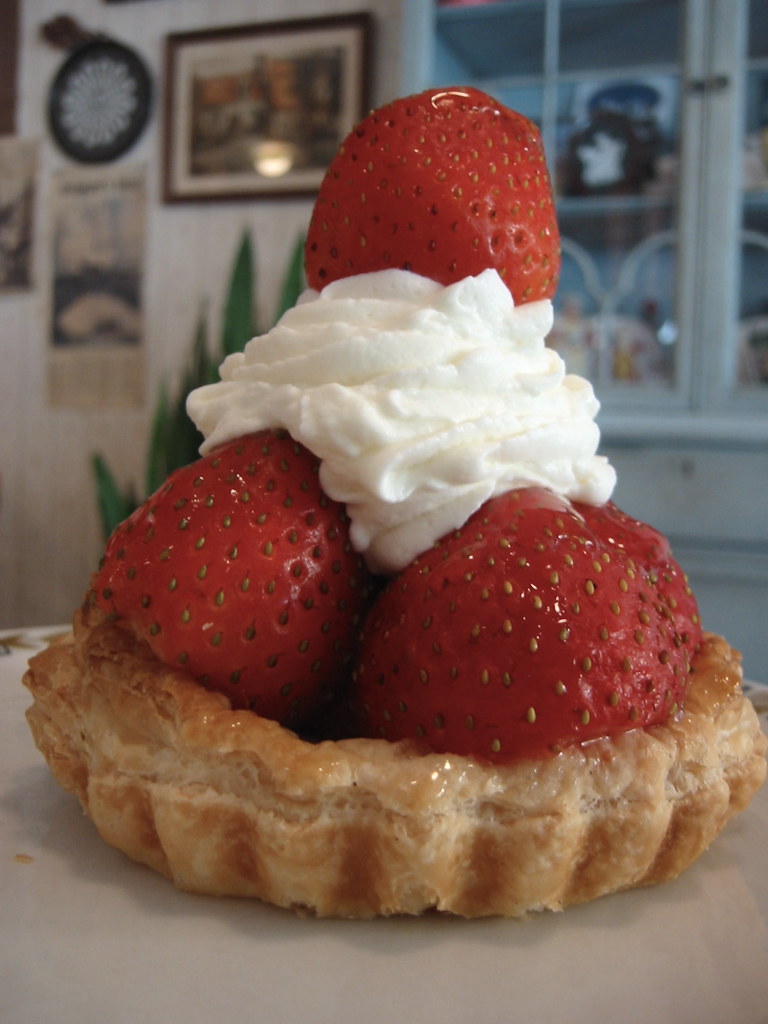
2. **Quick Strawberry Tartlets**: Few desserts capture the essence of spring and summer quite like a vibrant, fruit-filled tartlet. These adorable quick strawberry tartlets are bursting with the fresh, sweet flavor of ripe strawberries, making them a feast for both the eyes and the palate. They look like they’ve been plucked straight from a high-end bakery display, yet their simplicity will have you making them again and again.
The secret to their astonishing speed and ease lies in utilizing pre-made mini tart shells. This clever shortcut bypasses the often time-consuming process of making and chilling pastry dough, instantly fast-forwarding you to the fun part. With your shells ready, all that’s left is to fill them with a dreamy, creamy mixture that complements the fruit beautifully. It’s an assembly job, not a baking marathon!
Once your creamy filling is nestled into the shells, the star of the show takes center stage: perfectly sliced fresh strawberries. Arrange them artfully on top of the cream, allowing their natural ruby-red color and appealing shape to create a visually stunning presentation. Each tartlet becomes a small work of art, inviting you to take a bite and savor the delightful combination of textures and flavors.
To elevate these beauties even further, a delicate glaze of warmed apricot jam brushed over the strawberries adds a magnificent shine and a hint of extra sweetness. This final touch makes them look even more professional and appealing. While strawberries are undeniably classic, feel free to get creative with other berries like raspberries or blueberries, or even a mix, for different flavor profiles. The versatility of this quick tartlet recipe is truly one of its charming attributes.
These tartlets are incredibly delicious and immensely satisfying, offering a light yet indulgent treat that’s perfect for brunches, afternoon tea, or simply a sweet moment to yourself. The combination of the crisp shell, the smooth cream, and the fresh, juicy fruit creates a harmonious balance that’s hard to resist. They are a testament to how elegant and impactful a quick dessert can be, proving that sophistication can be swift.

Strawberry Brie Tartlets
Ingredients
Equipment
Method
- Preheat your oven to 400°F (200°C) and line a baking sheet with parchment paper.
- On a lightly floured surface, gently unfold each puff pastry sheet. Using a 2-3 inch round cookie cutter or a sharp knife, cut 5 rounds from each sheet, yielding 10 rounds total.
- In a small bowl, whisk together the egg and 1 tablespoon of water to create an egg wash.
- Lightly score a smaller circle inside each puff pastry round, about 1/4 inch from the edge, being careful not to cut all the way through. This will create a defined rim.
- Place a small piece of brie (approximately 0.6 oz) in the center of each pastry round, within the scored circle.
- Arrange 2-3 thin slices of ripe strawberry on top of the brie in each tartlet. Add a small sprig of fresh thyme and a tiny pinch of salt.
- Carefully brush the outer rim of each pastry round with the prepared egg wash.
- Bake for 12-15 minutes, or until the pastry is puffed, deeply golden brown, and the brie is melted and bubbly.
- Remove the tartlets from the oven and immediately drizzle each with a small amount of honey.
- Serve the Strawberry Brie Tartlets warm to best enjoy the melted cheese and flaky pastry.
Notes
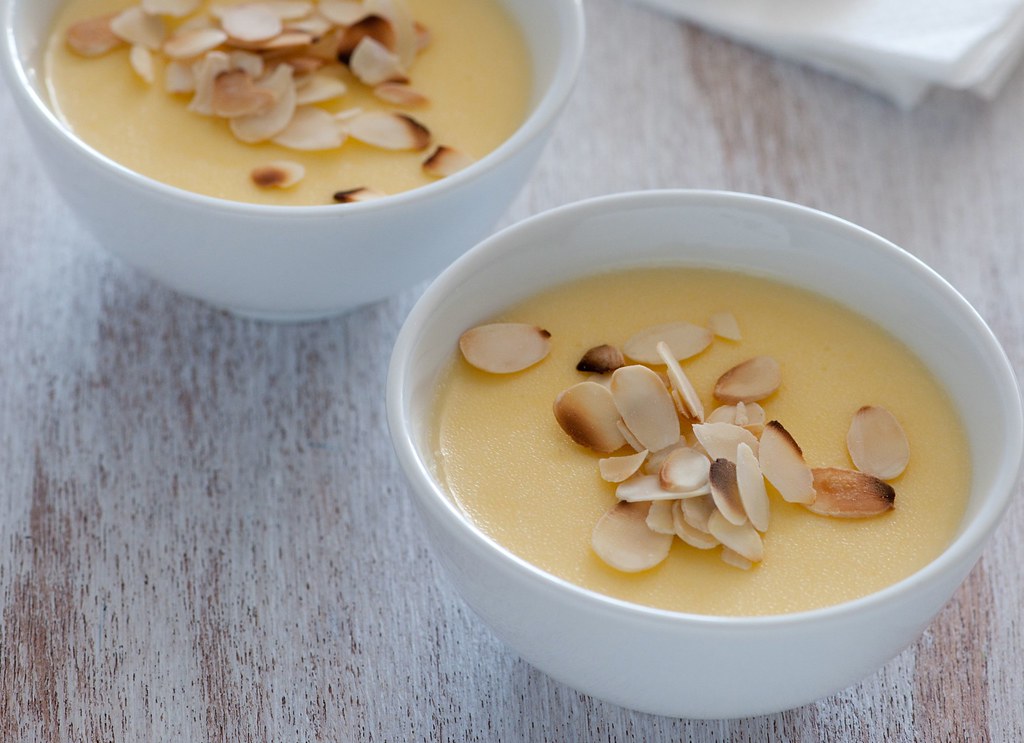
3. **Quick Lemon Posset**: Delightfully simple yet utterly luxurious, the quick lemon posset is a classic English dessert that exemplifies understated elegance. This creamy, tangy concoction is a revelation for anyone who appreciates desserts that are both refreshing and incredibly smooth. It’s a dessert that quietly impresses with its pure, unadulterated lemon flavor and velvety texture, making it a timeless choice for any occasion.
What makes this dessert truly remarkable is its incredibly short ingredient list and the magic that happens with minimal effort. You’ll need just a few basic kitchen staples: heavy cream, sugar, and fresh lemon juice. That’s it! No gelatin, no cornstarch, and no complicated tempering required. The simplicity is astounding, and the result is nothing short of gourmet perfection.
The science behind the posset’s luscious texture is as fascinating as it is easy to achieve. When the acidic lemon juice is gently stirred into the heated cream and sugar mixture, it acts as a natural coagulant, thickening the cream as it cools. This process creates that signature smooth, luxurious texture that melts in your mouth, leaving a delicate balance of sweet and tart notes. It’s an old-world technique made accessible for the modern, busy home cook.
While the preparation itself takes mere minutes, the posset does require a couple of hours to chill thoroughly, allowing the flavors to meld and the cream to set perfectly. Once beautifully firm, it’s ready to be served in individual ramekins or elegant glasses. For a splash of contrasting color and an extra burst of freshness, consider garnishing with a few vibrant blueberries or a delicate curl of lemon zest.
This dessert offers a sophisticated palate cleanser or a light, bright ending to any meal. Its charm lies in its uncomplicated nature, allowing the natural brightness of the lemon to shine through the rich cream. The quick lemon posset is a testament to the power of simple ingredients, proving that sometimes, less truly is more, especially when crafting an iconic dessert that tastes utterly divine.

Easy lemon meringue possets
Ingredients
Equipment
Method
- Combine whipping cream and 150g castor sugar in a medium saucepan. Heat gently over medium heat, stirring constantly until the sugar has fully dissolved.
- Bring the cream mixture to a rolling boil, then reduce the heat to a simmer and continue to cook for 3 minutes, stirring occasionally.
- Remove the saucepan from the heat and immediately stir in the 100ml lemon juice.
- Divide the hot posset mixture evenly among 6 small serving glasses or ramekins.
- Refrigerate the possets for at least 4 hours, or until they are thoroughly chilled and set firmly.
- In a separate, very clean and dry mixing bowl, whisk the 2 egg whites with an electric mixer until soft peaks form.
- Gradually add the remaining 100g castor sugar, about a tablespoon at a time, continuing to whisk until the meringue is stiff, glossy, and holds firm peaks.
- Spoon or pipe the meringue over the top of each chilled lemon posset.
- Optionally, use a kitchen blow torch to lightly brown the meringue peaks for an appealing toasted finish.
- Garnish each posset with mixed berries just before serving.
Notes
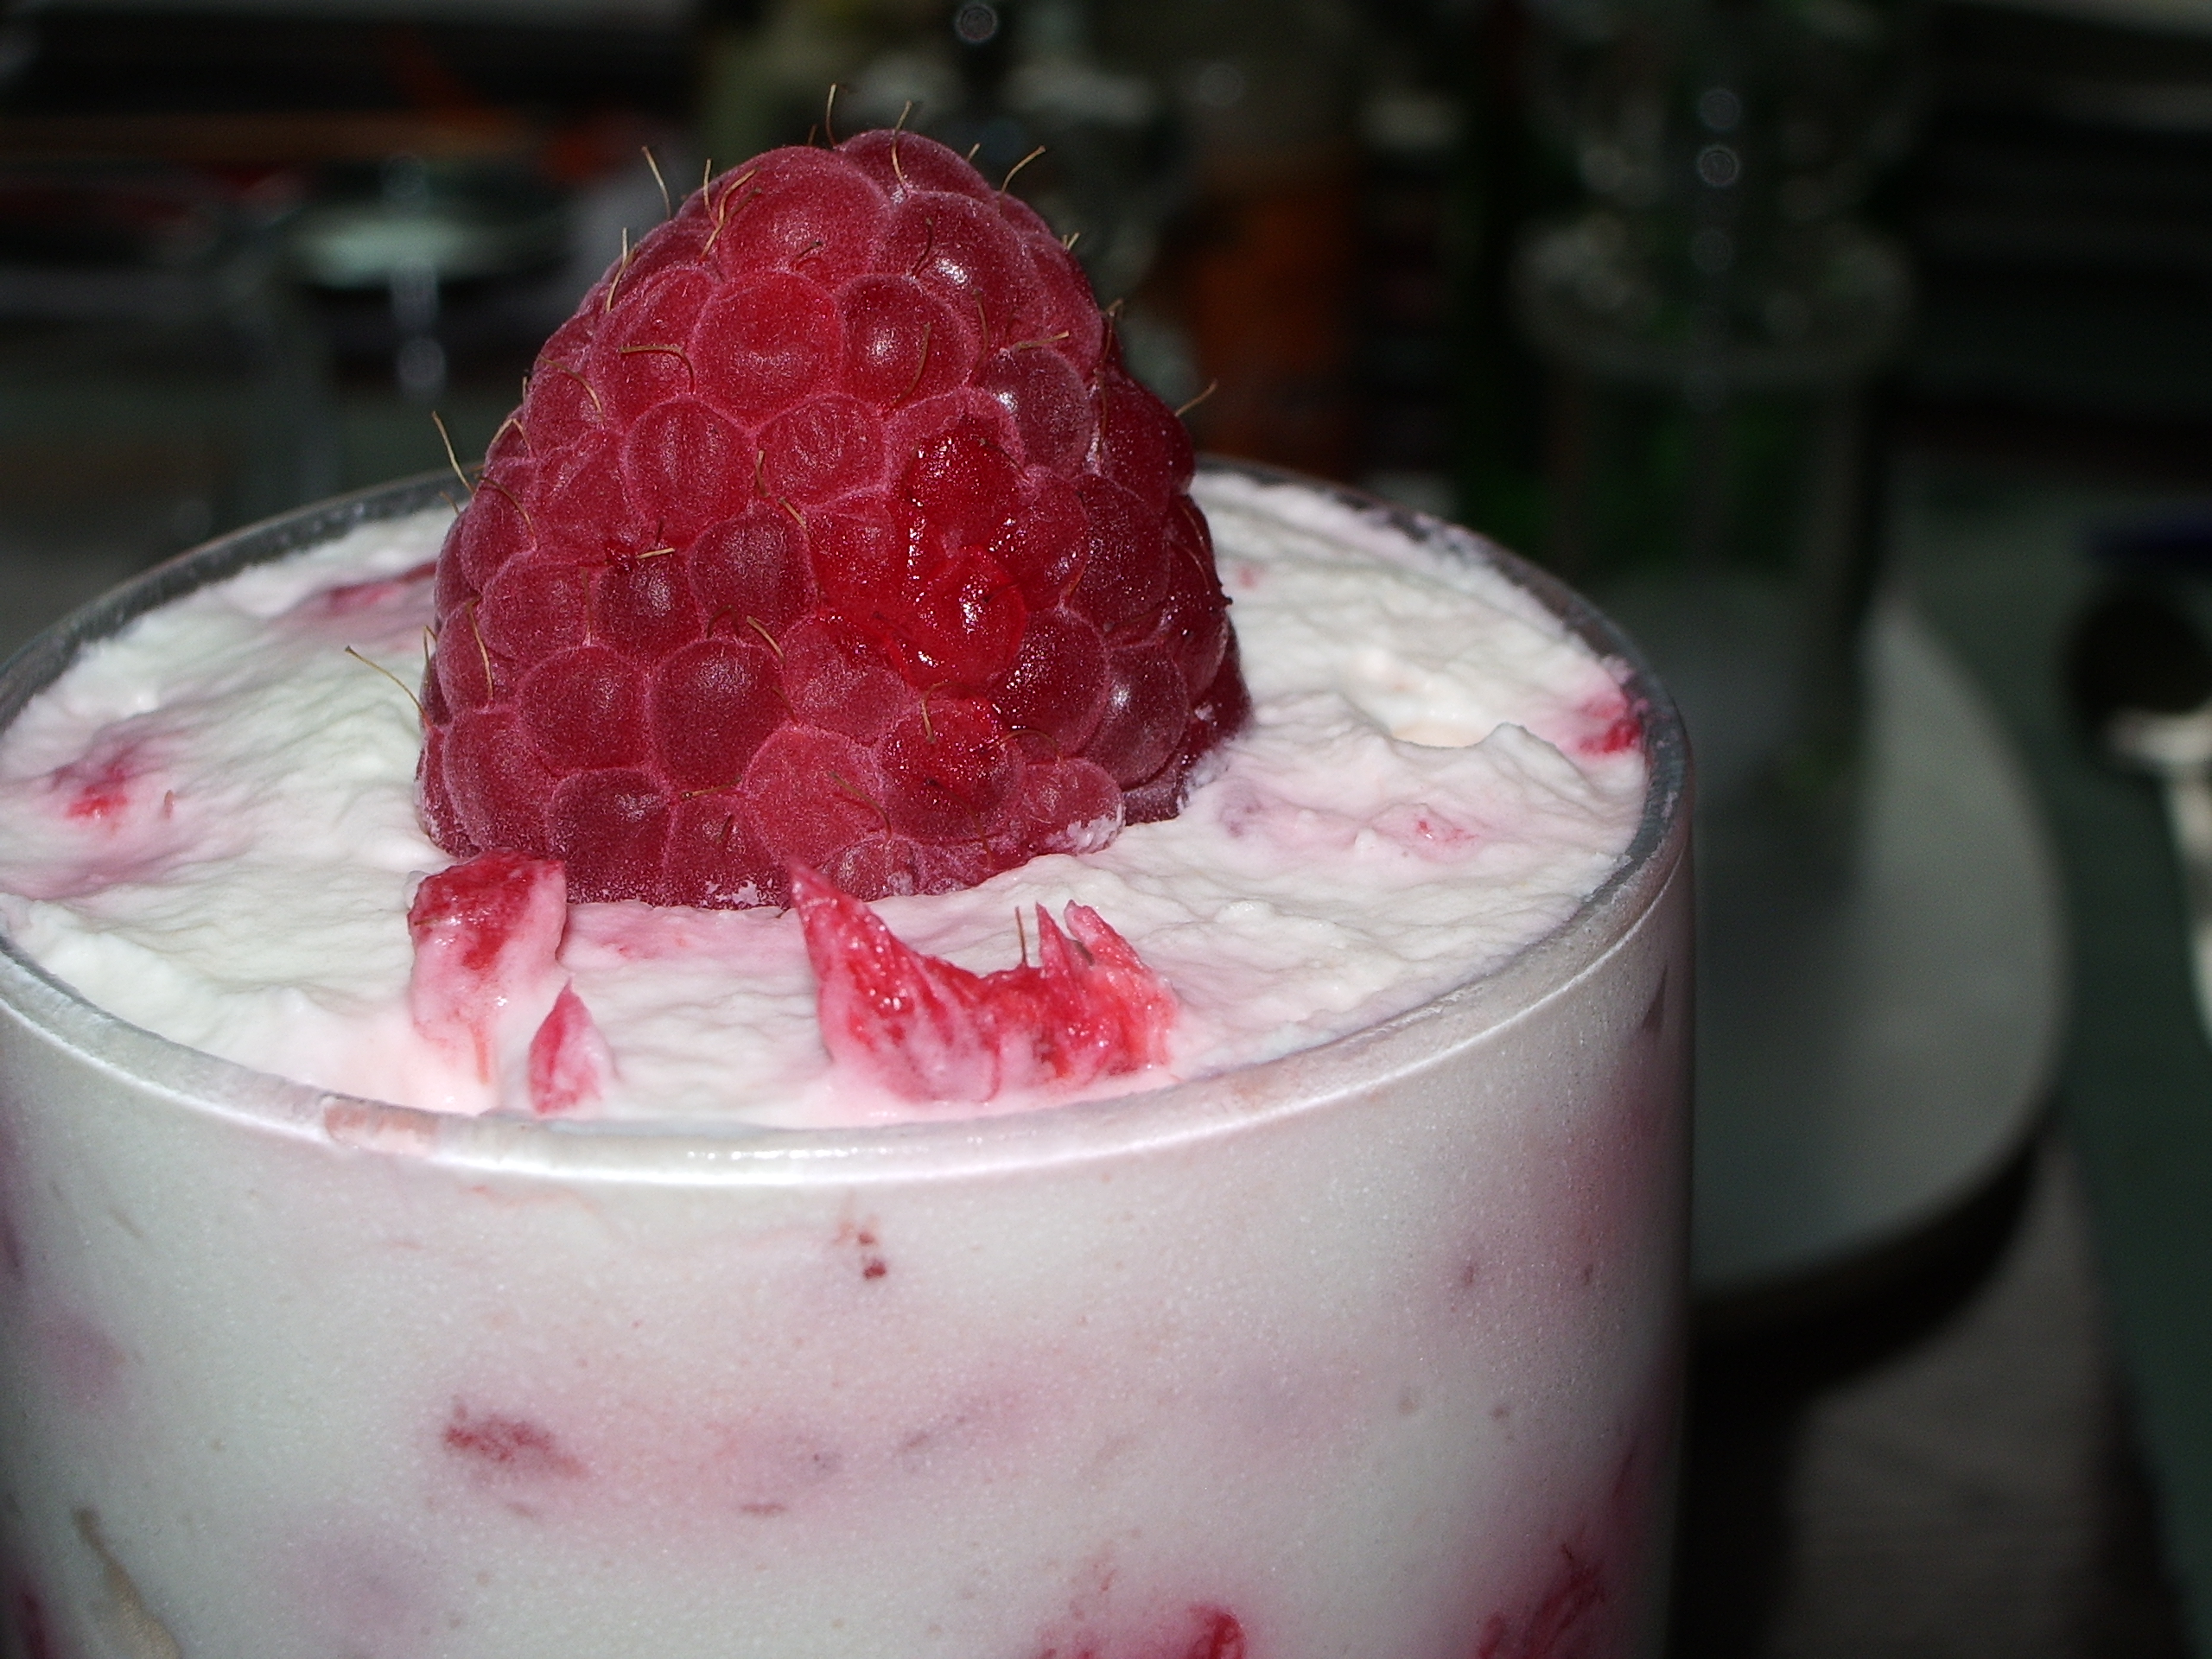
4. **Quick Raspberry Fool**: Stepping back into the realm of traditional English desserts, we encounter the incredibly charming and refreshingly simple quick raspberry fool. This delightful treat is so straightforward to prepare, it almost feels like cheating – but the incredible taste and lovely presentation will quickly dispel any guilt. It’s a celebration of fresh fruit and rich cream, combined in the easiest way imaginable.
A fool, by definition, is a classic dessert made by folding together puréed fruit with whipped cream, and this raspberry version is a shining example of its effortless appeal. The beauty of this recipe is that it truly lets the vibrant flavor of the raspberries take center stage. You can use fresh or frozen raspberries, making it a versatile dessert to enjoy year-round. Crushing the berries gently helps release their juices and intense color, blending them beautifully with the airy cream.
The primary components are simply fluffy whipped cream and the crushed raspberries. The folding technique ensures that the dessert remains light and airy, creating a cloud-like texture that’s incredibly pleasing to the palate. Depending on the sweetness of your raspberries and your personal preference, you have the option to add a touch of sugar or a drizzle of honey to enhance the flavor balance. This allows for a customized sweetness that perfectly suits your taste buds.
Once gently combined, the raspberry fool is best served chilled, allowing the flavors to fully meld and the textures to become perfectly harmonious. Presenting it in individual glasses instantly elevates its appeal, transforming a humble dessert into an elegant course. The swirls of pink and white, interspersed with the occasional whole raspberry, make for a visually enticing treat that promises pure joy with every spoonful.
This dessert is a perfect example of how a few high-quality ingredients can create something truly spectacular without any fuss. It’s light, fruity, creamy, and undeniably refreshing, making it an ideal choice for a warmer day or a lighter end to a hearty meal. The quick raspberry fool is a delightful reminder that sometimes, the simplest pleasures are the most profound, delivering elegance and deliciousness in record time.

Quick and Easy Raspberry Fool recipes
Ingredients
Equipment
Method
- Gently rinse and pat dry the Driscoll’s raspberries.
- In a medium-sized mixing bowl, combine the cleaned raspberries with 2 tablespoons of granulated sugar.
- Using a fork or a potato masher, gently mash the raspberries, leaving some whole or chunky pieces for texture. Set aside.
- In a separate large, chilled mixing bowl, combine the 2 cups of whipping cream, ¼ cup of confectioners sugar, and 1 teaspoon of vanilla extract.
- Using an electric mixer or a whisk, whip the cream mixture until medium-soft peaks form. Be careful not to over-whip, which can make it grainy.
- Using a rubber spatula, gently fold about two-thirds of the mashed raspberries into the whipped cream until just combined, creating a lovely marbled effect.
- Spoon or pipe the raspberry fool mixture into individual serving glasses or a larger dessert bowl.
- Dollop the remaining mashed raspberries on top of each serving for an attractive garnish.
- Chill the raspberry fool in the refrigerator for at least 30 minutes to allow the flavors to meld and the dessert to set properly.
- Serve chilled, optionally garnished with a fresh raspberry or a mint sprig for an elegant finish.
Notes

5. **Quick Chocolate Mousse**: Ah, chocolate mousse – the epitome of French sophistication, a dessert synonymous with indulgence and silky smooth perfection. The idea of making it at home might conjure images of delicate egg tempering and meticulous folding, but fear not! Our quick chocolate mousse recipe is rich, decadent, and delightfully easy to achieve, proving that this iconic dessert is well within your grasp for a spontaneous sweet craving.
The essence of this rapid rendition lies in streamlining the process without compromising on that luxurious, melt-in-your-mouth texture. At its core, you’ll be working with melted chocolate, enhanced with a little butter for extra richness and sheen, which then gets gently folded into a cloud of freshly whipped cream. The simplicity of these two main components coming together is what makes this recipe a true game-changer for chocolate lovers.
For an extra layer of complexity and an even more refined flavor profile, don’t hesitate to experiment with subtle additions. A splash of coffee liqueur can deepen the chocolate notes, adding a sophisticated warmth that elevates the entire experience. Alternatively, a tiny pinch of sea salt can brilliantly cut through the sweetness, enhancing the chocolate’s inherent bitterness and creating an irresistible salty-sweet dynamic. These small touches make a big difference in the final taste.
The magic of mousse is in its airiness, so the folding technique is key to maintaining that light, ethereal quality. Once everything is perfectly combined, the mousse needs time to chill, allowing it to set into its characteristic smooth, pillowy consistency. This brief period in the refrigerator is crucial for achieving that delightful texture that makes chocolate mousse so iconic and beloved across the globe.
Finally, when it’s time to serve, a garnish of delicate chocolate shavings adds not only visual appeal but also another dimension of chocolate flavor. This quick chocolate mousse is always a crowd-pleaser, delivering all the rich, intense satisfaction of a classic French dessert with astonishing speed and minimal fuss. It’s proof that you can enjoy world-class flavors without needing world-class culinary expertise.

Quick Chocolate Mousse Pie
Ingredients
Equipment
Method
- Ensure plain cream cheese is fully softened to room temperature; this is crucial for achieving a smooth, lump-free filling.
- In a large mixing bowl, beat the softened cream cheese with an electric mixer until it is light, fluffy, and completely smooth.
- Add the 1/4 cup Marzetti® Chocolate Fruit Dip to the cream cheese mixture and continue to beat until well combined and uniform in color.
- Gently fold in 2 cups of the whipped topping into the chocolate cream cheese mixture using a rubber spatula until just combined, being careful not to deflate the mixture.
- Pour the prepared mousse filling evenly into the chocolate cookie piecrust, smoothing the top with the back of a spoon or spatula.
- Place the pie in the refrigerator and chill for at least 3-4 hours, or until the mousse is firmly set.
- Just before serving, dollop or pipe the remaining 1/2 cup of whipped topping onto the chilled pie.
- Optionally, garnish with chocolate shavings, a dusting of cocoa powder, or fresh berries for an elegant finish.
- Slice the pie into 8 servings and serve cold to enjoy its creamy, rich texture.
Notes
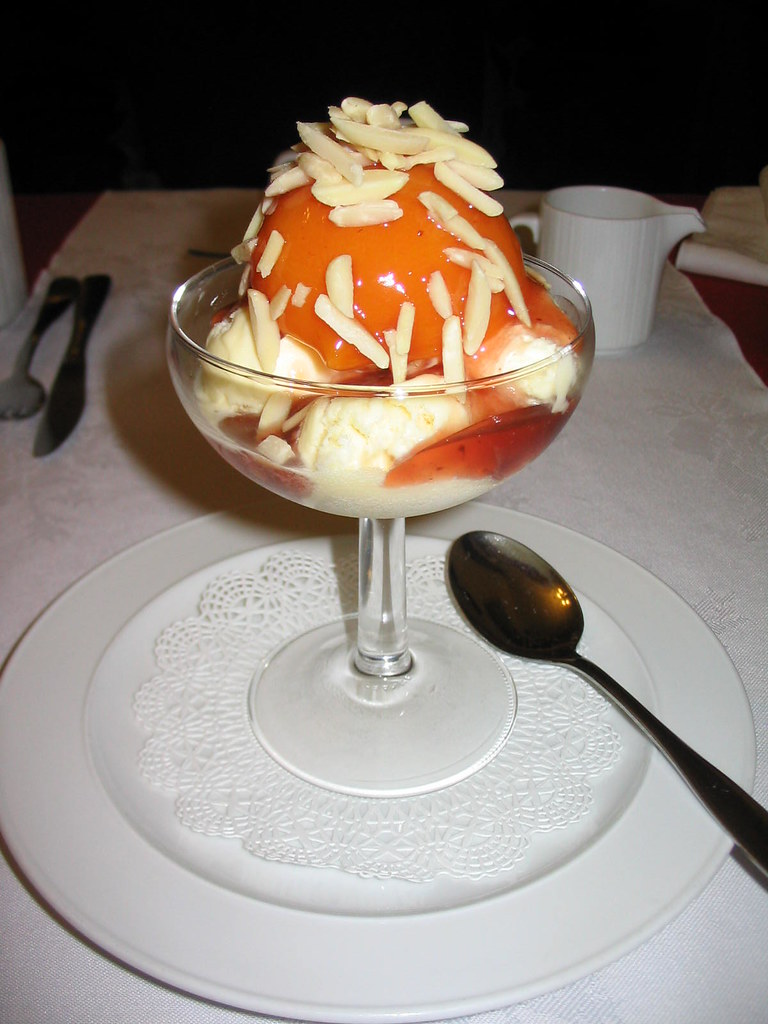
6. **Quick Peach Melba**: Here’s another classic that whispers of old-world charm and refreshing elegance: the quick peach melba. This iconic dessert, created by the legendary chef Auguste Escoffier for the Australian opera singer Nellie Melba, is a beautiful symphony of flavors and textures. It combines tender peaches, creamy vanilla ice cream, and a vibrant raspberry sauce into a harmonious and incredibly refreshing treat that feels both luxurious and delightfully light.
Traditionally, peach melba involves poaching fresh peaches, a step that adds to its gourmet appeal but can be time-consuming. For our quick rendition, we have excellent shortcuts to ensure you’re enjoying this dessert in minutes. Using canned peaches, drained and perhaps lightly warmed, is a brilliant way to save precious time without sacrificing flavor or texture. If you prefer fresh, a quick poaching in a simple syrup can also be accomplished swiftly.
The heart of the peach melba experience lies in the contrast between the warm or room-temperature peaches and the cool, creamy vanilla ice cream. The smoothness of the ice cream provides a delightful backdrop for the soft, sweet fruit. Ensuring your vanilla ice cream is of good quality will significantly enhance the overall enjoyment, as its pure, comforting flavor is a crucial element of this iconic combination.
Completing this delectable dish is a vibrant, tangy raspberry sauce. This sauce adds a burst of bright color and a tart counterpoint to the sweetness of the peaches and ice cream, tying all the elements together beautifully. You can easily make a quick raspberry sauce by puréeing fresh or frozen raspberries and perhaps straining them for a smoother consistency, then sweetening to taste. It’s the final flourish that makes this dessert truly special.
The quick peach melba is an incredibly refreshing dish, perfect for warm evenings or as a lighter dessert after a substantial meal. It’s a testament to timeless flavor combinations and how they can be adapted for modern, busy lifestyles. Enjoy this slice of culinary history, brought to your table with speed and grace, and savor every bite of its delicate, fruity, and creamy perfection.
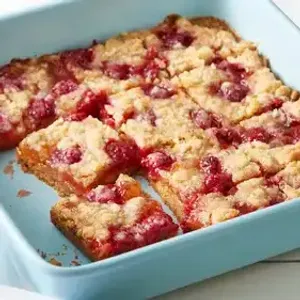
Peach Melba Crumble Bars
Ingredients
Equipment
Method
- Preheat oven to 375°F (190°C). Grease a 9×13 inch baking pan or line with parchment paper, leaving an overhang on the sides for easy lifting.
- In a large bowl, combine the Betty Crocker™ sugar cookie mix with the cold butter pieces. Use a pastry blender or your fingertips to cut the butter into the mix until coarse crumbs form.
- Press about two-thirds of the crumb mixture evenly into the bottom of the prepared baking pan to form the crust.
- In a separate small bowl, stir together the peach preserves and lemon juice until well combined.
- Spread the peach preserve mixture evenly over the cookie crust in the pan.
- Evenly scatter the fresh raspberries over the peach layer.
- Crumble the remaining cookie mixture over the raspberry layer, ensuring it covers the fruit and preserves.
- Bake for 35-40 minutes, or until the topping is golden brown and the filling is bubbly.
- Remove from the oven and let cool completely on a wire rack before cutting into bars. This is crucial for the bars to set properly.
- Once cooled and set, use the parchment paper overhang to lift the entire slab from the pan, then cut into 16 even bars.
Notes

7. **Quick Affogato**: When it comes to desserts that offer instant gratification with unparalleled sophistication, nothing beats the quick affogato. This Italian marvel is quite simply the easiest dessert of all, yet it delivers an experience that is absolutely divine. It’s a perfect illustration of how two seemingly simple ingredients can come together to create a profoundly satisfying and memorable treat.
The concept is brilliantly straightforward: “affogato” means “drowned” in Italian, and that’s precisely what happens. You take a perfectly pulled shot of hot, aromatic espresso and pour it directly over a generous scoop of cold vanilla ice cream. The visual appeal alone is captivating as the hot espresso begins to melt the ice cream, creating a delightful creamy, coffee-laced pool around it. It’s a minimalist masterpiece that packs a punch.
The true magic of the affogato lies in the incredible contrast it offers – the scorching heat of the espresso against the icy chill of the ice cream, the intense bitterness of the coffee playing off the sweet, creamy vanilla. This interplay of temperatures and flavors is what makes each spoonful an adventure for your taste buds. It’s a sensory experience that’s both invigorating and comforting, making it a favorite for coffee and dessert lovers alike.
While traditional affogato is typically made with vanilla ice cream, the beauty of this quick dessert is how easily it lends itself to experimentation. Feel free to explore different ice cream flavors to find your perfect combination. Think hazelnut, caramel, or even a dark chocolate ice cream for an extra layer of indulgence. Each variation promises a unique and exciting twist on the classic.
For those who crave even more decadence, a drizzle of chocolate syrup or a sprinkle of cocoa powder can elevate your affogato to new heights. It transforms a simple, elegant treat into an extra special indulgence that feels incredibly luxurious. The quick affogato is more than just a dessert; it’s a moment of pure bliss, easily created, profoundly enjoyed, and always a delightful way to conclude any meal.
Welcome back, sweet explorers! Our delightful journey across the globe continues, showcasing even more iconic desserts that prove you don’t need to be a professional pastry chef or spend hours in the kitchen to create truly spectacular treats. Get ready to add seven more fantastic, fast, and utterly delicious recipes to your culinary repertoire, featuring beloved American classics and inspiring international delights, all crafted in under half an hour!
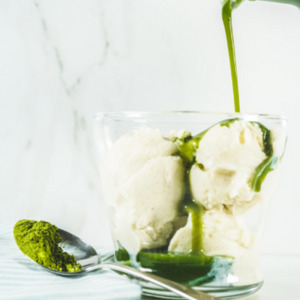
The Best Matcha Affogato You’ll Try. Quick + Easy Recipe for Dessert
Ingredients
Equipment
Method
- Measure 2 teaspoons (3-4g) of organic culinary matcha powder into a matcha bowl or small mug.
- Heat 6 tablespoons (90 ml) of fresh water to precisely 175°F (80°C) to ensure optimal matcha flavor without bitterness.
- Carefully pour the hot water over the matcha powder in the bowl.
- Using a bamboo matcha whisk (chasen) or a small metal whisk, whisk the matcha vigorously in an ‘M’ or ‘W’ motion until a smooth, frothy layer forms on top.
- Scoop ½ cup (120 ml) of high-quality vanilla ice cream into two chilled serving glasses or small bowls.
- Immediately and gently pour the freshly whisked hot matcha over the scoops of vanilla ice cream in each glass.
- Serve the Matcha Affogato without delay, allowing the hot matcha to slowly melt the ice cream, creating a delightful blend of temperatures and flavors.
Notes

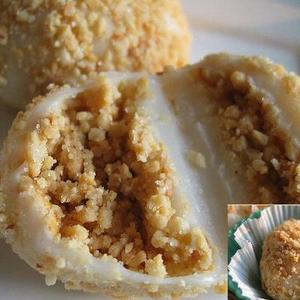
8. **Mochi (Japan)**: Step into the delightful world of Mochi, a cherished delicacy from Japan that promises a truly unique and joyful experience for your senses. Crafted from glutinous rice that is meticulously pounded into a smooth, elastic dough, mochi showcases remarkable versatility in Japanese cuisine, shining particularly brightly as a sweet treat that is both fun and fulfilling.
The chewy texture of mochi is undeniably one of its most captivating features, a testament to its careful preparation. Often, these charming, bite-sized confections, known as daifuku, come with a delightful surprise filling. Imagine sweet red bean paste, a scoop of creamy ice cream, or even fresh, vibrant fruit nestled inside, offering a wonderful contrast of textures and flavors in every bite.
Mochi is more than just a delicious dessert; it transcends its culinary role to become an integral part of cultural celebrations and cherished ceremonies across Japan. Symbolizing good fortune and unity, its subtle sweetness and uniquely soft, resilient bite make it a beloved and enduring aspect of Japanese gastronomy. It’s a dessert that brings joy and tradition to your table with surprising ease.
Peanut Mochi 花生麻薯
Ingredients
Equipment
Method
- Grind the 100 grams of dry roasted peanut kernels with the 30 grams of sugar in a food processor until it forms a coarse, sandy mixture. Set aside in a shallow dish.
- In a large mixing bowl, combine the 250 grams of glutinous rice flour, 250 grams of water, and 120 grams of sugar. Whisk thoroughly until the batter is smooth and no lumps remain.
- Stir in the 50 grams of Mazola corn oil until it is fully incorporated into the batter, creating a homogeneous mixture.
- Transfer the batter into a heat-proof, lightly greased dish or bowl that fits into your steamer.
- Steam the mixture over high heat for 20-25 minutes, or until the dough becomes completely translucent, firm, and springy to the touch.
- Carefully remove the hot mochi dough from the steamer. While still warm, transfer it to a lightly oiled surface or a non-stick mat.
- Using an oiled spatula, dough scraper, or gloved hands (lightly oiled), knead the warm mochi dough for 5-7 minutes until it is smooth, elastic, and cohesive.
- Pinch off small, even portions of the kneaded mochi dough, about 15-20 grams each.
- Roll each portion into a small ball or desired shape (e.g., small cylinders).
- Generously roll each shaped mochi piece in the prepared peanut mixture until it is thoroughly coated on all sides. Serve immediately or store covered at room temperature for optimal freshness.
Notes

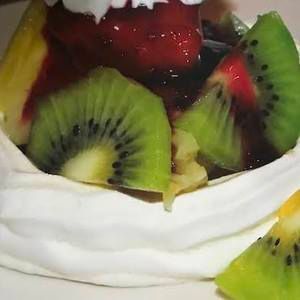
9. **Pavlova (Australia/New Zealand)**: Prepare to be dazzled by Pavlova, a culinary masterpiece hailing from the sun-drenched antipodes of Australia and New Zealand. This dessert is as elegant as it is utterly delicious, a true showstopper named after the famed Russian ballerina Anna Pavlova. It’s a meringue-based creation that perfectly balances sophistication with a burst of fresh, vibrant flavors.
The allure of pavlova begins with its pristine, crisp exterior, a delicate shell that gives way to a dreamy, marshmallow-like interior. This beautiful contrast of textures is one of its most appealing characteristics, promising a delightful surprise with every spoonful. While the baking process for the meringue might take a little time, the assembly of this stunning dessert is incredibly quick, allowing you to create something truly spectacular with minimal fuss.
To complete this masterpiece, the pavlova is traditionally crowned with a cloud of freshly whipped cream, adding a luxurious, creamy layer. Then, it’s generously adorned with a vibrant array of fresh fruits – think ruby-red strawberries, bright green kiwi slices, and tangy passion fruit. This explosion of colorful, juicy fruit not only looks magnificent but also creates a symphony of flavors that dances on your taste buds.
Whether you’re enjoying it on a warm summer afternoon or presenting it as the grand finale to a celebratory feast, pavlova stands as a symbol of culinary finesse and effortless beauty. It’s a dessert that feels light, refreshing, and indulgent all at once, proving that you can create an iconic, show-stopping treat that comes together in a flash, making it perfect for impressing guests without the stress.
Australian Pavlova
Ingredients
Equipment
Method
- Preheat your oven to a low temperature, around 250°F (120°C). Line a baking sheet with parchment paper and draw an 8-9 inch circle as a guide for your meringue base.
- Carefully separate the egg whites into a scrupulously clean, large mixing bowl, ensuring no trace of yolk. Let them come to room temperature for optimal volume.
- Using an electric mixer, beat the egg whites on medium speed until frothy. Add the cream of tartar and continue beating until soft peaks form.
- Gradually add the super-fine sugar, one tablespoon at a time, beating on high speed until the meringue is stiff, glossy, and the sugar has completely dissolved.
- Spoon the meringue onto the prepared parchment paper, using the drawn circle as a guide. Create a nest shape with a slightly sunken center and higher sides.
- Bake for 1 hour to 1 hour 15 minutes, or until the meringue is crisp on the outside but still soft and marshmallowy inside. Turn off the oven and let the pavlova cool completely inside with the door ajar.
- While the pavlova cools, prepare the topping: In a separate cold bowl, whip the heavy cream, powdered sugar, and vanilla extract until medium-stiff peaks form. Do not over-whip.
- Wash, slice, and prepare the strawberries and kiwi, ensuring all fruits are dry.
- Once the meringue is completely cool, carefully transfer it to a serving plate.
- Just before serving, spoon the whipped cream into the center of the pavlova and arrange the fresh sliced strawberries, kiwi, and blueberries decoratively on top.
Notes
And there you have it, fellow dessert aficionados! From the rich, syrupy embrace of Indian Gulab Jamun to the no-bake bliss of Canadian Nanaimo Bars, we’ve journeyed across continents, proving that iconic, world-class flavors are not just for professional chefs. These seven additional treats, alongside our initial selection, solidify the fact that gourmet indulgence can be yours in 30 minutes or less. So go ahead, grab your apron (or maybe just your spoon!), and confidently whip up these international sensations. Impressing your taste buds and your guests has never been so achievable, or so incredibly delicious! Dive in, savor the sweetness, and let the flavors of the world delight your kitchen, one quick, iconic dessert at a time. Yum!


