

America’s dinner tables have always been a fascinating reflection of our ever-changing society. Over the decades, they’ve shown us everything from evolving health trends to shifting cultural influences, serving as a culinary mirror to the nation’s soul. It’s a journey through time, marked by fads and staples alike, where some foods soared to popularity only to quietly, or sometimes dramatically, fade into the background, leaving us to wonder, “Seriously, what’s the deal?”
Remember a time when certain dishes were everywhere? From potlucks to elegant dinner parties, these were the stars of the show, proudly gracing tables and filling stomachs. But then, almost without warning, they started to disappear, replaced by trendier, healthier, or simply more convenient alternatives. What happened to these once-beloved culinary icons? Why did they vanish from our plates, becoming mere whispers of bygone eras?
Join us on a fun, flavorful, and slightly nostalgic trip down memory lane as we explore 14 classic American foods that, for one reason or another, just don’t get eaten anymore. Prepare to uncover the fascinating stories behind their rise and fall, delving into the cultural shifts and changing tastes that relegated these dishes to the annals of food history. Get ready to rekindle a memory or two of these forgotten favorites, and perhaps even laugh at some of the wild culinary experiments our ancestors dared to create!

1. **Jell-O Salad** Ah, Jell-O Salad – a dish that conjures images of vibrant, wobbly creations gracing every mid-century American dinner table. Beloved Jell-O was an “unmistakable fixture of dinner parties in the 1950s,” often appearing as “elaborate molded salads incorporating everything from whipped cream and pineapple to mini marshmallows.” These shimmering, gravity-defying towers were not just food; they were a testament to domestic artistry and a hallmark of a certain kind of celebratory meal.
However, this gelatinous reign was not to last. “By the mid-1970s, their popularity had crashed so dramatically that several flavors were discontinued entirely.” It seems that the very same innovations that made Jell-O so appealing—its quick setting time and vibrant colors—couldn’t save it from the relentless march of changing lifestyles and palates. It truly went from a culinary marvel to a perplexing relic in a surprisingly short span.
The decline of the Jell-O salad can be “directly attributed to the rise in women joining the workforce in larger numbers,” a significant societal shift that brought with it a demand for “quicker and simpler meal solutions than labor-intensive molded gelatin masterpieces.” The hours once spent carefully layering and chilling these intricate molds suddenly became a luxury fewer and fewer families could afford. Convenience trumped culinary spectacle, and Jell-O salads, unfortunately, were on the losing end.
Today, “most younger Americans have never experienced the polarizing textures of lime Jell-O, cottage cheese, and canned pears,” a combination that might sound more like a dare than a delightful dessert to contemporary ears. What was once a symbol of ingenuity and celebration now stands as a quirky, often-mocked, memory of a very different American culinary landscape.
Product on Amazon: Vacation Strawberry Jello Salad SPF 30 Lip Balm, Hydrating Sunscreen for Lips, Water-Resistant, Lightweight, Transparent Sheen, Vegan Formula Made without Beeswax (Pack of 3)
Brand: VACATION
Binding: Health and Beauty Product Group: Beauty
Price: 12 USD
Rating: 4.1 Total reviews: 390
Item Form: Stick
Sun Protection: 30 SPF
Skin Type: All
Color: Strawberry Jello Salad
Shopping on Amazon >>

Raspberry Jell-O Salad
Ingredients
Equipment
Method
- Finely crush graham cracker sheets. Combine crumbs with melted butter and 2 Tbsp. sugar. Press firmly into the bottom of a 9×13″ baking dish and chill to set.
- In a large heatproof bowl, combine raspberry gelatin powder with 2 cups boiling water, stirring until fully dissolved.
- Add frozen raspberries, lemon juice, and 1 tsp. kosher salt to the dissolved gelatin. Stir gently until raspberries begin to thaw and the mixture is well combined.
- Pour the raspberry gelatin mixture over the chilled graham cracker crust. Refrigerate for at least 4 hours, or until completely set.
- In a mixing bowl, beat room temperature cream cheese with the remaining 1 Tbsp. sugar and ¼ tsp. kosher salt until smooth and creamy.
- In a separate, chilled bowl, whip heavy cream until stiff peaks form.
- Gently fold the whipped cream into the cream cheese mixture until just combined, being careful not to deflate the cream.
- Spread the cream cheese topping evenly over the set raspberry gelatin layer.
- Refrigerate the salad for at least 2 hours, or until the topping is firm and well chilled.
- Serve cold, slicing into individual portions.
Notes
Read more about: Step Back in Time! 14 Jaw-Dropping Pictures That Prove the 1950s Were Totally Wild and Way Cooler Than You Think

2. **Cottage Cheese** For a long stretch, cottage cheese was the undisputed king of the diet snack world, a creamy, lumpy staple that graced countless refrigerators across the nation. It was “a staple snack in the 1970s, with the average American eating nearly 5 pounds per year.” Marketed “ heavily as a slimming food throughout the 1970s and well into the 1990s,” its consumption figures “increased rapidly throughout the country,” reaching impressive peaks of “approximately 4.6–5.3 pounds per capita in the early 1990s.”
Fast forward to today, and the story is dramatically different. Cottage cheese has seen a dramatic fall from grace, with Statista reporting that “the figure declined to about 2 pounds of cottage cheese per person per year by the early 2020s, with a decline of as much as 58%.” This isn’t just a minor dip; it’s a significant plummet that speaks volumes about evolving food trends and consumer preferences.
So, what brought this once-mighty diet champion to its knees? The answer, ironically, lies in another dairy aisle superstar: yogurt. The “yogurt industry, with its superior taste, smoother texture, and more charming marketing, has been directly responsible for cottage cheese’s fall from grace.” Consumers simply gravitated towards a product that felt more refined, more versatile, and perhaps, a little less… lumpy.
This shift reflects “a broader shift toward foods perceived as healthier or more versatile,” a trend that continues to shape our eating habits today. While cottage cheese still has its loyalists, it’s clear that its heyday as a mainstream, universally loved snack is firmly in the rearview mirror, replaced by a new generation of dairy delights.
Product on Amazon: Amazon Grocery, Low Fat Cottage Cheese, Small Curd, 24 Oz (Previously Amazon Fresh, Packaging May Vary)
Brand: Amazon Grocery
Binding: Grocery Product Group: Amazon Fresh Perishables
Price: 0.1 USD
Rating: 4.6 Total reviews: 830
Number of Items: 1
Unit Count: 24.0 Ounce
Variety: Cottage Cheese
Item Form: Bar
Features:
1. One 24 ounce container of Small Curd Low Fat Cottage Cheese
2. Some of your favorite Amazon Fresh products are now part of the Amazon Grocery brand! Although packaging may vary during the transition, the ingredients and product remain the same. Thank you for your continued trust in our brands
3. Made with cultured pasteurized skim milk and real dairy ingredients
4. Contains: Milk
5. Amazon Grocery has all the favorites you love for less. You’ll find everything you need for great-tasting meals in one shopping trip
Shopping on Amazon >>
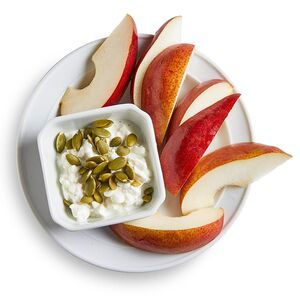
Pear & Cottage Cheese
Ingredients
Equipment
Method
- Wash the pear thoroughly under cold water.
- Using a cutting board and a paring knife, carefully slice the pear into even, bite-sized pieces or thin wedges.
- Measure out ¼ cup of low-fat cottage cheese and place it into a serving bowl.
- Arrange the sliced pear around or on top of the cottage cheese in the bowl.
- Measure out 1 tablespoon of pepitas and sprinkle them evenly over the pear and cottage cheese.
- Serve immediately as a refreshing and nutritious snack or light starter.
Notes
Read more about: Cracking the Code: Can Diabetics Safely Enjoy Watermelon? Your In-Depth Guide to Fruit and Blood Sugar Management
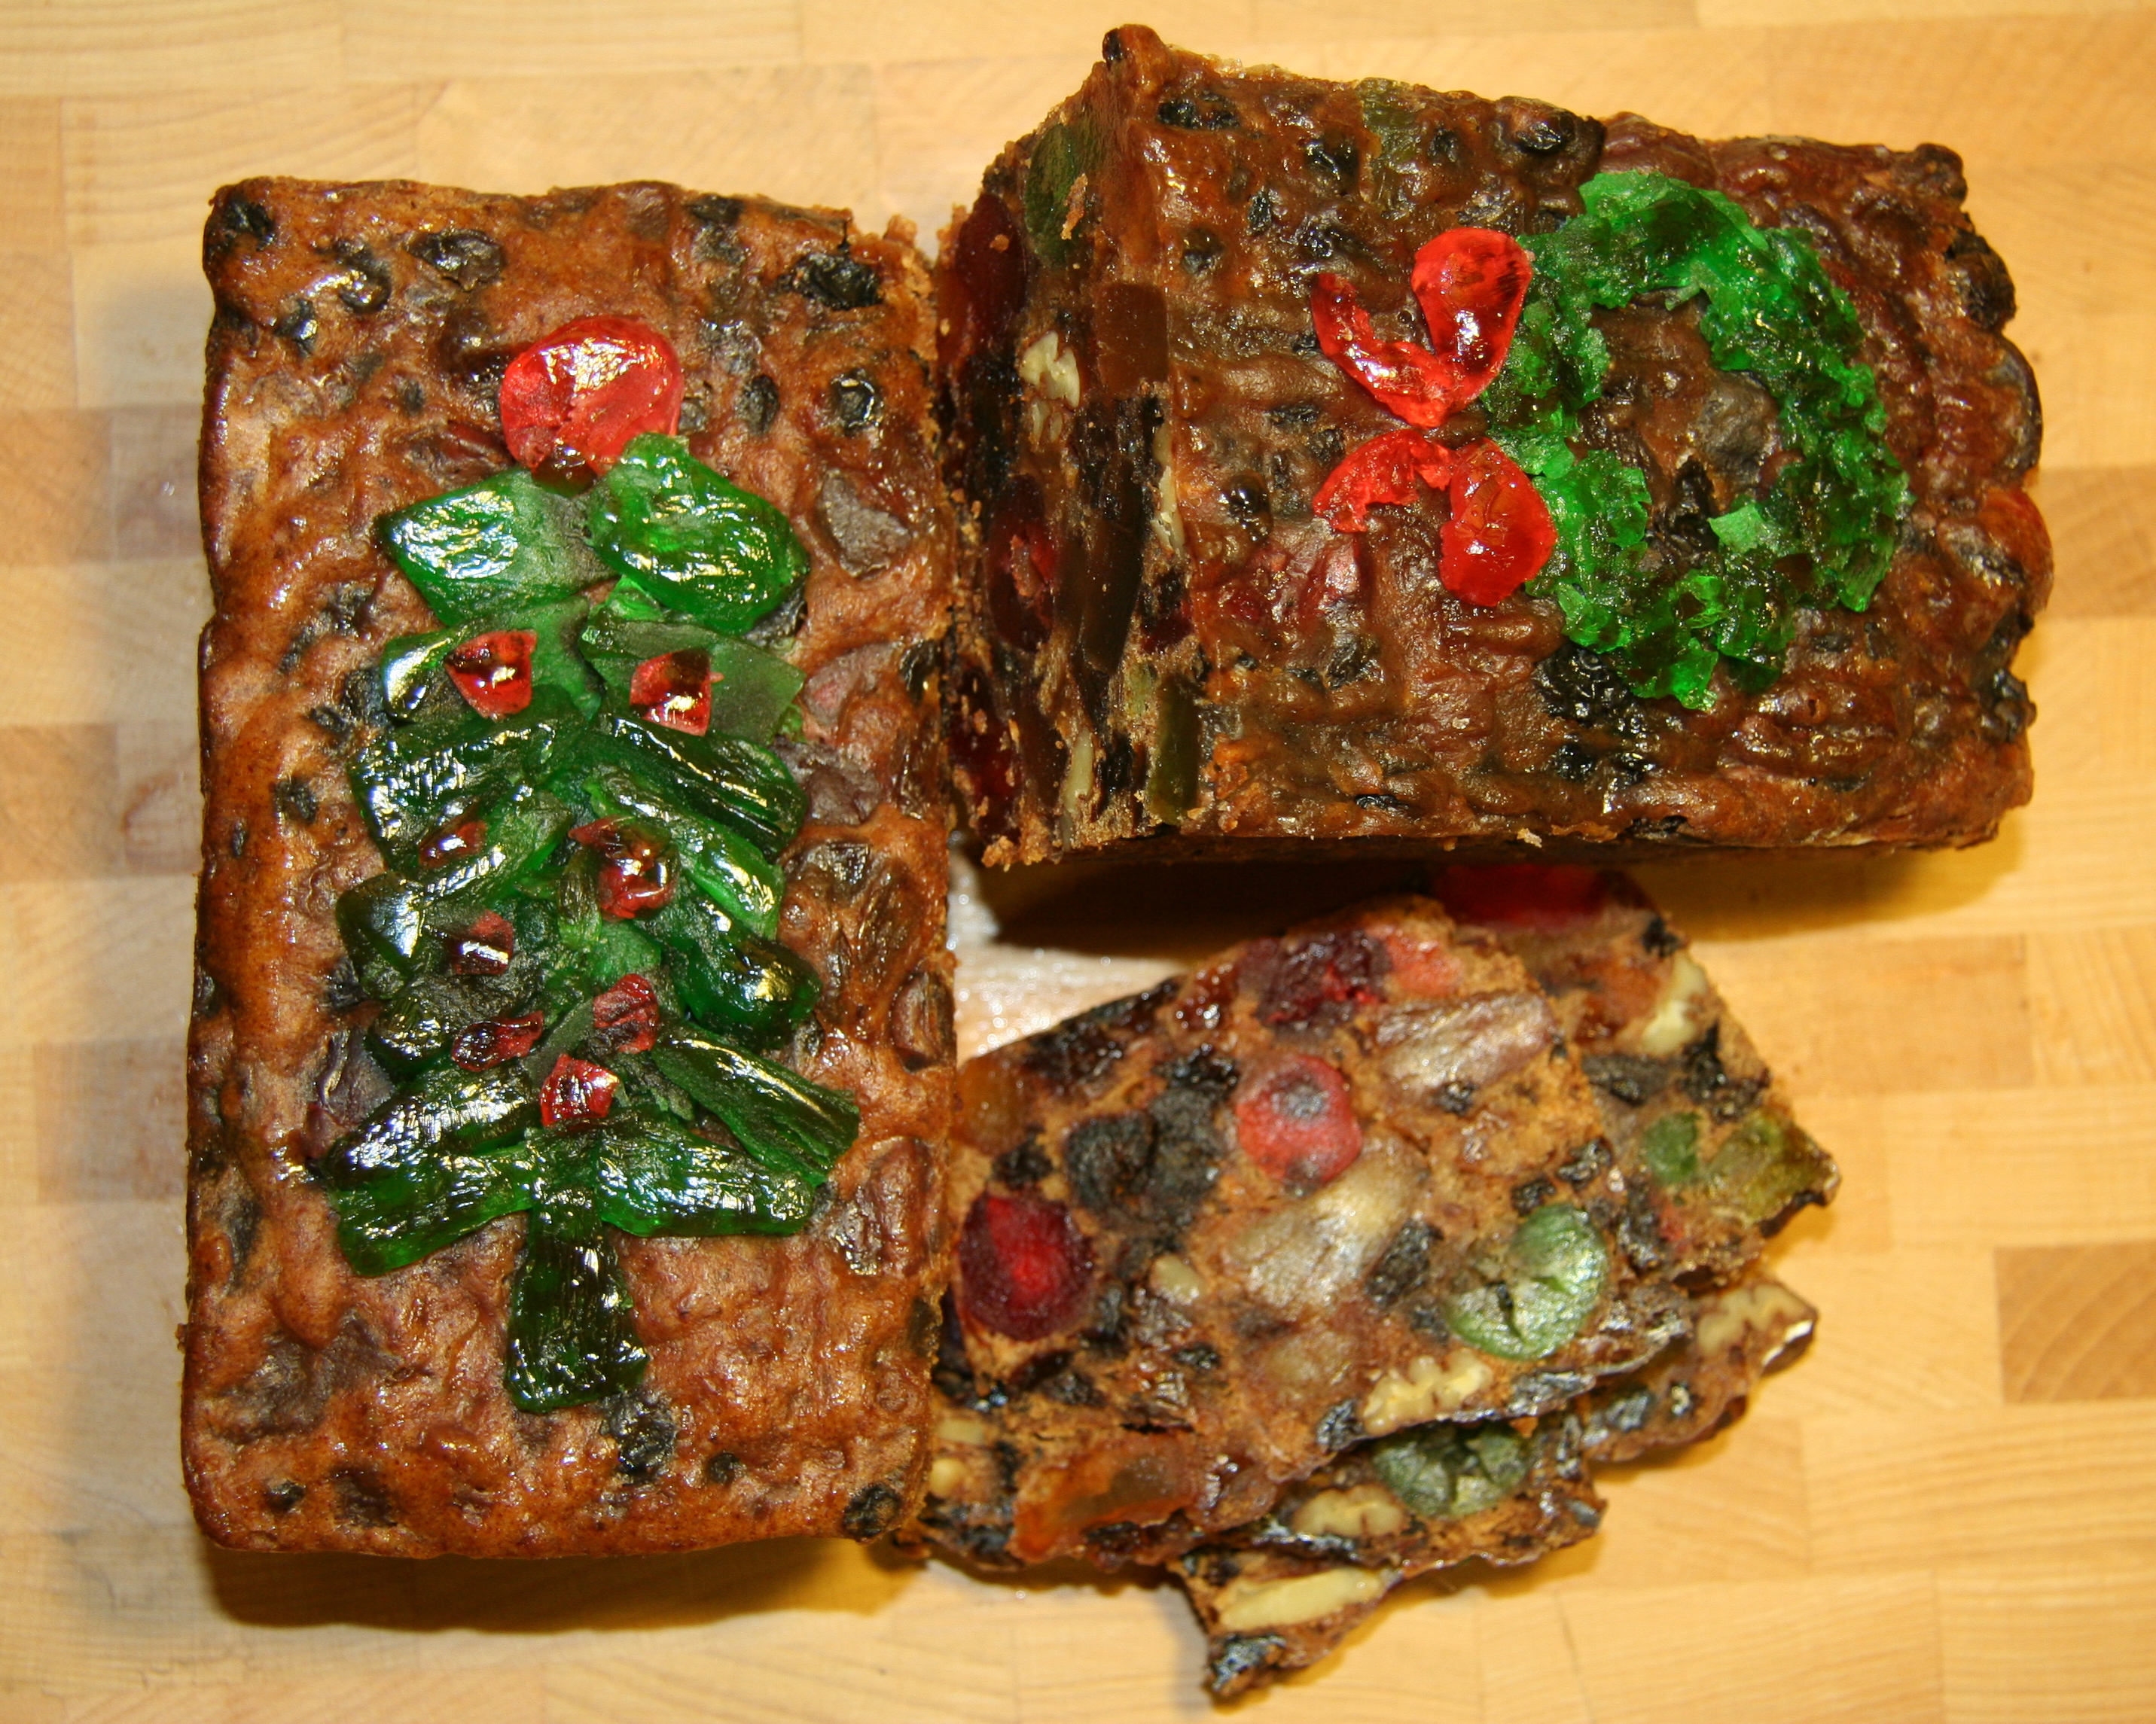
3. **Fruitcake** Oh, fruitcake. Just the mention of the word often elicits groans, eye-rolls, and perhaps a chuckle about that notorious brick-like dessert. It’s a dish so universally “disliked” that “43% of survey participants chose fruitcake as the holiday dessert they’d least like to see at a Christmas party in a recent Mashed survey,” making it “the most disliked dessert in the ranking.” The “once-beloved dense, boozy fruitcake, studded with candied fruits and nuts,” is undeniably “no longer at the center of American celebrations.”
But believe it or not, there was a time when fruitcake was genuinely cherished. “Families once devoted entire afternoons to assembling and baking fruitcakes or placed orders with specialty bakeries months in advance.” Its origins are surprisingly ancient and practical, with “humble beginnings in Ancient Rome” where its original form was a “mashed combination of barley, pomegranate seeds, nuts, and raisins,” effectively an “ancient power bar” – a portable food with a long shelf life.
This early form of sustenance evolved into “more special occasion fare during the Middle Ages and beyond,” and was particularly “favored by the Victorians who relished fruitcake’s long shelf life due to its dense texture and the spirits infused within.” Since “fruit itself was a costly commodity at the time,” fruitcake always remained “a dessert for special occasions,” a true mark of luxury and foresight in an era before refrigeration.
So how did it fall so far? “Their decline in popularity can be attributed to changing tastes and the unfortunate reputation fruitcakes have earned as the quintessential unwanted gift, often regifted for years, and the subject of countless jokes.” It seems a cultural consensus developed, branding fruitcake as the ultimate culinary castoff. This “derision started that prompted fruitcake to become widely despised in the States” has persisted, making “hating fruitcake is today as much a holiday tradition as the dessert itself.”
This means “fruitcake’s decline in popularity may have nothing to do with its merits as a dessert.” As chef Carla Hall summarized for Forbes, “I guess it is one of those things that is psychological. It inherently isn’t bad but we all have a stigma associated with it.” While it remains popular outside the United States as “a traditional British wedding cake and has long since become a Bengali culinary fixture,” stateside, its fate is sealed by its own unfortunate, self-perpetuating reputation.
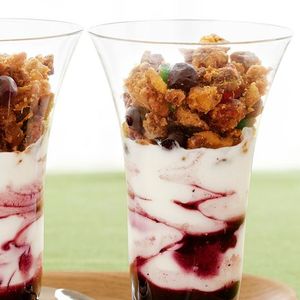
Fruitcake Parfaits
Ingredients
Equipment
Method
- Ensure frozen blueberries are fully thawed and, if desired, gently drain any excess liquid.
- Cut the fruitcake into small, bite-sized cubes or crumble it into coarse pieces.
- If desired, lightly sweeten the plain yogurt with honey or vanilla extract, stirring until well combined.
- Begin by spooning a layer of fruitcake into the bottom of each parfait glass.
- Add a layer of thawed blueberries over the fruitcake.
- Follow with a layer of the plain or sweetened yogurt.
- Repeat the layers: fruitcake, blueberries, and then yogurt, until the glasses are filled, ending with a yogurt layer.
- Optionally, garnish with a few extra blueberries or a small piece of fruitcake on top.
- Chill the parfaits in the refrigerator for at least 30 minutes to allow flavors to meld and for a cooler, more refreshing serve.
- Serve chilled and enjoy immediately.
Notes
4. **Ambrosia Salad** Speaking of retro party dishes, let’s talk about Ambrosia Salad. This colorful Southern potluck mainstay, a “trifecta of citrus, coconut, and marshmallows,” was once considered “an impressive treat to set before dinner guests.” Its very name, “ambrosia,” is of Greek origin and translates as “food of the gods,” hinting at the esteemed status it once held in American kitchens.
The initial appeal of ambrosia was rooted in its exoticism. It “first appeared as a very simple recipe in the late 1800s, making use of only three ingredients: layered orange slices, coconut, and sugar.” At that time, “oranges and coconuts were expensive, tropical fruits that only wealthier classes could then afford,” making the dish a symbol of luxury and sophistication. It remained popular for a long time precisely “because coconut and citrus were luxuries for most Americans.”
Over the decades, the recipe evolved, incorporating “additional fruits like pineapple and banana,” and eventually being “topped with whipped cream.” A clever “marketing campaign introduced marshmallow whip as the dressing of choice,” further solidifying its transformation from a simple fruit salad into a sweet, creamy, dessert-like concoction. By the 1930s, it had cemented its place as “a traditional Southern holiday confection,” partly due to the agricultural cycles that brought Florida oranges to market in December.
The “postwar proliferation of canned foods” helped ambrosia salad reach “its recognizable retro form with canned pineapple, maraschino cherries, and mandarin oranges, persisting into the mainstream with the buffet boom of the 1980s.” It was a convenient, vibrant, and surprisingly versatile dish that fit right into the era’s culinary trends. It spoke to a time of both indulgence and practical assembly.
However, times have changed. “Ambrosia salad is currently only visible at Thanksgiving and Christmas feasts,” if at all. “Perhaps through the contemporary inclination to avoid salads dressed with preservatives,” this once divine dish is “viewed today with more nostalgia than anticipation.” While “its legacy remains through shared stories and memories,” it’s now more a charming historical footnote than a modern menu star.
Product on Amazon: Old Fashion Claxton Fruit Cake 3-1 Lb. Regular Recipe Loaves – Individually Wrapped For Freshness in our Signature Red-White Carton – 3-pack
Brand: Claxton Fruit Cake
Binding: Unknown Binding Product Group: Grocery
Price: 24.95 USD
Rating: 4.5 Total reviews: 17003
Flavor: Regular Recipe
Item Weight: 3.4 Pounds
Unit Count: 48.0 Ounce
Number of Items: 3
Package Weight: 1.61 Kilograms
Package Information: Box
Number of Pieces: 1
UPC: 073652310018
Melting Temperature: 35 Degrees Celsius
Features:
1. Timeless Tradition: Savor Old Fashion Claxton Fruit Cake, a global favorite since 1910. Renowned for old-fashioned goodness and holiday charm, we’re proud to be the “Choice of Millions.”
2. Elegantly Wrapped: Contains 3 – 1 lb dark recipe cakes. Each one-pound cake comes individually wrapped for freshness and presented in our signature red-and-white striped carton.
3. Freshness You Can Trust: Store in the fridge and unwrap your cake just before eating to experience the perfect flavor and ultimate freshness.
4. Premium Ingredients: Our dark recipe cakes boast over 70% choice fruits and nuts like California raisins, pineapple, papaya, pecans, cherries, walnuts, almonds, and citrus peel.
5. Versatile Delight: Ideal for holidays, gatherings, or daily indulgence, our fruit cakes are a treat for any occasion. Enjoy them alone, with a beverage, or as a unique festive addition.
Shopping on Amazon >>

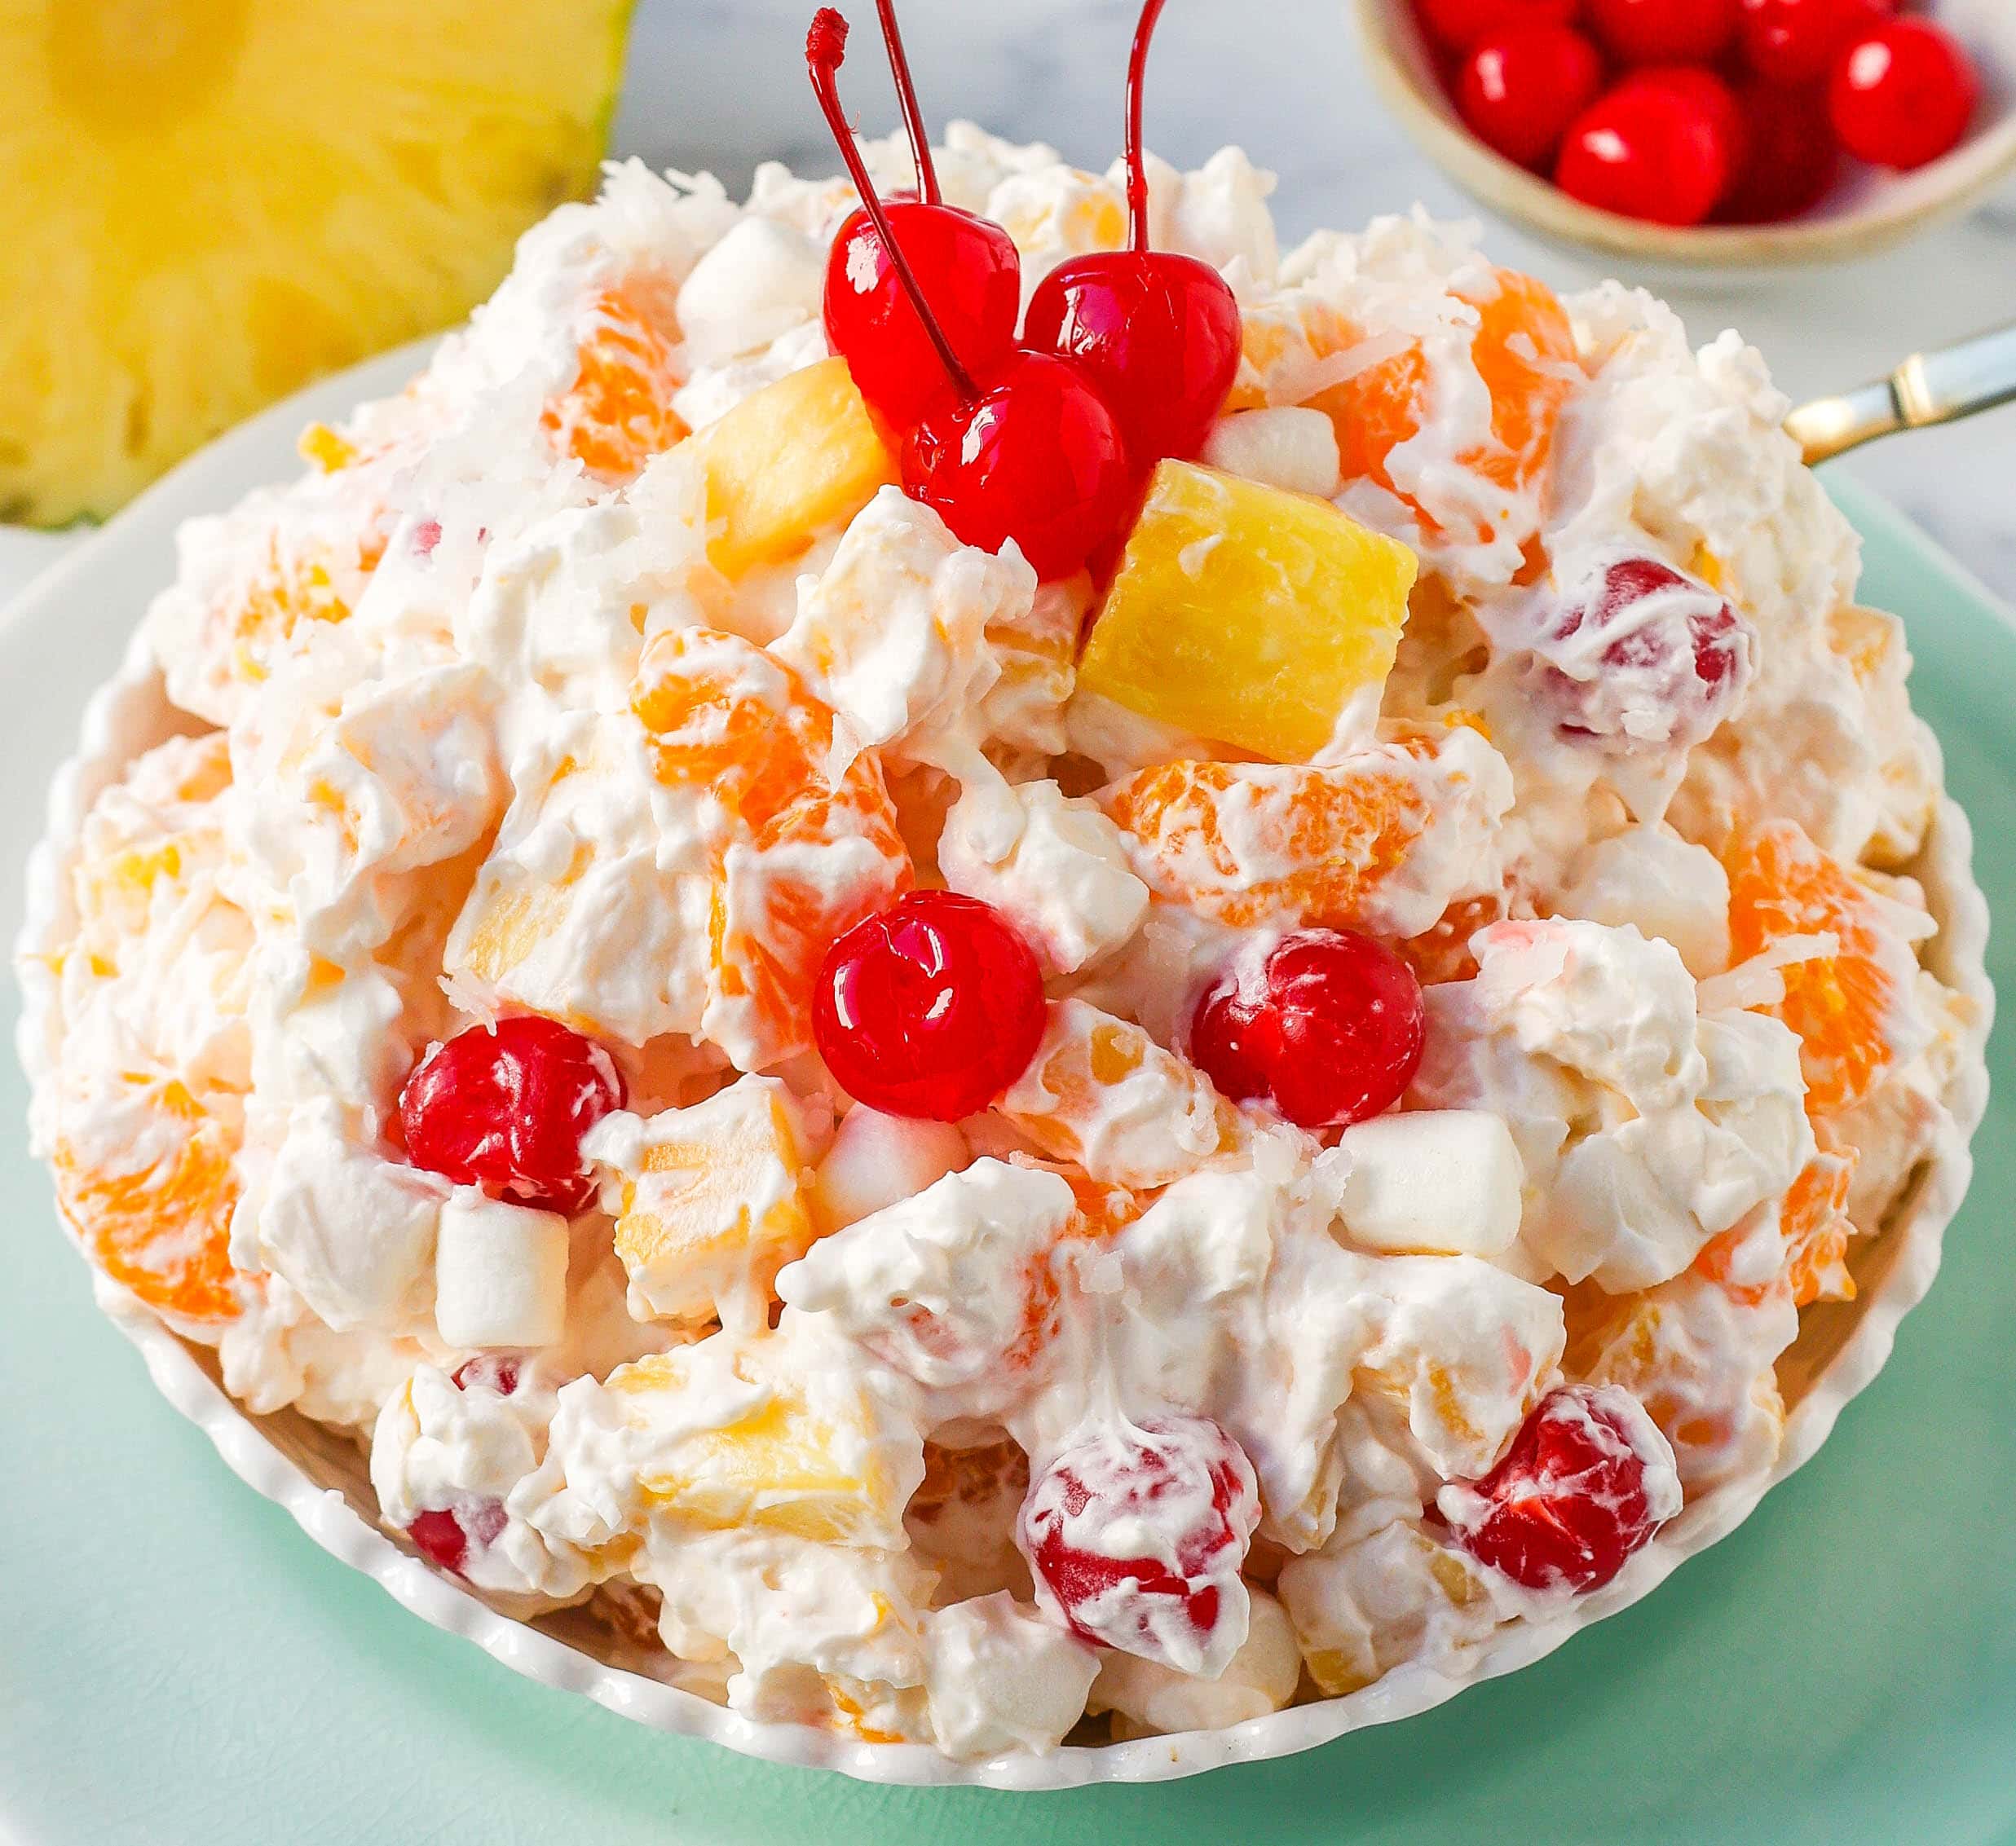
Ambrosia Salad
Ingredients
Equipment
Method
- Open and thoroughly drain the 11-ounce can of mandarin oranges.
- Open and thoroughly drain the 8-ounce can of pineapple chunks.
- In a large mixing bowl, combine the drained mandarin oranges and pineapple chunks.
- Add 1 cup of miniature marshmallows to the fruit mixture.
- Stir in 1 cup of flaked coconut.
- Add 1 cup of sour cream to the bowl.
- Gently fold all ingredients together until well combined and evenly coated with the sour cream.
- For best results, cover the bowl and chill in the refrigerator for at least 30 minutes to allow the flavors to meld.
- Serve chilled as a refreshing side dish or dessert.
Notes
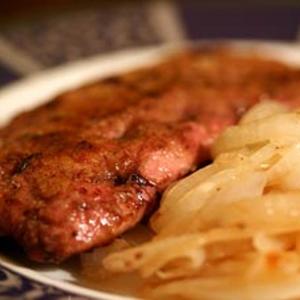
5. **Liver and Onions** Here’s one that often divides a room: Liver and Onions. For many younger generations, the very thought might induce a shudder, and indeed, this dish has “largely disappeared from restaurant menus, as younger generations are far less inclined to order or eat them.” This significant “shift is tied to a general aversion among younger people toward liver and offal,” despite liver being touted as “one of the most nutritionally dense foods available.”
Historically, the “origins of (and preferences for) the dish culminat[ed] in the UK,” and its “stateside lack of popularity seems to be simply because Americans have not completely developed a taste for it.” The unique pairing works by having “the onions, once cooked, contribute a slight sweetness that counteracts liver’s somewhat metallic taste,” an attempt to balance the assertive flavor profile of the organ meat.
Despite its culinary balancing act and undeniable health benefits, the “strong, often bitter or gamey flavor of liver does not rank it among crowd pleasers.” For many, the “negative associations may have just as much to do with bitter memories of being forced to eat it as with the potentially unsavory taste.” It’s a classic case of childhood trauma dictating adult preferences!
Once a ubiquitous “diner staple,” Liver and Onions has “lost prevalence, perhaps in tandem with a dwindling diner culture.” Even when seeking a diner meal, “people simply don’t stop in for a plate of liver and onions anymore.” It’s a “cheaper cut of meat,” certainly, but it “doesn’t conjure the same luxurious sentiments as choicer cuts of beef,” nor is it regarded as a “comfort food source of protein like the ubiquitous burger.”
It’s truly a paradox: “Even though liver contains significantly more vitamins than spinach or kale,” earning it “the distinction of being an underrated superfood,” it appears to be “one superfood that has not caught on.” While global demand for beef liver is projected to surge dramatically from “$5.4 billion in 2024” to “$15.03 billion by 2037,” its disappearance from the American dinner plate for direct consumption is a clear sign of changing palates and cultural taboos.
Liver And Onions
Ingredients
Equipment
Method
- Pat the thinly sliced calves liver thoroughly dry with paper towels.
- In a shallow dish, combine flour with salt, pepper, paprika, and dry mustard to taste. Dredge each liver slice thoroughly in the seasoned flour, shaking off any excess.
- Slice the yellow onions thinly.
- Heat 1.5 teaspoons of bacon fat in a large frying pan or skillet over medium heat.
- Add the sliced onions to the pan and cook slowly, stirring occasionally, until deeply softened and caramelized to a rich golden brown, about 15-20 minutes. Remove onions from the pan and set aside.
- Add the remaining 1.5 teaspoons of bacon fat to the same pan and increase heat to medium-high.
- Once the fat is shimmering, carefully add the dredged liver slices in a single layer, being careful not to overcrowd the pan. Cook for 1-2 minutes per side, or until beautifully browned and just barely pink in the center. Cook in batches if necessary to avoid steaming.
- Return the caramelized onions to the pan with the cooked liver and gently toss to combine and warm through.
- Transfer the liver and onions to serving plates and serve immediately.
Notes
Read more about: Forget What You Thought: Why Motor City Pizza’s Reign Isn’t Ending, It’s Just Getting Started!

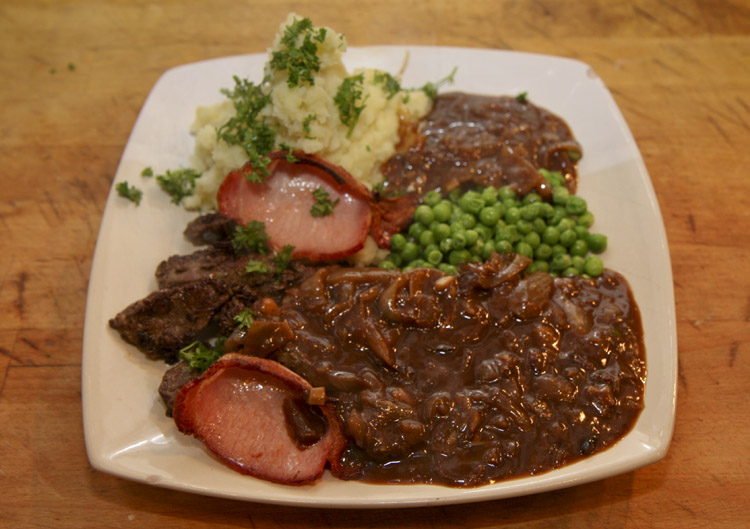
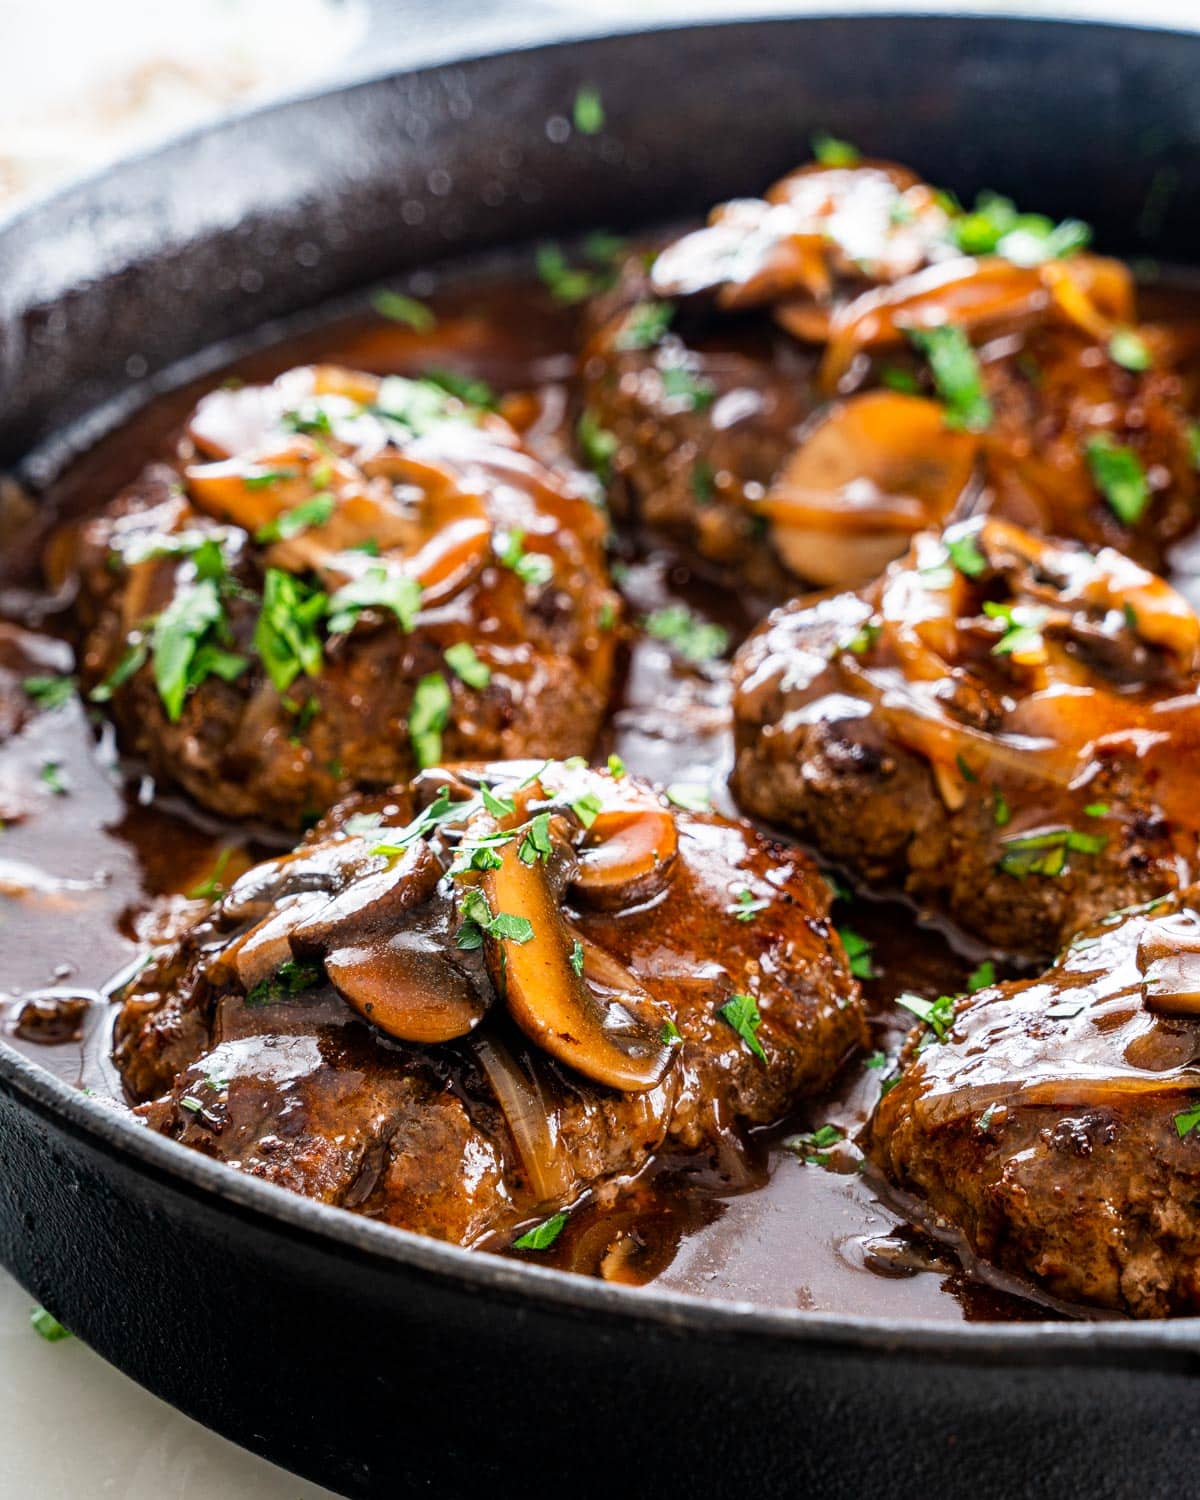
6. **Aspic and Savory Gelatin Salads** Before Jell-O salads, there was aspic, the sophisticated (or perhaps unsettling, depending on your view) ancestor of all things gelatinous. “Aspic and Savory Gelatin Salads were a hot trend in the 20th century” and truly represented a bygone era of culinary ambition. The ability to serve “shimmering towers of gelatin containing vegetables, meats, or seafood was a huge status symbol at dinner parties in the first half of the 20th century.”
These elaborate molds weren’t just about presentation; they were a display of wealth and technological access. They “demonstrated one’s sophistication and access to modern conveniences at a time when only a small percentage of the population had electricity in their homes, let alone refrigerators and freezers.” Imagine the awe of guests witnessing a perfectly congealed creation, knowing the effort and equipment required to produce such a marvel!
Gelatin itself, derived from “boiling animal skin and bones,” was once “a status symbol” largely “because the process of making it was quite labor-intensive.” While “today gelatin persists as a predominantly sweet treat largely associated with Jell-O,” there was a distinct time when “gelatin dishes were meant to be entirely savory.” Aspics “particularly appealed to the Victorian palate in the form of meals of meat encased in gelatin,” creating “works of art” that, “from afar,” might have been impressive, though “up close they might appear a bit unsavory to the contemporary eye.”
However, as the 20th century progressed, marked by “scarcity of resources during the numerous wars and subsequent economic hardships,” gelatin “escaped its elite origins to become a means of pure sustenance.” “Congealed salads were a way to stretch meals and reduce waste; leftovers could simply be served in a new form surrounded by a gelatinous casing.” This shift from high art to practical necessity highlights the adaptability of food in challenging times.
Despite fitting “the postwar inclination towards neatness and efficiency that defined many culinary habits of the 1950s,” the context tellingly notes that “there is little evidence to suggest even then that gelatin salads were actually enjoyed by those who had to eat them.” This perhaps explains their ultimate demise. Today, “aspic is largely absent from menus, seen as more peculiar than palatable,” its vivid, wobbly legacy enduring mainly “in cookbooks and vintage culinary imagery, a nod to a bygone era.”
Product on Amazon: French’s Original Crispy Fried Onions, 24 oz – One 24 Ounce Bag of Crunchy Fried Onions to Sprinkle on Salads, Potatoes, Chicken, Burgers and Green Bean Casseroles
Brand: French’s
Binding: Grocery Product Group: Grocery
Price: 9.12 USD
Rating: 4.7 Total reviews: 7642
Features:
1. EXCEPTIONAL FLAVOR, TEXTURE AND COLOR: Made with whole, carefully sourced globe onions, Frenchs Original Crispy Fried Onions deliver versatile flavor, exceptional texture and a beautiful golden color
2. HIGH QUALITY ONIONS: Americas top product for crispy onions, Frenchs onion topping will add a satisfying crunch to any recipe; premium onions sealed for maximum freshness and flavor
3. MADE FOR CHEFS: Chefs can add the ideal amount of crunch to signature dishes with Frenchs 24-ounce bag of fried onions; cut down on preparation time with pre-made Frenchs Fried Onions
4. VERSATILE: Sprinkle on burgers, chicken, potatoes and salads for delicious texture and a punch of flavor; onion topping complements all kinds of classic dishes and new menu items
5. FEEL GOOD INGREDIENTS: Kosher, vegetarian and free from high fructose corn syrup, dairy and GMOs; embellish your recipes with crispy fried onions you can feel good about serving
Shopping on Amazon >>

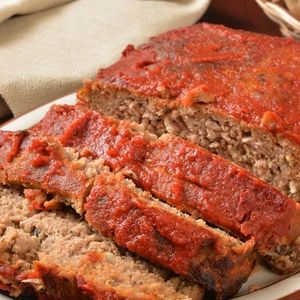
7. **Meatloaf** Meatloaf, once a comforting centerpiece of the American family dinner, is another dish that has seen its star dim considerably. For generations, this “ground beef and breadcrumb concoction” was “the weekly centerpiece that allowed families to make a small amount of pricey meat last for several days.” It was the ultimate thrifty meal, providing hearty sustenance without breaking the bank.
The history of meatloaf-like dishes stretches back much further, with “predecessors enjoyed as far back as the days of Ancient Rome.” Its strongest roots were in “northern Europe for centuries,” and it was the “German-descended Pennsylvania Dutch who devised a meatloaf prototype in the States” with their “scrapple,” making use of “all the extraneous parts of meat left over from a butchering session.” This practice of using every bit of the animal showcases a long-standing tradition of resourceful cooking.
The dish’s mainstream popularity in America truly soared during the major events of the 20th century. “With scant food sources during world wars and the Depression, Americans embraced the meatloaf as a simple but nourishing staple that could feed many on a low budget.” It was versatile, adaptable, and most importantly, affordable, making it an essential part of the national diet during times of scarcity.
Meatloaf “remained popular well into the 50s and 60s,” a period when “creative cooks embraced meatloaf’s simplicity while experimenting with its versatility,” finding new ways to flavor and prepare this humble staple. It was a blank canvas for culinary expression within the confines of practical, budget-conscious cooking.
However, modern times have brought new challenges. “In the United States, red meat consumption, particularly beef, has decreased significantly in recent decades,” with “USDA data” showing that “in 1976, Americans consumed about 89 pounds of red meat per capita.” While “restaurants in the United States continue to offer meatloaf as part of their menus,” it is increasingly “becoming a relic of a bygone era,” replaced by “a far wider variety of options than in previous generations,” and challenged by “a growing prevalence of plant-based preferences.” Its heyday, defined by scarcity, has been overshadowed by an era of abundance.
Alright, buckle up, food fanatics, because our journey through America’s culinary graveyard isn’t over yet! We’ve already taken a fascinating look at how some once-loved dishes became mere whispers of bygone eras. Now, get ready to unearth the stories behind even more forgotten American culinary curiosities. We’re talking about everything from frozen classics to truly exotic delicacies, and we’ll examine how evolving health trends, modern dining habits, and some serious societal aversions ultimately relegated these historical dishes to the annals of food nostalgia. Get ready for more delicious (and sometimes, let’s be honest, slightly bizarre) revelations!
Product on Amazon: Stouffer’s Family Size Meatloaf Frozen Meal
Brand: Stouffer’s
Binding: Grocery Product Group: Amazon Fresh Perishables
Price: 7.99 USD
Rating: 4.5 Total reviews: 2460
Package Information: Box
Number of Items: 1
Flavor: Meatloaf
Item Weight: 33 Ounces
Features:
1. SERVE UP COMFORT WITH EVERY BITE Gather around the table with your loved ones when you serve Stouffer’s Family Size Meatloaf. It’s a delicious dish that will turn dinnertime into a joyful moment SNAP and EBT Eligible item
2. CRAFTED WITH QUALITY YOU CAN TASTE Stouffer’s frozen dinners are thoughtfully crafted with flavorful, quality ingredients. Our oven roasted meatloaf is made with beef and pork, and topped with homestyle beef gravy
3. COOK IN THE OVEN OR MICROWAVE Bake the frozen meatloaf dinner in the oven for 65 minutes. Or cook in the microwave for 18 minutes
4. SOLVE DINNER DREAD When the recipe has 20 ingredients and the clock strikes dinner, think Stouffer’s. Whether you’re looking for after-work dinner ideas, or you need some easy comfort food, this meatloaf frozen dinner is the perfect way to solve your ‘what’s for dinner?’ dilemma
5. FAMILY SIZE PORTION With about 6 servings of this meatloaf dinner, you can keep the whole family happy and satisfied. Take boring and bland foods off the dinner table
Shopping on Amazon >>
Meatloaf
Ingredients
Equipment
Method
- Preheat your oven to 350°F (175°C).
- Finely chop the onion, garlic, and fresh parsley as specified.
- In a large mixing bowl, combine the meatloaf mix, cooked oatmeal, chopped onion, parsley, soy sauce, eggs, garlic, dried thyme, and black pepper.
- Gently mix all ingredients until just combined. Be careful not to overmix, as this can result in a tough meatloaf.
- Form the mixture into a uniform loaf shape and place it into a loaf pan.
- Evenly spread the chili sauce over the top of the meatloaf.
- Bake for approximately 60-70 minutes, or until an instant-read thermometer inserted into the center reads 160°F (71°C).
- Remove the meatloaf from the oven and let it rest in the pan for 10-15 minutes before slicing.
- Slice and serve warm, allowing juices to redistribute for a moist result.
Notes
Read more about: Beyond the Stars and Stripes: Unmasking the Surprising International Roots of 15 ‘All-American’ Foods

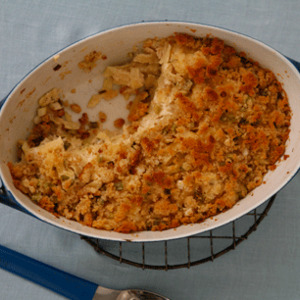
8. **Tuna Noodle Casserole**Ah, Tuna Noodle Casserole! This might just be the quintessential postwar staple, a dish that embodied the era’s culinary phenomenon of quick and easy-to-prepare meals straight from the pantry. Campbell’s even elegantly described it as the “original dump and bake,” a testament to its effortless charm. With many recipes simply calling for canned tuna, cream of mushroom soup, noodles, breadcrumbs, and peas, it was a quick, fortifying, and relatively hands-off meal that became a dinner table hero for countless families.
This culinary convenience really took off with the “postwar proliferation of canned foods in the 1950s.” Imagine being able to whip up a hearty meal with just a few cans and a box of pasta – it was revolutionary for its time! This casserole wasn’t just food; it was a symbol of efficiency and a helping hand for busy homemakers who embraced the simplicity that packaged ingredients offered.
So, what happened to this humble hero? Well, a lot of it comes down to a growing “distrust of canned tuna and processed ingredients in general.” Concerns over “mercury levels” didn’t help, and a broader “shift away from sodium-heavy options” certainly played a role. There’s also the amusing, yet telling, observation from Andy Mecs, former Vice President of Marketing and Innovation at StarKist, who noted, “A lot of millennials don’t even own can openers.” Perhaps it’s just too much work for a generation that prefers fresh, minimally processed ingredients!
Today, while you might still find a recipe or two lurking in old cookbooks or at nostalgic family gatherings, tuna noodle casserole’s widespread popularity has definitely receded. It’s a classic example of how evolving tastes and a demand for different kinds of convenience have slowly nudged a once-beloved dish out of the daily rotation. It’s a bit sad, but hey, at least we’ll always have those comforting memories!
Product on Amazon: Stouffer’s Tuna Noodle Casserole Frozen Meal
Brand: Stouffer’s
Binding: Grocery Product Group: Amazon Fresh Perishables
Price: 0.25 USD
Rating: 4.3 Total reviews: 1855
Package Information: Box
Number of Items: 1
Flavor: Tuna
Item Weight: 12 Ounces
Features:
1. DELICIOUS BITES FOR SOLO NIGHTS You’ll love every bite of Stouffer’s single serve Tuna Noodle Casserole. Make dinnertime a joyful moment with homestyle food SNAP and EBT Eligible item
2. CRAFTED WITH QUALITY YOU CAN TASTE Stouffer’s tuna noodle casserole is thoughtfully crafted with flavorful, quality ingredients, made with freshly made egg noodles, tuna, mushrooms, celery & peas in a creamy sauce
3. SOLVE DINNER DREAD When the recipe has 20 ingredients and the clock strikes dinner, think Stouffer’s. Whether you’re looking for after-work dinner ideas, or you need some easy comfort food, this tuna noodle casserole is the perfect way to solve your ‘what’s for dinner?’ dilemma
4. SINGLE PORTION Take boring and bland foods off the table with our single serve tuna casserole. It’s a dish you can look forward to on any night of the week
5. COOK IN THE OVEN OR MICROWAVE Bake the tuna casserole in the oven for 45 minutes, or cook it in the microwave for 7 minutes
Shopping on Amazon >>
Tuna–Noodle Casserole
Ingredients
Equipment
Method
- Preheat your oven to 375°F (190°C). Grease a 9×13-inch baking dish.
- Bring a large pot of salted water to a boil. Add the flat egg noodles and cook according to package directions until al dente; drain well.
- While noodles cook, melt 4 tbsp. of butter in a large skillet or saucepan over medium heat. Add the chopped scallions and cook until softened, about 3-5 minutes.
- Stir in the flour and dry mustard into the scallions, cooking for 2 minutes to create a roux.
- Gradually whisk in the milk until the sauce is smooth and thickened. Season generously with salt and freshly ground black pepper.
- Remove the sauce from heat and gently fold in the drained tuna chunks and cooked noodles.
- Transfer the noodle mixture into the prepared baking dish, spreading evenly.
- In a small skillet, melt the remaining 6 tbsp. of butter. Add the fresh bread crumbs and cook over medium heat, stirring frequently, until golden brown and crispy.
- Sprinkle the toasted bread crumbs evenly over the casserole.
- Bake for 20-25 minutes, or until the casserole is bubbly and the topping is golden brown. Let rest for a few minutes before serving.
Notes
Read more about: Unlock the Secrets: Your Ultimate Guide to Pairing Wine with Beloved Comfort Foods
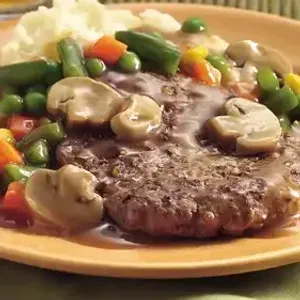
9. **Salisbury Steak -Frozen**For many, Salisbury Steak brings to mind those iconic frozen TV dinners, a symbol of mid-century convenience and a quick fix for a hungry family. This dish, named after Dr. James Salisbury who championed ground beef patties covered in brown gravy as a nutritious and convenient meal solution, was a staple that promised a hearty, no-fuss dinner right out of the freezer. It was the epitome of efficiency for its time, designed to make mealtime simpler.
However, the golden age of the frozen Salisbury Steak didn’t last forever. The “frozen meal category saw a downturn as consumers increasingly gravitated toward fresh, organic, and health-conscious alternatives,” according to the American Frozen Food Institute. Between 2010 and 2020, sales of this once-ubiquitous dish experienced a “significant decline,” reflecting a major shift in what Americans wanted on their plates.
The decline can be largely attributed to changing palates and a desire for more diverse culinary experiences. As options expanded, consumers started looking for “more gourmet, internationally inspired, or lighter frozen meal options” that offered a bit more pizazz than the classic brown gravy and patty combo. The straightforward appeal of Salisbury Steak simply couldn’t compete with the newer, trendier alternatives.
While you might still spot it in the frozen aisle, Salisbury Steak has definitely lost its former glory. It’s a poignant reminder of how quickly food trends can change, moving from a symbol of modern convenience to a nostalgic relic as consumer preferences shift towards fresher, more diverse, and often more health-conscious choices. It had a good run, though!
Product on Amazon: Stouffer’s Salisbury Steak, Single Serve, Frozen Salisbury Steak, Single Frozen Meals 9.625 oz
Brand: Stouffer’s
Binding: Grocery Product Group: Amazon Fresh Perishables
Price: 3.49 USD
Rating: 4.5 Total reviews: 5699
Number of Items: 1
Flavor: Salisbury Steak
Item Weight: 0.6 Pounds
Item Form: Solid
Features:
1. DELICIOUS BITES FOR SOLO NIGHTS You’ll love every bite of Stouffer’s Single Serve Salisbury Steaks. Make dinnertime a joyful moment with homestyle food SNAP and EBT Eligible item
2. CRAFTED WITH QUALITY YOU CAN TASTE Stouffer’s frozen dinners are thoughtfully crafted with flavorful, quality ingredients. Our Salisbury steak dinner is made with roasted beef patty, a rich onion gravy, and macaroni and cheese
3. COOK IN THE OVEN OR MICROWAVE Bake the frozen Salisbury steak dinner in the oven for 35 minutes. Or cook in the microwave for 5 and a half minutes
4. SOLVE DINNER DREAD When the recipe has 20 ingredients and the clock strikes dinner, think Stouffer’s. Whether you’re looking for after-work dinner ideas, or you need some easy comfort food, this Salisbury steak dinner is the perfect way to solve your ‘what’s for dinner?’ dilemma
5. SINGLE PORTION Take boring and bland foods off the table with our single serve Salisbury steak dinner. It’s a dish you can look forward to on any night of the week
Shopping on Amazon >>
Veggie Salisbury Steak
Ingredients
Equipment
Method
- Season the ground beef patties generously with peppered seasoned salt on both sides.
- Heat a large skillet over medium-high heat. Place the seasoned patties in the skillet and cook for 3-5 minutes per side, or until nicely browned and cooked through. Remove the patties from the skillet and set them aside.
- In the same skillet, add the chopped onion and frozen mixed vegetables. Sauté for 3-5 minutes, stirring occasionally, until the onion is softened and translucent, and the vegetables are tender-crisp.
- Stir in the ketchup, Worcestershire sauce, and drained sliced mushrooms into the skillet with the vegetables. Cook for 1 minute, allowing the flavors to meld.
- Pour in the beef gravy, stirring well to combine all ingredients thoroughly. Bring the gravy mixture to a gentle simmer.
- Carefully return the cooked beef patties to the skillet, nestling them into the simmering gravy and vegetable mixture.
- Reduce the heat to low, cover the skillet, and let it simmer for 5-7 minutes. This allows the patties to absorb the rich flavors of the gravy and ensures they are heated through.
- Taste the gravy and adjust seasoning if necessary.
- Serve the Veggie Salisbury Steak hot, spooning the flavorful gravy and vegetables over each patty.
Notes

10. **Fondue**Remember fondue? It was once a beloved shared experience, a social centerpiece for dinner parties that invited guests to gather around a simmering pot of cheesy (or chocolaty!) goodness. This culinary compulsion actually had humble beginnings as a practical winter peasant dish in Switzerland, but thanks to an aggressive, targeted advertising campaign by the Swiss Cheese Union in the post-WWI era, it was elevated to elite status as Switzerland’s national dish by the 1930s. Its popularity hopped across the pond to the U.S. a few decades later, becoming a true fad.
In America, fondue experienced a major resurgence, often associated with the glamorous ‘Disco Decade.’ The communal aspect, dipping and sharing, made it incredibly popular, transforming mealtime into an interactive event. It was the kind of dinner party trick that wowed guests and fostered conversation, turning a meal into a memorable experience that lasted for hours.
But alas, the fondue fad didn’t quite make it into the new millennium with the same vigor. “Fewer people are now hosting elaborate dinner parties that require guests to spend hours over a pot of fondue, so home fondue-making has seen a steady decline in the 2000s.” Plus, modern diet trends often advise cutting out both bread and dairy, the two main staples of traditional cheese fondue, making it a less appealing choice compared to other collective dining traditions like hot pot or shabu-shabu.
Today, the fondue pot is often a “retro novelty” rather than a must-have wedding gift. While cheese fondue remains widespread in its native Switzerland, stateside, it’s largely become a “nostalgia piece.” Chocolate fondue, a mid-century American innovation to keep the trend alive, has fared a bit better, evolving into somewhat of a special occasion treat, often appearing in the form of a chocolate fountain. Still, the days of fondue being a household staple seem firmly in the past.
Product on Amazon: Emmi Swiss Fondue, 14 oz
Brand: Emmi
Binding: Grocery Product Group: Amazon Fresh Perishables
Price: 0.89 USD
Rating: 4.6 Total reviews: 563
Number of Items: 1
Unit Count: 14.0 Ounce
Variety: Swiss
Item Form: Solid
Features:
1. Origin: Switzerland
2. Milk Type: Cow
3. Yes
4. Pre-mixed Swiss cheese blend with brandy and kirsch
5. Warm on the stovetop or microwave for instant, authentic fondue
Shopping on Amazon >>

Fondue Español
Ingredients
Equipment
Method
- Rehydrate the dried ancho chile in 1 cup of hot water until softened (about 20-30 minutes). Remove seeds and stem, reserving the soaking water.
- Roast bell peppers and tomatoes in the oven until softened and slightly charred, then peel tomatoes if desired.
- Toast slivered almonds and day-old French bread slices until golden brown; set aside.
- In a blender or food processor, combine the rehydrated ancho chile, roasted peppers, tomatoes, toasted bread, minced garlic, toasted almonds, salt, and black pepper. Blend until a smooth purée forms, adding some reserved chile water or red wine vinegar to aid blending if needed.
- Grate the Manchego Curado cheese.
- In a medium saucepan, gently warm the puréed mixture over medium-low heat.
- Gradually add the grated Manchego cheese to the saucepan, stirring continuously with a whisk or wooden spoon until the cheese is completely melted and the fondue is smooth.
- Stir in 1/4 cup dry white wine.
- Adjust the fondue’s consistency by adding additional warm water or white wine, one tablespoon at a time, until it reaches your desired dipping consistency. Taste and adjust seasoning with salt, pepper, or optional cayenne pepper.
- Transfer the Fondue Español to a preheated fondue pot and serve immediately with your choice of dippers.
Notes
Read more about: Nearly a Decade Behind the Scenes at Longhorn Steakhouse: Secrets, Hacks, and What I Learned

11. **Baked Alaska**Baked Alaska – now there’s a dessert that was once the magnum opus of home cooks, a true showstopper designed to wow guests at dinner parties. Imagine the spectacle: a perfectly cooked, frozen confection, dramatically torched at the table, flames dancing atop its meringue peaks! It required a serious level of skill, as it involved “cooking and freezing multiple components with skill before torching the final meringue topping at the table.” This wasn’t just dessert; it was culinary theater!
This intricate dessert was the ultimate flex for a host, demonstrating not only their culinary prowess but also their dedication to creating a truly unforgettable dining experience. It stood as a testament to an era when elaborate, multi-step dishes were the height of sophistication and a way to make a grand statement.
So, why has this fiery marvel all but disappeared? Well, its very complexity is its downfall. “The decline in the popularity of Baked Alaska is due to both the skill required to make it and the movement away from fussy, over-the-top desserts in favor of something simpler or less of a production.” The technical difficulties and labor required to create it make it a rare sight, with Tastewise reporting that “only 0.04% of restaurants currently offer Baked Alaska on their menus.”
Today, the thought of whipping up a Baked Alaska at home might seem more like a daunting challenge than a delightful endeavor. It’s a magnificent relic from an era of culinary extravagance, a dessert that, while still impressive, has been largely phased out by a modern preference for ease and understated elegance. It’s truly a shame, as a well-made Baked Alaska is a sight to behold!
Product on Amazon: Vegan Baked Alaska (Auntie Clem’s Bakery Book 9)
Binding: Kindle Edition Product Group: Digital Ebook Purchas
Price: 0.99 USD
Rating: 4.3 Total reviews: 81
Shopping on Amazon >>

Baked Alaska
Ingredients
Equipment
Method
- Cut the pound cake into a round shape, slightly smaller than your desired Baked Alaska, or to fit the base of your serving dish.
- Allow chocolate ice cream to soften slightly, then scoop it onto the pound cake, shaping it into a dome. Work quickly to minimize melting.
- Place the cake and ice cream assembly onto a freezer-safe plate or small baking sheet lined with parchment paper, and freeze for at least 2-3 hours, or until solid.
- In a very clean, grease-free mixing bowl, combine egg whites and cream of tartar. Beat with an electric mixer on medium-high speed until soft peaks form.
- Gradually add sugar, one tablespoon at a time, while continuing to beat. Once all sugar is incorporated, add vanilla extract and beat until stiff, glossy peaks form.
- Retrieve the deeply frozen cake and ice cream. Quickly and completely cover the entire frozen dome with the meringue, ensuring no ice cream is exposed. Use an offset spatula to create decorative peaks.
- Immediately torch the meringue with a kitchen torch until beautifully browned and caramelized.
- Serve immediately to enjoy the delightful contrast of hot meringue and frozen ice cream.
Notes
Read more about: The Digital Witness: An In-Depth Examination of Livestreamed Crimes and Their Unsettling Societal Impact
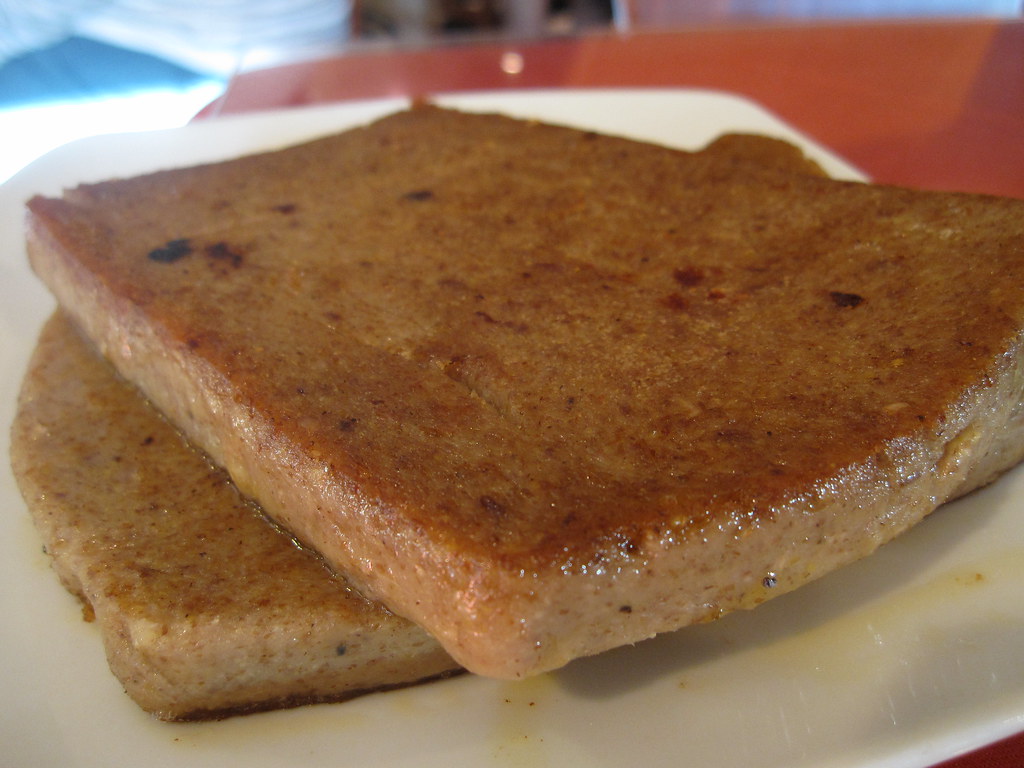
12. **Scrapple**Here’s a dish that hails from the thrifty traditions of the Pennsylvania Dutch: scrapple. It’s a mash of “pork trimmings, cornmeal, and flour” originally conceived as a super-efficient way to use up “every part of the pig to make a filling breakfast sausage.” This wasn’t just about taste; it was about resourcefulness, a practice deeply ingrained in farming communities where nothing went to waste.
Scrapple truly embodies a historical approach to food—a time when economy and sustenance were paramount. It started as a practical necessity, taking “all the extraneous parts of meat left over from a butchering session” and transforming them into a loaf that could be easily sliced and fried for a hearty, energy-packed breakfast. It’s a fascinating glimpse into the culinary ingenuity born of necessity.
However, modern American palates have, shall we say, become a bit more… particular. “The pig parts that go into its creation aren’t particularly appetizing to the modern eye, which has given scrapple a bad reputation.” It seems the idea of “trimmings” just doesn’t sit well with contemporary diners. As a result, “grocery store sales of Scrapple have steadily decreased since 2000, as modern Americans have abandoned this Pennsylvania Dutch delicacy.”
Today, scrapple remains a regional specialty with a loyal following, particularly in its birthplace, but it’s far from the mainstream staple it once was. Its decline illustrates a broader shift away from nose-to-tail eating and a general aversion to dishes that explicitly highlight their more unconventional components. It’s a shame, as it’s a piece of American culinary history!
Product on Amazon: Habbersett Scrapple 1 Lb. (6 Pack)
Brand: Habbersett
Binding: Misc. Product Group: Grocery
Price: 69.95 USD
Rating: 4.6 Total reviews: 1349
Number of Items: 6
Item Weight: 7 Pounds
Size: 1 Pound (Pack of 6)
Number of Pieces: 6
Features:
1. Six 1 pound blocks
2. The scrapple will have a minimum 14 day Best By window upon arrival
3. A Philadelphia Favorite since 1863
4. A Guaranteed 14 day minimum Best By date window upon delivery.
Shopping on Amazon >>

Scrapple
Ingredients
Equipment
Method
- Brown the ground pork sausage in a large pot or Dutch oven over medium heat, breaking it apart as it cooks.
- Once the sausage is fully cooked, drain any excess fat from the pot.
- Add the sweetened condensed milk to the pot with the cooked sausage.
- Gradually whisk in the yellow cornmeal and coarsely ground black pepper, ensuring no lumps form.
- Continue to cook the mixture over medium-low heat, stirring constantly with the whisk or a sturdy spoon, until it thickens considerably and pulls away from the sides of the pot.
- Remove the pot from the heat and carefully transfer the thick scrapple mixture into a loaf pan, pressing it down firmly and evenly with the back of a spoon or spatula.
- Allow the scrapple to cool to room temperature, then cover the loaf pan and refrigerate for at least 4 hours, or preferably overnight, until completely firm.
- Once thoroughly chilled, unmold the scrapple onto a cutting board.
- Using a sharp knife, slice the firm scrapple into ½-inch thick pieces.
- Heat a lightly oiled skillet over medium heat and fry the sliced scrapple for 3-5 minutes per side, or until golden brown and crispy.
Notes
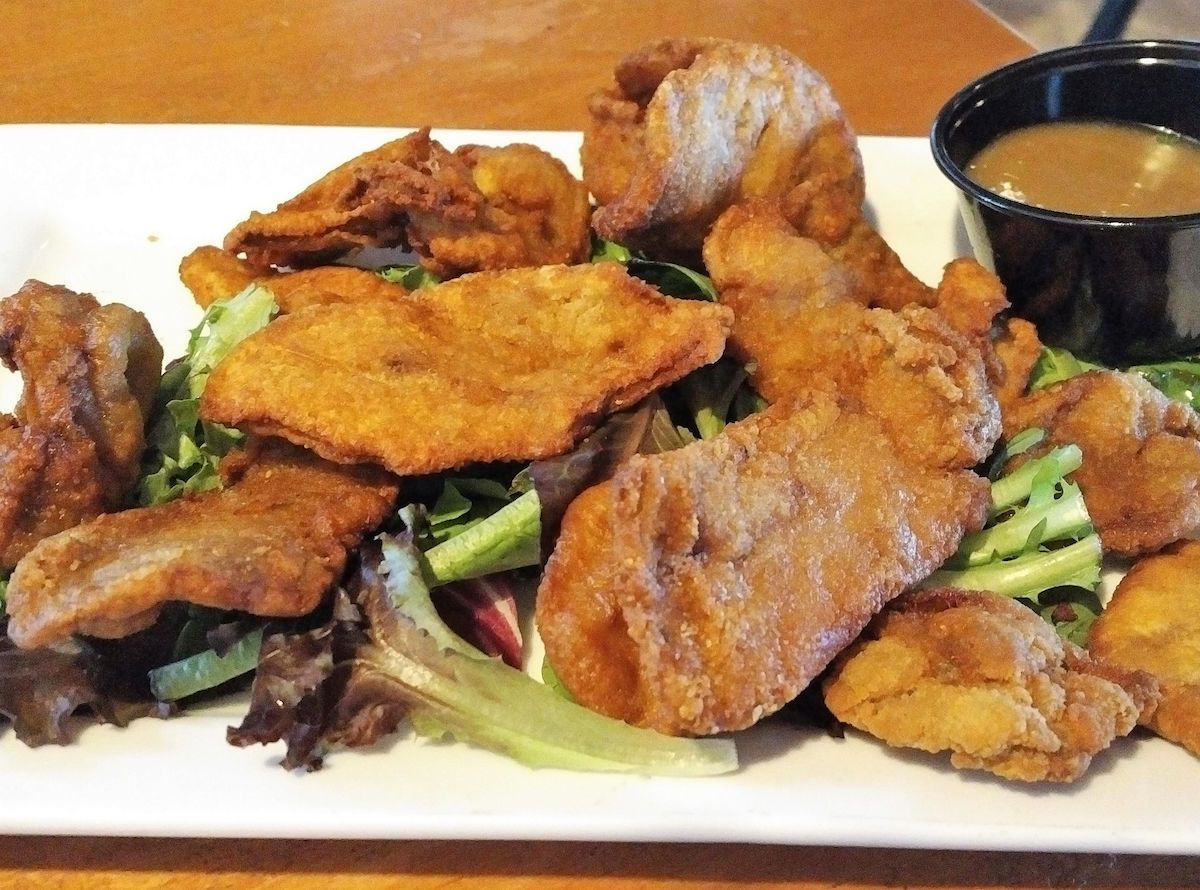
13. **Rocky Mountain Oysters**Alright, prepare yourselves, because this next one is definitely for the adventurous eaters of yesteryear! We’re talking about “Testicle fries, or Rocky Mountain oysters,” a dish that certainly makes a statement. Believe it or not, “organ meats once played a central role in the American diet, particularly during resource-scarce periods such as the Great Depression and World War II.” This was a time when every edible part of an animal was utilized, and dishes like this were a matter of practical sustenance.
These were not just novelty items; they were a significant source of protein and nutrients during challenging times. For communities, especially those on small, family-run farms, using organ meats was a fundamental aspect of responsible butchery and ensuring no part of a valuable animal went to waste. It reflected a mindset where food scarcity dictated ingenuity in the kitchen.
But with the “postwar era came rapid industrialization and large-scale meat production, which changed consumer habits.” Suddenly, a wider variety of more conventional cuts became readily available and affordable. “American diets shifted to favor more conventional cuts of meat,” and the need to consume offal lessened. “Younger generations, disconnected from traditions of eating offal and the small, family-run farms that depended on it,” simply didn’t develop a taste for these unique delicacies.
As a result, Rocky Mountain oysters have “significantly declined in popularity.” These once-popular dishes have become “increasingly rare,” largely relegated to novelty restaurants or specific regional festivals. It’s a clear example of how changes in food production and generational preferences can push even historically significant foods out of the mainstream.
Product on Amazon: Rocky Mountain Beef Oysters Sliced & Breaded (1 bag / 10 lbs.)
Brand: TenderBison
Binding: Unknown Binding Product Group: Grocery
Price: 228.75 USD
Rating: 3.9 Total reviews: 15
Size: 10 Pound (Pack of 1)
Flavor: Beef
Item Weight: 10 Pounds
Specialty: Frozen
Features:
1. How many slices per pound? 8 to 9
2. How many slices per case? Varies according to size
3. What are the sizes? Varies according to size
4. What is the thickness? Less than ½”
5. Each are individually breaded use a Chicken Fry Breading.Each are individually breaded use a Chicken Fry Breading.
Shopping on Amazon >>
14. **Fried Brain Sandwich**And for our final culinary curiosity, we present the Fried Brain Sandwich – yes, you read that right! This was once a genuine “Midwest specialty that was served in eateries all across the country.” Gaining popularity in the early 20th century, it was another example of a resourceful dish that found its way onto many American plates, particularly in regions where it became a distinctive local offering.
These sandwiches offered a unique texture and flavor profile, appealing to a specific set of tastes that appreciated the rich, tender quality of brain meat, often thinly sliced and fried until crispy. For a time, it was simply another protein option, a part of the diverse culinary landscape that reflected regional ingredients and historical eating habits.
However, the fate of the fried brain sandwich was sealed by a very specific, and quite terrifying, public health crisis. “Mad cow disease, a neurological disorder caused by eating the brains of infected cows, was a popular fear at the time.” This understandable alarm had a direct and devastating effect on the dish’s popularity, causing a widespread aversion.
Unsurprisingly, this health scare effectively wiped the fried brain sandwich off most menus. It has since become a “historical relic that few places still offer,” a stark reminder of how quickly a dish can fall from grace due to health concerns. While a fascinating piece of culinary history, it’s safe to say this is one once-popular food that won’t be making a comeback anytime soon.
Product on Amazon: Funny Stockyard Diner Fried Brain Sandwiches T-Shirt
Brand: Fried Brain Sandwiches
Binding: Apparel Product Group: Apparel
Price: 14.99 USD
Rating: 5.0 Total reviews: 1
Shopping on Amazon >>

The Secret to the Perfect Salsa Verde
Ingredients
Equipment
Method
- Thoroughly wash and dry the large bunch of flat-leaf parsley, then finely chop it by hand or pulse briefly in a food processor until finely minced, but not a paste.
- Peel the garlic clove and mince it very finely. For a milder garlic flavor, you can crush it to a paste.
- If using capers in salt, rinse them well under cold water to remove excess salt, then finely chop them.
- In a medium mixing bowl, combine the finely chopped parsley, minced garlic, and chopped capers (if using).
- Gradually pour in the virgin olive oil, stirring continuously with a spoon or spatula until all ingredients are well combined and the mixture forms a loose, vibrant green sauce.
- Taste the salsa verde and adjust seasoning if necessary. Depending on the capers, you might not need additional salt.
- For an extra layer of brightness, you may add a squeeze of fresh lemon juice or a dash of white wine vinegar.
- Allow the salsa verde to sit for at least 15-20 minutes for the flavors to meld before serving.
- Serve at room temperature as a condiment for grilled fish, meats, vegetables, or as a dressing.
- Store any leftover salsa verde in an airtight container in the refrigerator, ensuring it is covered with a thin layer of olive oil to preserve its freshness and color, for up to 3-4 days.
Notes
Read more about: Beyond the Stars and Stripes: Unmasking the Surprising International Roots of 15 ‘All-American’ Foods
And there you have it, folks! Another deep dive into the fascinating, sometimes baffling, world of America’s forgotten foods. From the convenience-driven casseroles and frozen dinners of the postwar era to the more adventurous organ meats born of necessity, each of these dishes tells a unique story about our nation’s evolving palate. It’s clear that everything from health scares and shifting demographics to new preferences for fresh, local, and less processed ingredients has played a role in retiring these culinary curiosities to the annals of food nostalgia. While we might not be craving a brain sandwich or a savory aspic anytime soon, understanding their place in our history offers a tasty (and occasionally hilarious) look at just how much our dinner tables have changed. Who knows what modern staples will become the “what’s the deal?” foods of future generations? One thing’s for sure: America’s culinary journey is always full of surprises!


