

Ever think about those once-popular foods that had us all talking, only to fade into obscurity? It’s crazy when you think about how much our plates change over time, almost like how fashion trends or social media crazes do. Foods become hot, have their fifteen minutes of fame in the culinary world, and then silently disappear into obscurity, leaving us to wonder, “Whatever became of that?”
From thick family basics to offbeat snacks that had their day, America’s culinary past is filled with foods that we used to love but have since lost. They’re not mere old-fashioned recipes; they’re freeze frames of whole periods, and they tell us how we lived, what mattered, and even how technology influenced our meals. This phenomenon reflects “broader societal changes in how and what we eat,” driven by evolving tastes, health consciousness, and a constant quest for convenience.
So, take a snack (not powdered Kool-Aid, we’ll arrive there eventually!), get comfortable in your chair, and come along with me on this food time machine. We’re going to travel back through 16 foods that used to be totally trendy but that are all but gone from our plates – victims of changing tastes, emerging health trends, and our constant quest for convenience. Warning: you may find yourself saying, “Wait, I used to totally eat that!”
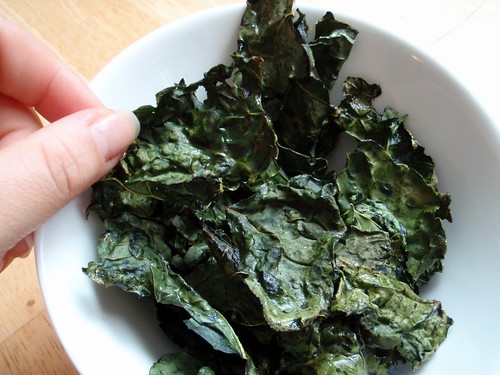
1. **Kale**Who forgot the kale invasion of the 2000s? Overnight, this green leaf turned from sad salad-bar filler to the reigning superfood of the decade. Smoothies, chips, grain bowls – name it, kale was there. It was the health halo ingredient, overshadowing iceberg lettuce and even spinach for a few.
Its meteoric rise was truly something to behold. For a while, it seemed like kale was in everything, championed for its impressive nutritional profile. It embodied the health-conscious shift that swept across American tables, promising vitality and wellness in every bite.
But kale, to be honest, was a bit of a diva. The rough stems, the bitter leaves, and the quirky tradition of “massaging” it into palatability made it more effort than most people felt like expending. This labor-intensive preparation started to wear on home cooks and restaurant chefs alike.
Against the ease of romaine or arugula, the spa-treatment lettuce had lost its glamour. While kale is not quite disappeared, its moment in the sun has obviously passed, fading from its superstar status as more convenient and perhaps less bitter green alternatives gained traction.
Product on Amazon: 365 by Whole Foods Market Organic Chopped Kale, 12 OZ
Brand: 365 by Whole Foods Market
Binding: Grocery Product Group: Amazon Fresh Produce
Price: 4.99 USD
Rating: 4.7 Total reviews: 8767
Item Form: Whole
Item Weight: 0.75 Pounds
Number of Items: 1
Unit Count: 12 Ounce
Features:
1. Brought to you by Whole Foods Market
2. Triple washed
3. Organic
4. Great for recipes
5. Third Party Certifications Include: Organic
Shopping on Amazon >>
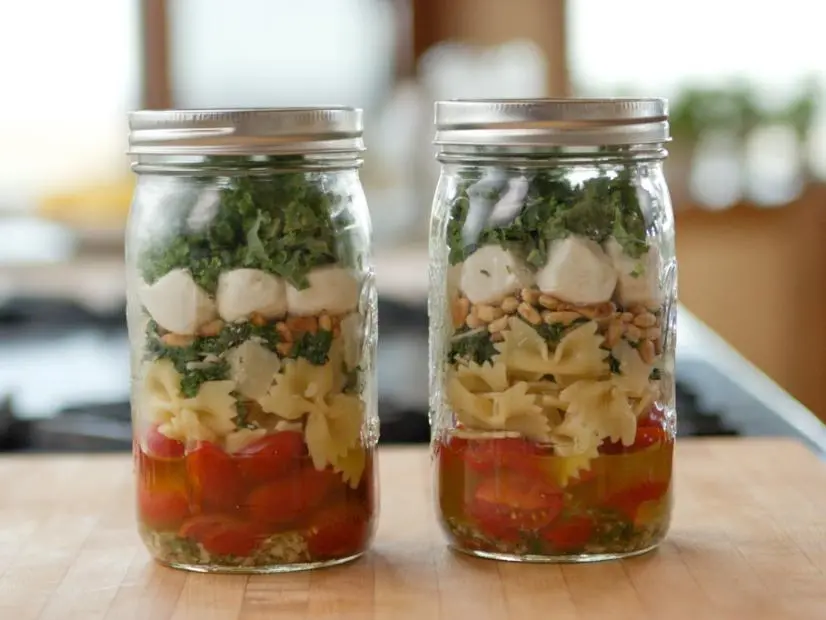
Kale-Pasta Mason Jar Salad
Ingredients
Equipment
Method
- For the pasta and pine nuts: Bring a pot of water to a boil and cook the pasta according to the package directions. Drain, rinse with cold water and add to a bowl. Set aside.
- Add the pine nuts to a small skillet over low heat. Toast slowly over the course of 3 to 4 minutes, tossing regularly. Remove from the skillet and set aside.
- For the dressing: In a large skillet, heat the olive oil and garlic over low heat so that the garlic slowly infuses the oil, about a minute. When the garlic begins to sizzle, stir it around so it doesn’t get too brown. When the garlic starts to turn golden, add the salt and pepper and stir; set aside for 5 minutes.
- After 5 minutes, pour the oil mixture (scraping out the salt, pepper and garlic) into a small mason jar. Add the lemon juice, lemon zest, basil and parsley, put the lid on and shake it.
- For the kale: Finely slice 1 bunch of the kale. Set the same skillet (without cleaning it) over medium-high heat. Add the sliced kale and cook until partly wilted, about 5 minutes. Let cool, then add the Parmesan shavings and toss. Season with salt and pepper.
- Finely slice the remaining 1/2 bunch kale and set aside.
- For the assembly: Start by pouring 1/4 cup dressing into each quart-size mason jar, followed by 3/4 cup cherry tomatoes, 1 1/4 cups pasta, 1 tablespoon pine nuts, 1/2 cup cooked kale with Parmesan, 8 to 9 mozzarella balls and, finally, 1/2 cup sliced raw kale. Put the lids on the jars and refrigerate until ready to eat.
Notes
Read more about: Beyond the Red Carpet: Unpacking 14 of Hollywood’s Most Eye-Popping Age Gap Romances That Defy Expectations

2. **Powdered Milk**Prior to the day when grocery stores boasted unlimited dairy products, powdered milk was revolutionary. Shelf-stable, lengthy, and ideal for refrigerator-less families or those who received no milk delivery, it was a kitchen lifesaver. It powered homes, soldiers, and rural towns in equal measure, providing essential nutrition when fresh milk wasn’t an option.
This unassuming product was a testament to ingenuity and necessity. It allowed communities and individuals to access dairy products without the need for refrigeration, a significant advantage in times when fresh milk distribution was limited or unreliable. Its practicality made it an indispensable staple for many households.
However, as “fresh milk [became] inexpensive, convenient, and uniformly favored for flavor and texture,” the utility of powdered milk began to wane. The widespread availability of refrigerated dairy products transformed grocery stores, making the once-revolutionary powdered form seem less appealing.
Cut to the present, and it primarily exists in baking recipes, emergency supplies, and the occasional camping excursion. With fresh milk now readily accessible and preferred for its taste and texture, powdered milk has faded into obscurity, a relic of a bygone era when convenience meant something entirely different.
Product on Amazon: Swiss Miss Shelf Stable Nonfat Dry Powdered Milk, 45.43 oz. Canister – Fortified with Vitamins A and D, Excellent Source of Calcium
Brand: Swiss Miss
Binding: Grocery Product Group: Grocery
Price: 12.13 USD
Rating: 4.6 Total reviews: 4541
Features:
1. Fortified with Vitamins A & D.
2. Excellent Source of Calcium. Each serving provides 8g of protein.
3. Shelf-Stable: perfect for pantry storage, survival or emergency kits, and everyday use.
4. Versatile in the Kitchen: Great for baking, cooking, or simply mixing into beverages like coffee or smoothies for a creamy taste. Use in recipes like homemade bread, cookies or cake.
5. Easy to Prepare – Multiple Serving Sizes – Quickly mix with cold water to make 1 cup or a full quart.
Shopping on Amazon >>

Powdered Milk Loaf with dense crumb topping
Ingredients
Equipment
Method
- Preheat your oven to 350°F (175°C). Grease and flour an 8.5 x 4.5 inch loaf pan, or line with parchment paper.
- In a large bowl, whisk together self-raising flour (or all-purpose flour with baking powder and salt, if using).
- In a separate bowl, cream the softened unsalted butter with the sugar until light and fluffy. Beat in the eggs one at a time, ensuring each is fully incorporated before adding the next.
- If using powdered milk, dissolve it in the hot water. If using condensed milk, ensure it’s at room temperature.
- Gradually add the dry ingredients to the wet mixture, alternating with the milk mixture, mixing until just combined and no streaks of flour remain.
- Pour the loaf batter evenly into the prepared loaf pan.
- For the crumb topping, combine the white sugar, brown sugar, and melted butter in a small bowl.
- Mix with a fork or your fingertips until a coarse, sandy, dense crumb mixture forms.
- Evenly sprinkle the crumb topping over the top of the loaf batter in the pan.
- Bake for 50-60 minutes, or until a wooden skewer or toothpick inserted into the center of the loaf comes out clean. Let cool in the pan for 10 minutes before transferring to a wire rack to cool completely.
Notes
Read more about: Gene Espy, Pioneering Hiker of the Appalachian Trail, Dies at 98: An In-Depth Look at a Wilderness Legend’s Life and Legacy

3. **Gelatin Salads (Jell-O Molds)**Few dishes holler “retro Americana” as loudly as gelatin salads. Colorful, jiggly monuments of Jell-O filled with fruit, cottage cheese, marshmallows or occasionally even vegetables were superstar potluck fare. They were the undisputed stars of many a mid-century gathering, celebrated for their vibrant appearance and unique texture.
They weren’t just quirky: back in the day, gelatin molds were status symbols. Before boxed mixes, making them was labor-intensive and expensive, so pulling one off was a show of skill. This elaborate preparation added to their allure, making them a centerpiece that spoke volumes about the host’s culinary prowess and dedication.
However, as “the next wave of consumers tilted towards essential, natural products, the days of Jell-O salads were done.” The shift in culinary tastes favored simpler, “more natural flavors,” making the artificial colors and flavors of Jell-O salads seem increasingly out of place.
In the 1980s and ’90s, “allergies to processed, unnatural colors and flavors were revealed as lifestyle diseases. Anything like that made Jell-O salads seem old-fashioned and risky.” Today, you’ll mostly spot them at grandma’s formal dinners, relics of an era when aspics were chic, but now viewed with a mix of nostalgia and mild apprehension.
Product on Amazon: Jello Dessert Mold Tupperware Jel-Ring Serving Mold
Brand: Tupperware
Binding: Kitchen Product Group: Kitchen
Price: 31.57 USD
Rating: 4.7 Total reviews: 356
Material: Plastic
Color: Blue,Green
Shape: Ring
Special Feature: Dishwasher Safe
Features:
1. Tupperware quality brand
2. Removable center and top seals facilitates easier unmolding
3. Color: Mint ice cream
4. Color: Vintage Baby Blue
Shopping on Amazon >>
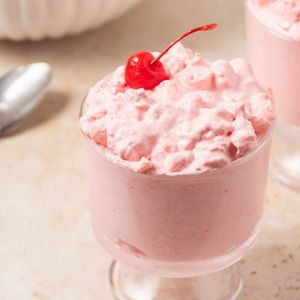
Ambrosia Salad with Jell-O
Ingredients
Equipment
Method
- Ensure the frozen whipped topping is completely thawed in the refrigerator before starting.
- In a large mixing bowl, gently combine the thawed whipped topping and the strawberry-flavored gelatin powder until well incorporated.
- Add the crushed pineapple with its juice to the mixture; do not drain the pineapple.
- Fold in the chopped walnuts and miniature marshmallows.
- Using a rubber spatula or sturdy spoon, gently fold all ingredients together until evenly distributed, being careful not to overmix and deflate the whipped topping.
- Transfer the ambrosia salad to an airtight container or a decorative serving bowl.
- Cover the container or bowl and refrigerate for at least 4 hours, or preferably overnight, to allow the flavors to meld and the gelatin to set slightly.
- Before serving, give the salad a final gentle stir.
- Serve chilled as a refreshing side dish or dessert.
Notes
4. **Liver and Onions**For the elder generations, liver and onions was common diner fare. Nutritively, liver is a superfood positively chock-full of vitamins and minerals. It was often recommended for its health benefits, especially for iron deficiency, making it a regular feature on menus and dinner tables across America.
Despite its impressive nutritional profile, the taste of liver has always been a point of contention. That gamey, metallic flavor has never successfully won over the mainstream American palate, with many finding it an acquired taste that was simply too challenging to embrace regularly.
Caramelized onions assisted, providing a sweet counterpoint to the liver’s robust flavor, but for many, liver was “a meal to grit through, not savor.” The effort to mask or balance its distinct taste often felt like a chore rather than a culinary delight, limiting its broad appeal.
As diner culture fell on hard times and cheaper pieces of meat yielded to burgers and chicken breasts, liver declined, as well, “despite its impressive health credentials.” The general shift towards more palatable, less gamey meats ultimately sealed its fate as a once-common but now rarely seen dish.
Product on Amazon: French’s Original Crispy Fried Onions, 24 oz – One 24 Ounce Bag of Crunchy Fried Onions to Sprinkle on Salads, Potatoes, Chicken, Burgers and Green Bean Casseroles
Brand: French’s
Binding: Grocery Product Group: Grocery
Price: 9.13 USD
Rating: 4.7 Total reviews: 7642
Features:
1. EXCEPTIONAL FLAVOR, TEXTURE AND COLOR: Made with whole, carefully sourced globe onions, Frenchs Original Crispy Fried Onions deliver versatile flavor, exceptional texture and a beautiful golden color
2. HIGH QUALITY ONIONS: Americas top product for crispy onions, Frenchs onion topping will add a satisfying crunch to any recipe; premium onions sealed for maximum freshness and flavor
3. MADE FOR CHEFS: Chefs can add the ideal amount of crunch to signature dishes with Frenchs 24-ounce bag of fried onions; cut down on preparation time with pre-made Frenchs Fried Onions
4. VERSATILE: Sprinkle on burgers, chicken, potatoes and salads for delicious texture and a punch of flavor; onion topping complements all kinds of classic dishes and new menu items
5. FEEL GOOD INGREDIENTS: Kosher, vegetarian and free from high fructose corn syrup, dairy and GMOs; embellish your recipes with crispy fried onions you can feel good about serving
Shopping on Amazon >>

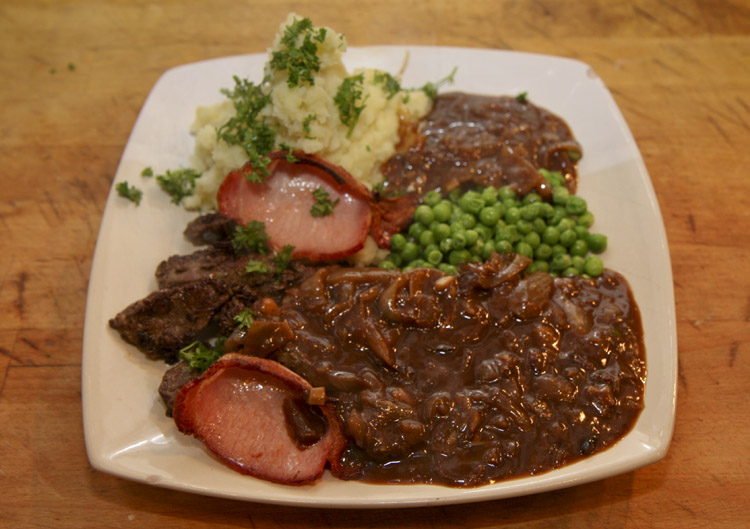
Liver And Onions
Ingredients
Equipment
Method
- Thinly slice the yellow onions and set aside.
- In a shallow dish, combine flour with salt, pepper, paprika, and dry mustard. Mix well to create the seasoned flour.
- Gently pat the calf’s liver slices dry with paper towels to ensure a good crust forms.
- Heat 1-2 teaspoons of bacon fat in a large skillet over medium heat. Add the sliced onions and cook slowly, stirring occasionally, until deeply caramelized and tender, about 15-20 minutes. Remove onions from the skillet and set aside.
- Dredge each liver slice thoroughly in the seasoned flour, shaking off any excess.
- Add the remaining bacon fat to the skillet and increase heat to medium-high.
- Working in batches if necessary to avoid overcrowding the pan, add the floured liver slices. Sear for 1-2 minutes per side until nicely browned and just cooked through (medium-rare to medium). Do not overcook.
- Return the caramelized onions to the skillet with the cooked liver, stirring gently to combine and warm through for about 30 seconds.
- Serve immediately, garnished with fresh parsley or chives if desired.
Notes
Read more about: Forget What You Thought: Why Motor City Pizza’s Reign Isn’t Ending, It’s Just Getting Started!
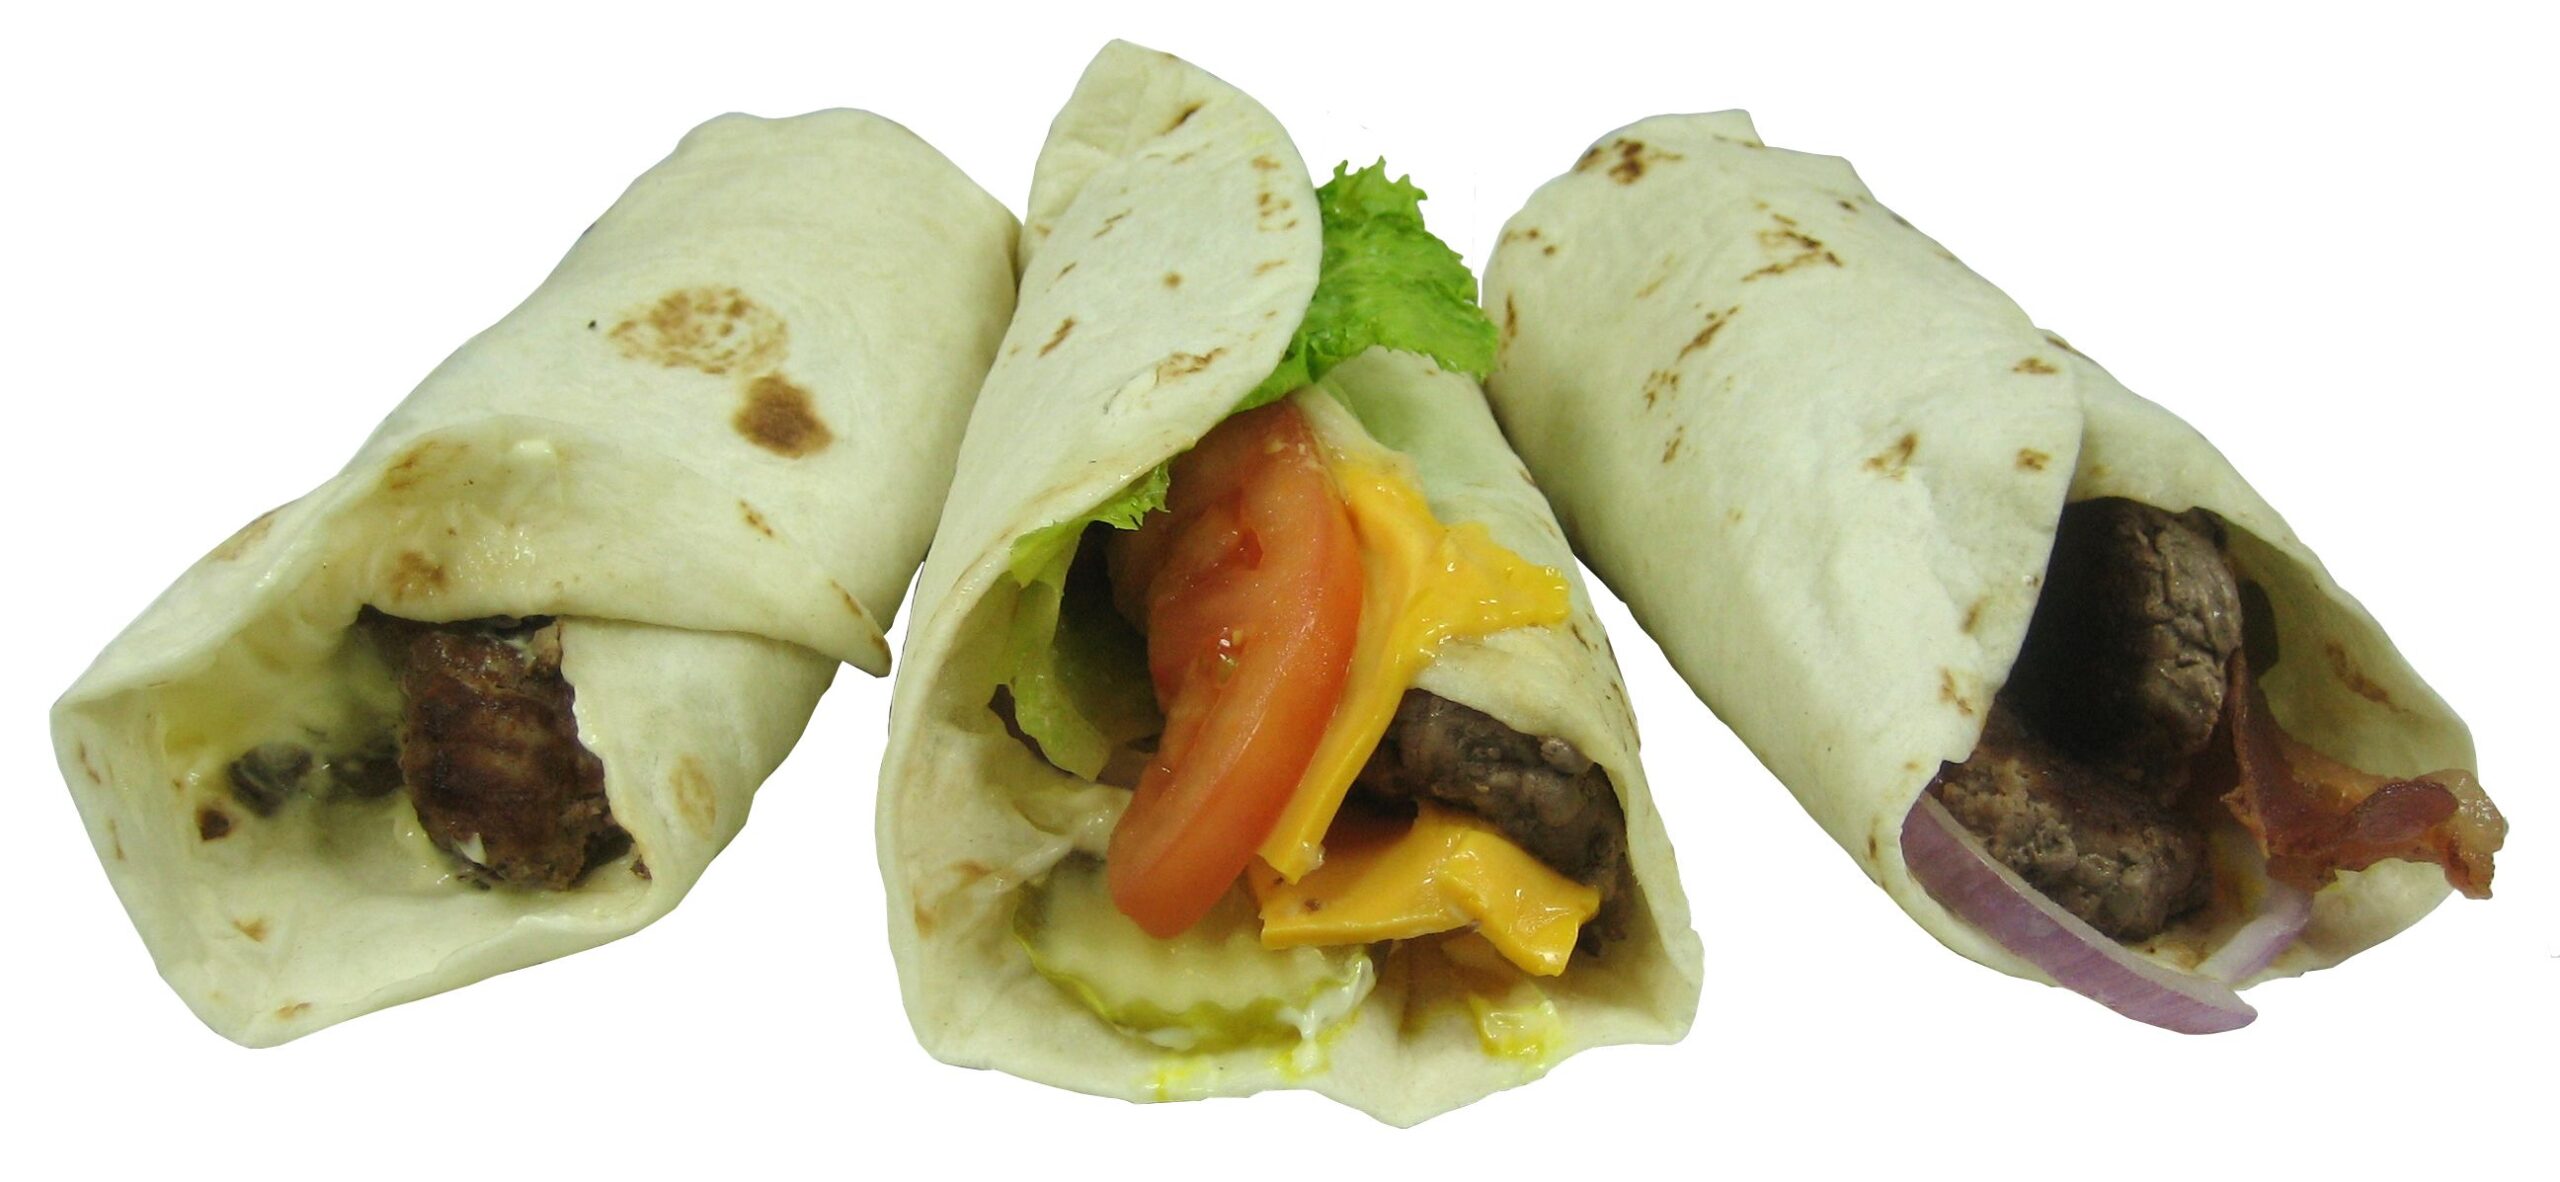
5. **Wraps**In the early 2000s, wraps were ubiquitous. Cafes, delis, fast-food chains – you couldn’t get away from them. They were sold as “fresher, lighter, trendier” than sandwiches, embodying a new wave of convenience food that seemed to perfectly fit the lifestyle of a new millennium.
Their appeal was rooted in their perceived healthiness and modern aesthetic. They offered a neat, portable package for a variety of fillings, suggesting a more sophisticated and health-conscious choice than the traditional bread-based sandwich. For a time, they delivered precisely that image, becoming a symbol of contemporary dining.
But the hype ultimately faded. As with many food trends, the initial excitement gave way to a more sober assessment. What was once novel became commonplace, and the “fresher, lighter” image began to be scrutinized as other trends emerged.
Wraps still linger, of course, but they’re no longer the hip, trendy alternative. They’ve shrunk to a back-of-the-menu niche, overtaken by other “healthy” food trends, proving that even a popular innovation can become just another option as culinary currents shift.
Product on Amazon: Mission Carb Balance Soft Taco Whole Wheat Tortillas, Medium Size, 8 Count, Low Carb, Keto, Whole Grains, High Fiber, No Sugar
Brand: Mission Foods
Binding: Grocery Product Group: Amazon Fresh Perishables
Price: 4.99 USD
Rating: 4.7 Total reviews: 2639
Flavor: Wheat
Item Weight: 12 Ounces
Allergen Information: Wheat
Specialty: Cholesterol Free
Features:
1. One 8-count package of Mission Carb Balance Soft Taco Whole Wheat Tortillas
2. We’ve balanced high fiber whole wheat with lower carbs and zero sugar for a wholesome great tasting soft tortilla wrap
3. Enrich your diet with a tortilla free from trans fat and cholesterol
4. With only 3g of net carbs per tortilla and no sugar, you can feel good using these tasty tortillas anytime
5. These versatilze tortillas make a great addition to any of your favorite low carb recipes
Shopping on Amazon >>
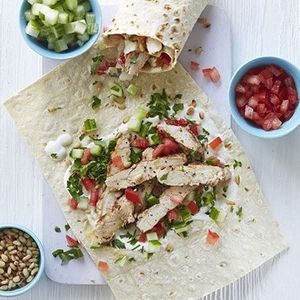
Lebanese chicken wraps
Ingredients
Equipment
Method
- Cut the chicken fillets into strips or bite-sized pieces for even cooking.
- In a mixing bowl, combine Greek yogurt, lemon juice, lemon zest, allspice, olive oil, and crushed garlic. Add the chicken to this marinade, ensuring it’s well-coated. Marinate for at least 30 minutes in the refrigerator.
- While the chicken marinates, toast the pine nuts in a dry pan over medium-low heat until golden brown, watching carefully to prevent burning. Set aside.
- Dice the tomatoes and cucumber. Finely chop the fresh parsley. Combine these in a separate bowl to create a fresh salad topping.
- Heat a frying pan over medium-high heat. Remove chicken from the marinade, shaking off excess, and cook in batches until golden brown and cooked through, approximately 5-7 minutes per batch.
- Warm the tortilla wraps or flatbreads according to package instructions (e.g., in a dry pan or microwave) to make them pliable.
- Spread a thin layer of the Greek yogurt marinade (or fresh yogurt) onto each warm wrap.
- Layer the cooked chicken strips evenly over the yogurt.
- Top generously with the diced tomato, cucumber, and chopped parsley salad, then sprinkle with the toasted pine nuts.
- Roll up the wraps tightly and serve immediately, optionally with extra mixed salad on the side.
Notes
Read more about: Beyond the Red Carpet: Unpacking 14 of Hollywood’s Most Eye-Popping Age Gap Romances That Defy Expectations

6. **Pinterest Foods**If you were on Pinterest during the 2010s, your feed was filled to the brim with cauliflower pizza crusts, zucchini noodles (“zoodles”), mason jar salads, and Instant Pot everything. These weren’t just meals; they were visual, Instagram-worthy lifestyle options, perfectly crafted for sharing online.
These foods capitalized on the burgeoning social media landscape, transforming cooking into a performance and a shareable experience. The emphasis was not only on taste but also on presentation and the perceived health benefits, fitting perfectly into the “clean eating” and DIY trends of the era.
But trends move fast online. What’s viral today can be forgotten tomorrow, and the rapid pace of digital culture means food fads burn bright but briefly. The constant demand for novelty quickly moves consumers on to the next big thing.
Cauliflower everything and spiralized zucchini have largely vanished from dinner tables. The Instant Pot is still around, but not the obsession it once was. These “Pinterest foods” are the perfect example of how internet-driven fads flare up fast and fade just as quickly, replaced by new aesthetic and dietary obsessions.
Product on Amazon: The Pinterest Food Recipes: Get Dinner For Your Family Ready In No Time
Binding: Kindle Edition Product Group: Digital Ebook Purchas
Price: 9.99 USD
Shopping on Amazon >>
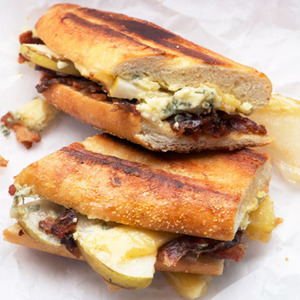
Pressed Stilton, Pear, Date, and Bacon Sandwiches Recipe
Ingredients
Equipment
Method
- Cook the coarsely chopped bacon in a large skillet over medium heat until very crispy. Remove bacon with a slotted spoon and drain on paper towels, reserving a small amount of rendered fat if desired.
- While bacon cooks, pit and quarter the Medjool dates. Scrub, core, and slice the Asian pear into 20 wedges. Crumble the 8 ounces of Stilton cheese.
- Split the four 6-inch pieces of baguette in half lengthwise, creating 8 halves.
- Spread 1 teaspoon of Dijon mustard evenly over the cut side of each of the bottom baguette halves.
- Evenly distribute the crispy bacon, sliced pear wedges, quartered dates, and crumbled Stilton cheese onto the mustard-spread baguette halves.
- Top with the remaining baguette halves to form four sandwiches.
- Preheat a panini press to medium-high heat, or heat a large heavy skillet over medium heat.
- Place the sandwiches into the preheated panini press and close, or place in the heavy skillet and press down firmly with a second heavy skillet or a foil-wrapped brick.
- Cook for 4-7 minutes, or until the baguette is golden brown and crisp, and the Stilton cheese is melted and gooey.
- Remove the pressed sandwiches, slice them in half diagonally if desired, and serve immediately.
Notes
Read more about: Your Ultimate Step-by-Step Guide to Planning Your First Dream Trip to Europe

7. **TV Dinners**The frozen TV dinner was a 1950s wonder. Conceived in the 1950s as a way to consume leftover Thanksgiving turkey, it evolved into the epitome of the modern convenience: a full meal in a neat tray, best consumed in front of the television. It promised a hassle-free solution for busy families, freeing up time from the kitchen.
Microwaves in the 1980s made them even more desirable, further cementing their place in American households. The ability to quickly heat a complete meal, often within minutes, was revolutionary for its time, catering to a growing desire for speed and simplicity in meal preparation.
But their demise was baked in – literally. “Processed textures, suspect ingredients, and high sodium couldn’t compete with evolving nutrition expectations.” As health consciousness grew and awareness of artificial additives increased, the appeal of these highly processed meals began to wane significantly.
What was futuristic once is now retro, superseded by healthier grab-and-go meals and meal kits. The TV dinner, once a symbol of modernity, has become a nostalgic curiosity, struggling to compete with fresh, less processed alternatives that align better with contemporary dietary preferences.
Product on Amazon: Stouffer’s Salisbury Steak, Single Serve, Frozen Salisbury Steak, Single Frozen Meals 9.625 oz
Brand: Stouffer’s
Binding: Grocery Product Group: Amazon Fresh Perishables
Price: 3.49 USD
Rating: 4.5 Total reviews: 5699
Number of Items: 1
Flavor: Salisbury Steak
Item Weight: 0.6 Pounds
Item Form: Solid
Features:
1. DELICIOUS BITES FOR SOLO NIGHTS You’ll love every bite of Stouffer’s Single Serve Salisbury Steaks. Make dinnertime a joyful moment with homestyle food SNAP and EBT Eligible item
2. CRAFTED WITH QUALITY YOU CAN TASTE Stouffer’s frozen dinners are thoughtfully crafted with flavorful, quality ingredients. Our Salisbury steak dinner is made with roasted beef patty, a rich onion gravy, and macaroni and cheese
3. COOK IN THE OVEN OR MICROWAVE Bake the frozen Salisbury steak dinner in the oven for 35 minutes. Or cook in the microwave for 5 and a half minutes
4. SOLVE DINNER DREAD When the recipe has 20 ingredients and the clock strikes dinner, think Stouffer’s. Whether you’re looking for after-work dinner ideas, or you need some easy comfort food, this Salisbury steak dinner is the perfect way to solve your ‘what’s for dinner?’ dilemma
5. SINGLE PORTION Take boring and bland foods off the table with our single serve Salisbury steak dinner. It’s a dish you can look forward to on any night of the week
Shopping on Amazon >>

Janette’s Healthy TV Dinners
Ingredients
Equipment
Method
- Prepare the Portobello Ragu: Heat olive oil in a large skillet, sauté chopped onions until softened, then add garlic and chopped portobello mushrooms, cooking until mushrooms release their liquid and brown.
- Finish the Ragu: Stir in kosher salt, Parmesan, dry nonfat milk, and chopped parsley to the cooked mushrooms, simmering briefly to meld flavors; set aside.
- Prepare Lasagna Components: Cook lasagna noodles according to package directions until al dente; drain and rinse. Defrost and thoroughly drain chopped spinach, squeezing out all excess water.
- Assemble Lasagna Filling: In a mixing bowl, combine lowfat ricotta, 1 teaspoon kosher salt, black pepper, cayenne pepper, nutmeg, 1 tablespoon Parmesan, the drained spinach, and 1 cup of the prepared Portobello Ragu.
- Form Lasagna Roll-Ups: Spread an even layer of the ricotta-ragu mixture onto each cooked lasagna noodle, then carefully roll each noodle. Place roll-ups seam-side down in individual oven-safe dishes or a baking dish, topping with fat-free pasta sauce and a sprinkle of Parmesan.
- Prepare Meatless Meatball Mixture: In another mixing bowl, combine whole wheat bread crumbs, 1 tablespoon Parmesan, 1 1/2 cups of the Portobello Ragu, ground toasted almonds, egg white, and garlic salt.
- Form and Cook Meatballs: Shape the mixture into small meatballs. Spray a nonstick baking sheet with olive oil cooking spray, arrange meatballs, and bake or pan-fry until lightly browned and heated through.
- Prepare Side Dishes: Cook frozen peas according to package directions, then season with butter-flavor cooking spray. Drain canned peach halves and top with lowfat granola, a sprinkle of ground cloves, and cinnamon.
- Assemble and Bake Dinners: Arrange the prepared lasagna roll-ups, meatless meatballs, seasoned peas, and granola peaches into individual oven-safe dishes. Bake or reheat until the lasagna and meatballs are hot and bubbly.
- Serve: Carefully remove the healthy TV dinners from the oven and serve warm.
Notes
Read more about: From Cabo Sunsets to Vegas Lights: A Deep Dive into Selena Gomez’s ‘Fun But Chill’ Bachelorette & Benny Blanco’s Bachelor Parties!
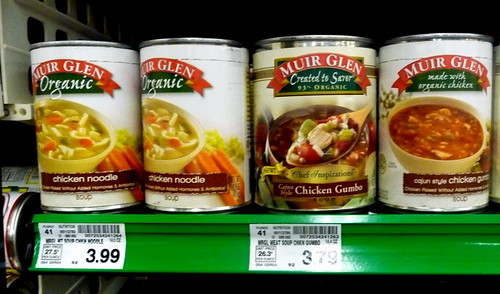
8. **Canned Soup**Canned soup was comfort in a can – cheap, dependable, and ready in minutes for decades. Those red-and-white labels became shorthand for a no-fuss warm meal, a staple in pantries across America, particularly on chilly days or when time was short. It represented ultimate culinary convenience for generations.
Its pervasive presence spoke to its reliability and affordability. For many, a can of soup was synonymous with a quick, comforting lunch or a simple dinner starter, requiring minimal effort and delivering a consistent, if sometimes uninspired, experience.
But now, “real” ingredients are in vogue. Visible vegetables, fresh herbs, and broths with homemade flavor are what people crave. The shift towards “simpler, more natural flavors” has significantly impacted the standing of canned, highly processed soups.
Do-it-yourself soups or fresher supermarket ones have stolen the show, relegating canned soup to a nostalgic second best. While still present, its formerly dominant position as a go-to meal solution has diminished, replaced by options that promise better taste and perceived nutritional value.
The previous section took us on a wild ride through the culinary graveyard, where once-iconic foods like kale (yes, kale!) and TV dinners now lie in various states of remembrance. We’ve seen how convenience, health fads, and simply new trends can sweep once-beloved staples right off our plates.
But hold onto your aprons, folks, because we’re only halfway through our nostalgic nosh-fest! Get ready to unearth eight more forgotten American foods, exploring how everything from cultural shifts to ingredient availability, and even our ever-changing taste buds, led to their eventual disappearance or a much-diminished role in our kitchens. Let’s dive deeper into the delicious, and sometimes perplexing, stories of what America used to eat!
Product on Amazon: Amazon Kitchen, Chicken Noodle Soup, 24 oz
Brand: Amazon Kitchen
Binding: Grocery Product Group: Amazon Fresh Deli and Prepared Meals
Price: 0.29 USD
Rating: 4.1 Total reviews: 4764
Item Form: Liquid
Package Information: Tub
Number of Items: 1
Item Volume: 24 Fluid Ounces
Features:
1. Tender chicken with noodles, celery, carrots, and onions in a savory broth
2. Heat Up, Spoon In
3. Empty soup into bowl and heat in microwave 5-6 minutes or pour into pot and simmer on stove 12-15 minutes
4. Brought to you by Amazon Kitchen, grab-and-enjoy meal solutions, prepped for what’s next
Shopping on Amazon >>
Chicken Casserole with Campbell’s Canned Soup recipes
Ingredients
Equipment
Method
- Preheat your oven to 375°F (190°C) and generously grease a 9×13 inch casserole dish.
- Cook the egg noodles according to package directions until they are al dente; drain them thoroughly and set aside.
- Dice the boneless, skinless chicken breasts into uniform bite-sized pieces.
- In a large mixing bowl, combine the cream of mushroom soup, cream of chicken soup, and sour cream. Season generously with kosher salt and freshly ground black pepper, then stir until well combined.
- Add the cooked egg noodles and diced chicken to the soup mixture in the bowl, stirring gently until all ingredients are evenly coated.
- Pour the entire casserole mixture into the prepared baking dish, spreading it out evenly.
- Melt the stick of unsalted butter. Crumble the 4 slices of white bread into fine crumbs, then toss them with the melted butter until well coated.
- Evenly sprinkle the buttery bread crumbs over the top of the casserole mixture.
- Bake in the preheated oven for 25-30 minutes, or until the casserole is bubbly and the topping is golden brown and crisp.
- Remove the casserole from the oven and let it rest for 5-10 minutes before serving to allow the sauce to set.
Notes
Read more about: Beyond the Stars and Stripes: Unmasking the Surprising International Roots of 15 ‘All-American’ Foods
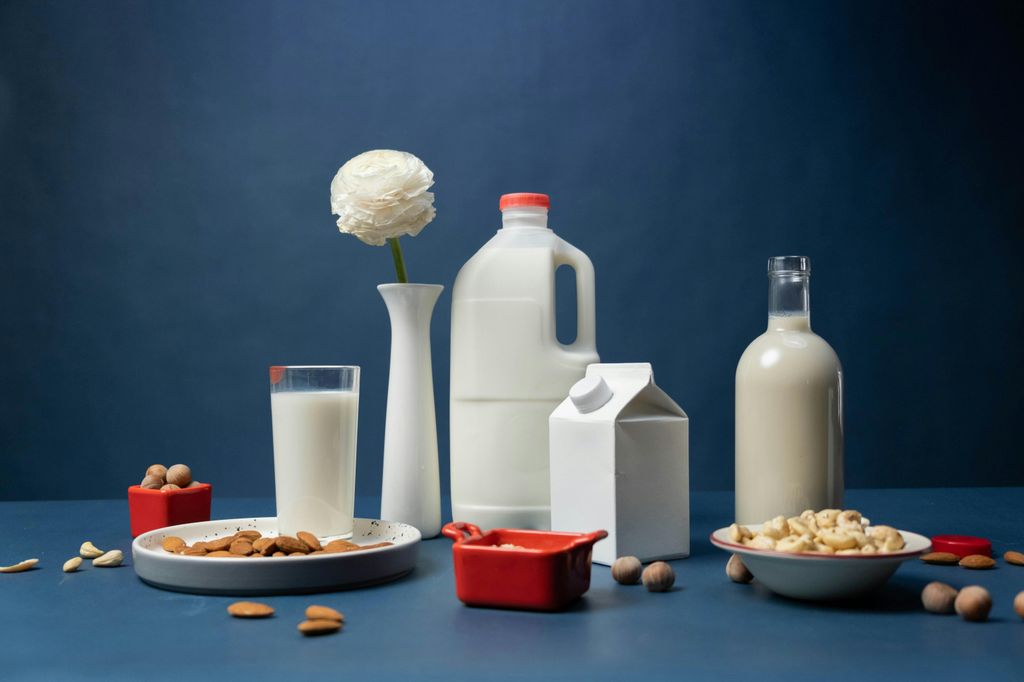
9. **Almond Milk**Remember when almond milk became *the* darling of the dairy-free aisle? It burst onto the scene, marketed as this fantastic alternative that was not only healthier for us but also “kinder to the earth.” For a good while, it seemed like everyone was swapping out cow’s milk for this nutty, plant-based beverage in their lattes, cereals, and smoothies. It truly captured the zeitgeist of a health-conscious and environmentally aware consumer base seeking lighter options.
Its rise was meteoric, riding the wave of growing dietary restrictions and increased interest in plant-based diets. It offered a palatable, versatile option for those avoiding dairy due to lactose intolerance, allergies, or ethical choices. The initial messaging successfully positioned it as a guilt-free, wholesome choice, a natural progression from traditional dairy.
However, as often happens with seemingly perfect trends, a closer look revealed a hidden cost. The “kinder to the earth” narrative began to crack when environmental activists highlighted the immense amount of water required to grow almonds, especially in drought-prone regions like California. This revelation sparked a significant public conversation, challenging almond milk’s sustainable image.
This environmental reckoning, combined with a growing market, paved the way for new contenders. Suddenly, the shelves were overflowing with alternatives like oat milk, which quickly gained popularity for its creamy texture and often-touted lower environmental footprint. While almond milk certainly still has its devoted followers, its reign as the undisputed “king of dairy substitutes” has undoubtedly softened, now sharing the throne with a diverse court of plant-based milks.
Product on Amazon: Amazon Grocery, Original Unsweetened Almondmilk, 64 Fl Oz (Previously Fresh Brand, Packaging May Vary)
Brand: Amazon Grocery
Binding: Grocery Product Group: Amazon Fresh Perishables
Price: 0.04 USD
Rating: 4.7 Total reviews: 3178
Flavor: Unsweetened
Unit Count: 64 Fluid Ounces
Allergen Information: Almonds
Item Form: Liquid
Features:
1. One 64 fl oz carton of Original Unsweetened Almond Milk
2. Some of your favorite Fresh products are now part of the Amazon Grocery brand! Although packaging may vary during the transition, the ingredients and product remain the same. Thank you for your continued trust in our brands
3. 50% more calcium than dairy milk, excellent source of Vitamin E, and good source of Vitamins A & D
4. Contains: Almond
5. Amazon Grocery has all the favorites you love for less. You’ll find everything you need for great-tasting meals in one shopping trip
Shopping on Amazon >>

Skinny Vanilla Latte
Ingredients
Equipment
Method
- Measure 9 ounces of unsweetened almond milk into a small saucepan.
- Gently heat the almond milk over medium-low heat until it is steaming and hot, but not boiling. Stir occasionally to prevent scorching.
- While the milk is heating, add 2 teaspoons of instant coffee, 1 teaspoon of stevia, and 1 teaspoon of vanilla extract (or a drop, depending on potency) into your serving mug.
- Once the almond milk is heated, carefully pour it into the mug over the instant coffee, stevia, and vanilla.
- Stir thoroughly with a spoon until the instant coffee and stevia are fully dissolved and all ingredients are well combined.
- Taste and adjust the sweetness with additional stevia if desired.
- Serve immediately and enjoy your Skinny Vanilla Latte.
Notes
Read more about: Jennifer Aniston’s Ageless Blueprint: Unpacking Her Science-Backed Wellness Routine for Enduring Vitality and a Thriving Career

10. **Snack Cakes**Ah, snack cakes. Just uttering the names Little Debbie, Hostess, or Swiss Rolls likely conjures up a powerful wave of childhood nostalgia for many of us. These individually portioned, sweet, and utterly convenient treats were the undisputed champions of lunchboxes and after-school snacks for generations. They were a simple joy, a sugary reward that felt like pure indulgence in a small, portable package.
For decades, these brightly packaged delights symbolized a certain kind of American childhood, a carefree era where a Zebra Cake or a Twinkie was a perfectly acceptable part of a balanced diet. They offered instant gratification, a sweet escape that didn’t require any effort, fitting perfectly into the busy lives of families and the simple desires of kids across the nation.
But as America’s health consciousness began its slow, inevitable ascent, these sugary confections found themselves in the crosshairs. The once-charming “guilty pleasure” label started to feel more like, well, just “guilty.” The shift towards “clean” eating, reducing processed sugar, and scrutinizing ingredient lists meant that these retro cakes, with their long ingredient lists and high sugar content, began to feel less like a treat and more like an anachronism.
Today, while they haven’t vanished entirely, their role has significantly diminished. They’re no longer the everyday lunchbox staple but rather a “taste of throwback decadence,” often reserved for children’s parties or a momentary trip down memory lane. This decline reflects a broader cultural shift where convenience now often means fresh and whole, rather than processed and packaged.
Product on Amazon: Hostess Brands Hostess Cup Cake Multi Pack, Choc,8 Count (Pack of 1)-1.59 Oz Cakes, 12.7 Oz, (197038)
Brand: Hostess
Binding: Grocery Product Group: Grocery
Price: 1.57 USD
Rating: 4.6 Total reviews: 9342
Flavor: Chocolate
Item Weight: 0.1 Pounds
Allergen Information: Eggs, Milk, Soy, Wheat
Specialty: Boxed pastries
Unit Count: 12.72 Ounce
Number of Items: 1
Package Weight: 0.4 Kilograms
Package Information: Pouch
Number of Pieces: 8
Features:
1. Contains eight (8) individually wrapped Hostess Cupcakes
2. Soft, fluffy chocolate cupcakes with chocolatey icing
3. Sweet, creamy filling in the center
4. Perfectly snackable to satisfy your sweet tooth any time of day
5. Individually wrapped for easy packing
Shopping on Amazon >>

Chocolate Yogurt Snack Cakes
Ingredients
Equipment
Method
- Preheat oven to 350°F (175°C) and line a 12-cup muffin tin with paper liners or grease and flour.
- In a small saucepan over low heat or in a microwave-safe bowl, melt the chopped chocolate with the vegetable oil, stirring until smooth. Let cool slightly.
- In a large mixing bowl, whisk together the yogurt, sugar, room temperature eggs, vanilla extract, and almond extract until well combined.
- Gradually whisk the cooled melted chocolate mixture into the wet ingredients until fully incorporated.
- In a separate medium bowl, whisk together the flour, baking powder (preferably aluminum-free), and coarse salt.
- Add the dry ingredients to the wet ingredients in two additions, mixing gently with a spatula or whisk until just combined. Be careful not to overmix.
- Divide the batter evenly among the prepared muffin cups, filling each about two-thirds full.
- Bake for 20-25 minutes, or until a wooden skewer inserted into the center of a cake comes out with moist crumbs.
- Remove the muffin tin from the oven and let the cakes cool in the tin for 5-10 minutes before transferring them to a wire rack to cool completely.
- Serve cooled snack cakes.
Notes
Read more about: Beyond the Stars and Stripes: Unmasking the Surprising International Roots of 15 ‘All-American’ Foods

11. **Shake and Bake**For anyone who grew up in a certain era, the jingle “It’s Shake ‘n Bake, and I helped!” is practically etched into their subconscious. This ingenious product was a revelation, transforming the humble act of breading chicken or pork into a simple, almost foolproof, and incredibly kid-friendly dinner experience. The concept was brilliant: just add your meat to a bag, toss it with seasoned crumbs, and bake. Dinner, quite literally, was done, and fast.
It was the ultimate convenience food for busy parents who wanted to put a home-cooked, crispy meal on the table without the mess and fuss of traditional frying. Shake and Bake promised a consistent, satisfying result every time, making it a freezer and pantry staple for millions. It tapped into the desire for homemade goodness without extensive time commitment, embodying the mid-century quest for kitchen efficiency.
However, the culinary landscape continued to evolve, and with it, the tastes and priorities of home cooks. As people became more adventurous, they started to gravitate towards what they perceived as “fresher” or “cooler” substitutes. The rise of new kitchen gadgets, especially air fryers, offered a new way to achieve that perfect crispy texture with less oil and often with a perceived healthier outcome.
Furthermore, the explosion of do-it-yourself recipes and the increasing availability of international spice mixes meant that home cooks could create their own customized, flavorful coatings from scratch. Shake and Bake, while still available, found its once-pervasive status diminishing, relegated to a nostalgic option rather than the go-to solution. It’s a prime example of how even an iconic product can lose its sparkle when evolving tastes and new technologies offer more diverse alternatives.
Product on Amazon: Shake ‘N Bake, Original Chicken Seasoned Coating Mix, 4.5 Oz
Brand: SHAKE’N BAKE
Binding: Grocery Product Group: Grocery
Price: 0.93 USD
Rating: 4.5 Total reviews: 991
Package Information: Bag
Number of Items: 1
Flavor: Original Chicken
Item Weight: 4.5 Ounces
Features:
1. 2 pouches for 2 meals
2. The start of some amazing home-cooked meals!
3. 30 calories per serving
4. Kosher
5. Kraft Recipes: Crispy Baked Chicken, Crispy Chicken Sandwich, Easy Chicken Nuggets.
Shopping on Amazon >>
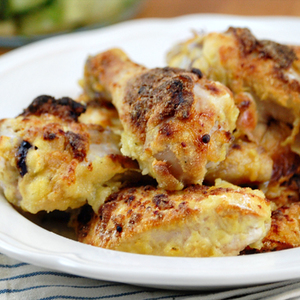
Homemade ‘Shake ‘n Bake’ Chicken
Ingredients
Equipment
Method
- Preheat your oven to 375°F (190°C).
- In a large mixing bowl, combine the cornmeal, wholemeal flour, salt, dried parsley, ground pepper, onion powder, garlic powder, and cumin. Mix thoroughly until well combined.
- Place the low-fat yogurt in a separate medium bowl. Dip each piece of chicken into the yogurt, ensuring it is fully coated.
- Transfer the yogurt-coated chicken pieces, one or two at a time, into a large resealable bag containing the dry coating mix. Seal the bag and shake vigorously until each chicken piece is evenly coated.
- Lightly grease a large baking sheet with olive or vegetable oil, or melted butter.
- Arrange the coated chicken pieces on the prepared baking sheet in a single layer, ensuring there is space between each piece for even cooking.
- Bake for 45-50 minutes, or until the chicken is golden brown, crispy, and cooked through.
- To confirm doneness, insert a meat thermometer into the thickest part of a chicken piece (avoiding the bone); it should read 165°F (74°C).
- Remove the chicken from the oven and let it rest for a few minutes before serving.
- Serve hot with your preferred side dishes.
Notes
Read more about: Shaken Not Stirred: The Definitive Ranking of the 10 Great James Bond Movies That Defined a Legacy

12. **Powdered Sugary Drinks**Before the era of sparkling waters and artisanal lemonades, there was a simpler, more vibrant time, epitomized by the Kool-Aid Man. The image of him bursting through walls, roaring “Oh yeah!” is a core memory for countless Americans. Powdered drink packets like Kool-Aid were inexpensive, playful, and the quintessential solution for quenching thirst on sweltering summer afternoons. They were a budget-friendly way to bring a burst of artificial fruit flavor to any gathering.
These colorful concoctions offered a sense of fun and novelty, especially for kids who loved watching the powder dissolve into a bright, sugary liquid. They were a symbol of carefree childhood, easy to prepare, and even easier to gulp down. The affordability and widespread availability made them a democratic beverage choice, accessible to nearly every household across the nation.
But like many sugar-laden products from earlier decades, powdered sugary drinks eventually ran head-first into a formidable opponent: growing health concerns. Worries about excessive sugar intake, which contributes to childhood obesity, began to dominate dietary conversations. Coupled with increasing awareness about the potential links between artificial food colorings and behavioral problems in children, the party for these vibrant drinks slowly started to wind down.
Today, while the Kool-Aid Man might still represent nostalgia, he’s definitely “not so cool anymore” in the eyes of many health-conscious parents. Fewer households stock these packets in their cabinets, as children (and adults!) have found more fashionable, and often healthier, beverages to sip on. This shift reflects a significant cultural evolution in how we view hydration and nutrition, moving away from overtly artificial and sugary options.
Product on Amazon: Welch’s Singles To Go Variety Pack, Watertok Powdered Drink Mix, Includes 4 Flavors, Grape, Passion fruit, Strawberry Peach, Cherry Pomegranate, 1 Box (40 Servings)
Brand: SINGLES TO GO!
Binding: Grocery Product Group: Grocery
Price: 9.28 USD
Rating: 4.6 Total reviews: 6044
Item Weight: 3.19 Ounces
Item Form: Powder
Package Information: Box
Features:
1. Welch’s SINGLES TO GO –Now you can bring the taste of the rainbow with you anywhere, anytime Welch’s Singles To Go drink mix sticks are bursting with fruit flavor that will add tasty excitement to your water.
2. NO ASPARTAME: Welch’s Singles To Go are aspartame free and only 5 calories per serving.
3. QUICK AND CONVENIENT: Each serving of Welch’s drink mix is perfect for the average water bottle – just shake and enjoy
4. GREAT TASTE: Welch’s powdered drinks are a delicious way to bring a burst of refreshment during the summer and all year round.
5. NATURALLY FLAVORED: Enjoy Welch’s drink mix, that is naturally and artificially flavored, without worrying about your dietary restrictions. Sugar Free
Shopping on Amazon >>

Low-Guilt Hot Chocolate
Ingredients
Equipment
Method
- Pour the 8 oz of unsweetened vanilla almond milk into a small saucepan.
- Heat the almond milk over medium-low heat, stirring occasionally, until it is warm but not boiling. Alternatively, microwave the milk in a mug for 1-2 minutes until warm.
- Add 1/2 tablespoon of unsweetened cocoa powder to the warm almond milk.
- Whisk the mixture thoroughly and vigorously until the cocoa powder is completely dissolved and there are no lumps.
- Continue to heat for another minute, ensuring the hot chocolate is heated through to your desired temperature without boiling.
- Carefully pour the hot chocolate into your serving mug.
- Generously top the hot chocolate with 4 servings of Reddi-wip Original Whipped Light Cream.
- Serve immediately and enjoy your comforting low-guilt hot chocolate.
Notes
Read more about: Fuel Your Day Right: 8 Power-Packed Healthy Snack Ideas to Stay Full and Energized
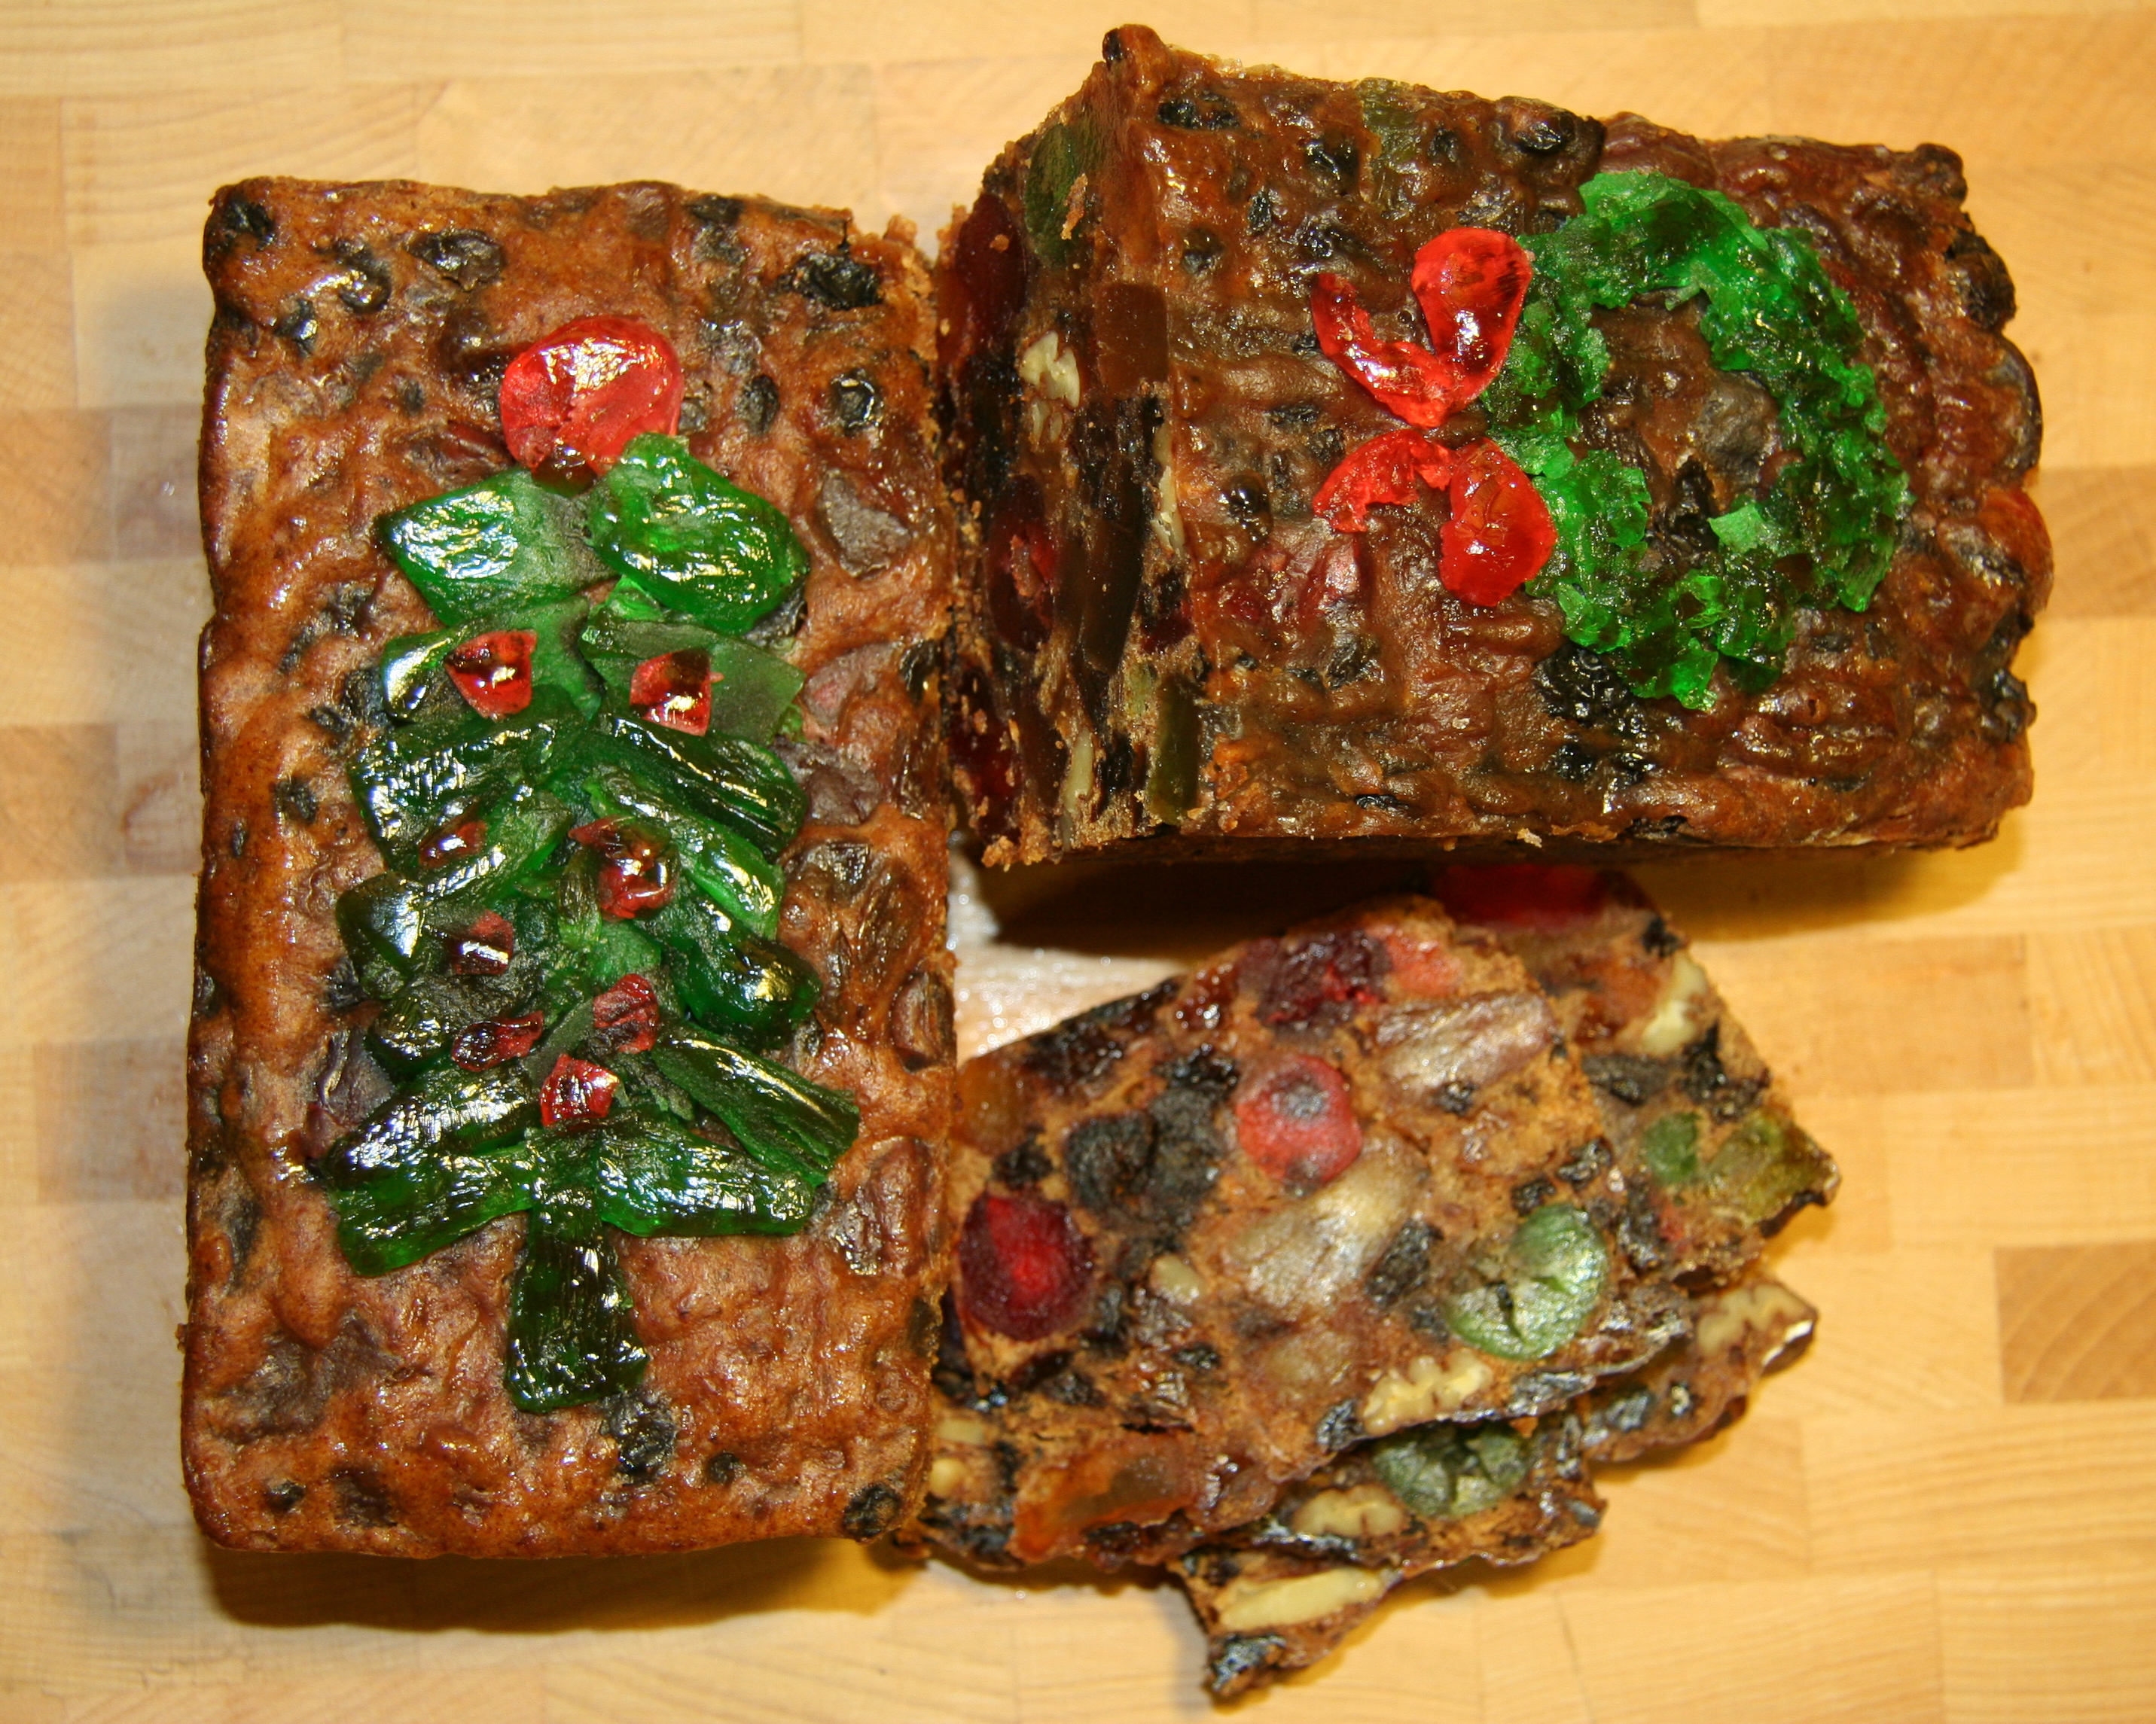
13. **Fruitcake**Ah, the fruitcake. Perhaps no other dessert in history has been the target of so many Christmas jokes, often depicted as an indestructible doorstop or a gift to be re-gifted endlessly. It’s truly a polarizing dessert, eliciting either groans or a quiet, knowing appreciation. Yet, despite its comical modern reputation, fruitcake has a surprisingly venerable and complex history, dating all the way back to Ancient Rome, where it was revered as an energy-dense, portable food.
Historically, fruitcake wasn’t just a holiday confection; it was a testament to preservation and a source of vital nutrients during leaner times. Rich with dried fruits, nuts, and often infused with spirits, it was designed to last, improving with age. Its preparation was often an elaborate affair, making it a symbol of festive abundance and a labor of love, far from the brick-like image it now holds in popular American culture.
Interestingly, this perception isn’t universal. In Britain, fruitcake remains a classic centerpiece for weddings, often tiered and elegantly decorated, symbolizing prosperity and good fortune. In places like Bengal, it continues to be a cherished favorite during Christmas, celebrated for its rich flavors and moist texture. These cultural differences highlight how a food’s standing can vary wildly based on local traditions and the quality of its preparation.
In the United States, however, the proliferation of mass-produced, often dry and bland, versions of fruitcake during the mid-20th century dealt a fatal blow to its reputation. These factory-made imitations, designed for shelf stability rather than flavor, gave the dessert a poor image that, tragically, never really improved. Even though many homemade versions can be wonderfully rich and delicious, the generic, often unpalatable, mass-market fruitcake solidified its fate as a punchline.
Product on Amazon: Old Fashion Claxton Fruit Cake 3-1 Lb. Regular Recipe Loaves – Individually Wrapped For Freshness in our Signature Red-White Carton – 3-pack
Brand: Claxton Fruit Cake
Binding: Unknown Binding Product Group: Grocery
Price: 24.95 USD
Rating: 4.5 Total reviews: 17003
Flavor: Regular Recipe
Item Weight: 3.4 Pounds
Unit Count: 48.0 Ounce
Number of Items: 3
Package Weight: 1.61 Kilograms
Package Information: Box
Number of Pieces: 1
UPC: 073652310018
Melting Temperature: 35 Degrees Celsius
Features:
1. Timeless Tradition: Savor Old Fashion Claxton Fruit Cake, a global favorite since 1910. Renowned for old-fashioned goodness and holiday charm, we’re proud to be the “Choice of Millions.”
2. Elegantly Wrapped: Contains 3 – 1 lb dark recipe cakes. Each one-pound cake comes individually wrapped for freshness and presented in our signature red-and-white striped carton.
3. Freshness You Can Trust: Store in the fridge and unwrap your cake just before eating to experience the perfect flavor and ultimate freshness.
4. Premium Ingredients: Our dark recipe cakes boast over 70% choice fruits and nuts like California raisins, pineapple, papaya, pecans, cherries, walnuts, almonds, and citrus peel.
5. Versatile Delight: Ideal for holidays, gatherings, or daily indulgence, our fruit cakes are a treat for any occasion. Enjoy them alone, with a beverage, or as a unique festive addition.
Shopping on Amazon >>
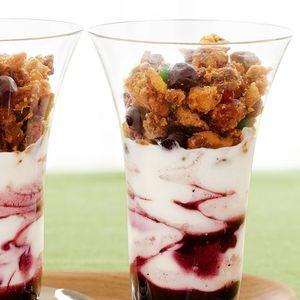
Fruitcake Parfaits
Ingredients
Equipment
Method
- Cut the fruitcake into small, bite-sized cubes or crumble it into coarse pieces; set aside.
- Ensure blueberries are fully thawed; gently drain any excess liquid if present, then set aside.
- Prepare four parfait glasses or individual dessert bowls.
- Begin by placing a layer of fruitcake crumbles at the bottom of each glass.
- Follow with a layer of plain yogurt, spreading it evenly over the fruitcake.
- Add a layer of thawed blueberries on top of the yogurt.
- Repeat the layering process: fruitcake, then yogurt, then blueberries, until the glasses are filled, ensuring the top layer is aesthetically pleasing.
- For best results, chill the parfaits for at least 30 minutes before serving to allow flavors to meld and the components to set slightly.
- Serve chilled, optionally garnished with a few whole blueberries or a small sprig of mint for added freshness and visual appeal.
Notes

14. **Frozen Juice Concentrate**For decades, the freezer shelves of American grocery stores held a ubiquitous presence: tiny, cylindrical cans of frozen orange juice concentrate. It was a marvel of convenience for its time, embodying the mid-century quest for efficiency. The ritual was simple: grab a can, add a few cans of water, stir vigorously, and voilà – you had a jug of juice, ready to serve. It was thrifty, practical, and for many, the quintessential taste of morning.
This unassuming little can was a household staple, particularly in frugal mid-century kitchens. It allowed families to have fresh-tasting juice on hand without the need for refrigeration of large quantities of liquid, and it offered a more economical option compared to buying pre-squeezed juice. Its long shelf life in the freezer made it a reliable choice for weekly grocery runs.
However, as the 1990s and 2000s rolled around, the beverage industry underwent a significant transformation. Bottled, ready-to-drink juices improved dramatically in quality and variety, often boasting “not from concentrate” labels and a perceived fresher taste. The need for mixing, once a minor chore, suddenly felt like an unnecessary step in an age that increasingly prioritized instant gratification and minimal effort. Consumers simply preferred the grab-and-go ease.
Today, frozen juice concentrate is a far rarer sight in mainstream grocery stores, largely recalled as a holdover from a bygone era. It’s been eclipsed by a plethora of convenient and often more premium juice options, from cold-pressed varieties to exotic blends. Its decline perfectly illustrates how the definition of “convenience” itself evolves; what was once revolutionary can become cumbersome when newer, even easier, alternatives hit the market, gently pushing the old standby into the annals of culinary history.
Product on Amazon: Amazon Fresh, Lemonade Frozen Concentrate, 12 Oz
Brand: Amazon Fresh
Binding: Grocery Product Group: Amazon Fresh Perishables
Price: 0.17 USD
Rating: 4.5 Total reviews: 282
Item Weight: 12 Ounces
Item Form: Liquid
Package Information: Bottle
Special Ingredients: Concentrated Lemon Juice, Lemon Pulp
Features:
1. WHAT’S INSIDE: One 12-ounce can of Lemonade Frozen Concentrate
2. WHY YOU’LL LOVE IT: No artificial colors, flavors or preservatives
3. HIGH QUALITY, LOW PRICES: Amazon Fresh brand products are all about high-quality food that fits every budget, every day.
4. ONLY FROM AMAZON: Look for the Amazon Fresh label to find great deals on a wide selection of grocery essentials.
Shopping on Amazon >>

Frozen Garibaldi
Ingredients
Equipment
Method
- Combine the frozen orange juice concentrate, Campari, fresh lemon juice, and kosher salt in a blender.
- Blend on high speed until all ingredients are thoroughly combined and the mixture is smooth.
- Taste the mixture and adjust the salt or lemon juice if necessary to achieve a balanced flavor profile.
- Pour the blended mixture into a freezer-safe container.
- Freeze for at least 4-6 hours, or until the mixture reaches a slushy, granita-like consistency, stirring occasionally to prevent a solid block.
- Once frozen to the desired consistency, return the mixture to the blender.
- Blend again until it is smooth and pourable, like a thick slushy or frozen cocktail.
- Pour the frozen Garibaldi into chilled serving glasses.
- Garnish each serving with a fresh orange wedge.
- Serve immediately to enjoy the refreshing, icy texture.
Notes
Read more about: Cracking the Code: Can Diabetics Safely Enjoy Watermelon? Your In-Depth Guide to Fruit and Blood Sugar Management
15. **Gourmet Dessert Trends**If you’ve been on the internet in the last decade, you’ve witnessed the rapid-fire emergence and equally swift disappearance of “gourmet dessert trends.” Remember the cupcake craze that swept the nation? Then came the gelato shops. And now, the spotlight shines brightly on giant gourmet cookies, boasting elaborate flavors and Instagram-worthy aesthetics. These dessert trends, friends, aren’t just fads; they’re a whole *lifestyle*.
The fascinating thing about these cycles is that they’re often less about the inherent deliciousness of the dessert itself, and more about the entire “experience.” Think about it: the adorable, often pastel-colored bakeries, the irresistible social media buzz, the thrill of novelty, and the joy of sharing a visually stunning treat online. These trends are perfectly crafted for the digital age, where food isn’t just sustenance; it’s content, designed to be seen, liked, and shared.
But here’s the kicker: the internet moves at warp speed, and so do its trends. What’s viral today is often old news tomorrow. The glitz and glamour, the initial rush of excitement that accompanies a new dessert obsession, inevitably wears off. Consumers, constantly seeking the next big thing, quickly move on, leaving behind a trail of once-bustling cupcake shops or gelato parlors. The demand for novelty is insatiable, and the culinary world is more than happy to oblige.
So, while gourmet cookies might be today’s darling, gracing every influencer’s feed and tempting us from shiny bakery windows, don’t expect them to reign forever. They are simply another delicious chapter in the ever-unfolding story of cyclical dessert trends. This phenomenon perfectly captures the “fleeting nature of internet fads” and how our collective sweet tooth is constantly chasing the newest, most shareable indulgence, ensuring that the dessert landscape is always evolving, always surprising, and always ready for its next big moment.
Product on Amazon: Gulluoglu Dubai Chocolate Filling – 200g 7oz Pistachio Cream with Crispy Kadayif | Middle Eastern Gourmet Dessert Best Ingredient For Dubai Chocolate | Rich, Crunchy & Decadent Treat
Brand: Baklavaci güllüoglu
Binding: Product Group: Grocery
Price: 14.99 USD
Rating: 3.9 Total reviews: 113
Package Information: Jar
Number of Items: 1
Flavor: Pistachio , Kadayif
Item Weight: 7 Ounces
Features:
1. 🔸 Premium Ingredients for a Gourmet Experience – Güllüoğlu combines high-quality pistachios, delicate kadayıf (crispy shredded phyllo), and a rich, creamy base to create an irresistible texture and flavor. No artificial flavors or preservatives—just pure, decadent sweetness..
2. 🔸 Versatile Dessert Ingredient or Standalone Treat – Use it as a filling for homemade chocolate bars, pastries, and crepes, or spread it on toast and pancakes. Perfect for baklava-style desserts or enjoying by the spoonful. The crispy and creamy combo adds a gourmet touch to any dish..
3. 🔸 Convenient 7oz Jar – Freshness Sealed – Elegantly packaged in a 7oz (200g) jar, this pistachio-kataifi blend stays fresh and flavorful. Great for gifting, sharing, or keeping in your pantry as your secret ingredient for next-level desserts..
4. 🔸 From the Legendary Güllüoğlu Heritage – With roots dating back generations, Güllüoğlu brings traditional Turkish craftsmanship into modern dessert culture. This pistachio filling merges Middle Eastern elegance with viral dessert trends—one bite, and you’re hooked..
Shopping on Amazon >>
Read more about: You Won’t Believe These Wild Food Trends Went Viral on TikTok in 2025
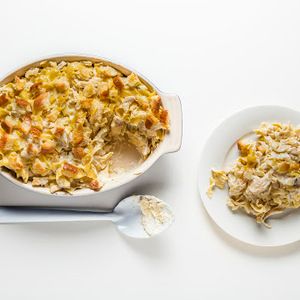
16. **Tuna Casserole**For Post-WWII America, tuna casserole wasn’t just a meal; it was a culinary institution. Affordable, hearty, and brilliantly constructed on canned staples like tuna, cream of mushroom soup, and often topped with crushed potato chips or breadcrumbs, it was the quintessential “dump and bake” dish. It stretched a family’s finances and provided comforting sustenance, requiring minimal culinary skill, making it a beloved staple in homes across the nation.
This creamy, comforting concoction embodied the spirit of thrift and convenience that defined the mid-century American kitchen. It was easy to assemble, baked in a single dish, and offered a reliable way to feed a family, especially when fresh ingredients were scarce or expensive. The combination of savory and creamy textures, often with a crunchy topping, made it a satisfying and familiar dish.
However, as the decades rolled on, culinary tastes evolved, and the humble tuna casserole began to seem, well, a bit passé. The reliance on canned-soup casseroles, once a symbol of ingenuity, now felt dated and less aligned with a growing preference for “fresher” and more “modern” ingredients. The artificial flavors and high sodium content of many canned soups became a point of contention for health-conscious consumers.
Adding insult to injury, two contemporary factors have further hastened its decline. First, increasing awareness of mercury levels in tuna has led some to reduce their consumption of the fish. Second, and perhaps more hilariously, the rise of newer generations (looking at you, millennials!) who often don’t even own can openers has subtly undermined the dish’s core convenience factor. So, while it was once ubiquitous, this cozy classic is definitely on its way out, a victim of changing tastes, health concerns, and even evolving kitchen gadgetry.
Product on Amazon: Stouffer’s Tuna Noodle Casserole Frozen Meal
Brand: Stouffer’s
Binding: Grocery Product Group: Amazon Fresh Perishables
Price: 0.25 USD
Rating: 4.3 Total reviews: 1855
Package Information: Box
Number of Items: 1
Flavor: Tuna
Item Weight: 12 Ounces
Features:
1. DELICIOUS BITES FOR SOLO NIGHTS You’ll love every bite of Stouffer’s single serve Tuna Noodle Casserole. Make dinnertime a joyful moment with homestyle food SNAP and EBT Eligible item
2. CRAFTED WITH QUALITY YOU CAN TASTE Stouffer’s tuna noodle casserole is thoughtfully crafted with flavorful, quality ingredients, made with freshly made egg noodles, tuna, mushrooms, celery & peas in a creamy sauce
3. SOLVE DINNER DREAD When the recipe has 20 ingredients and the clock strikes dinner, think Stouffer’s. Whether you’re looking for after-work dinner ideas, or you need some easy comfort food, this tuna noodle casserole is the perfect way to solve your ‘what’s for dinner?’ dilemma
4. SINGLE PORTION Take boring and bland foods off the table with our single serve tuna casserole. It’s a dish you can look forward to on any night of the week
5. COOK IN THE OVEN OR MICROWAVE Bake the tuna casserole in the oven for 45 minutes, or cook it in the microwave for 7 minutes
Shopping on Amazon >>
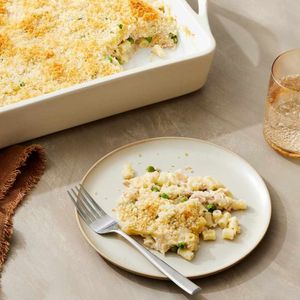
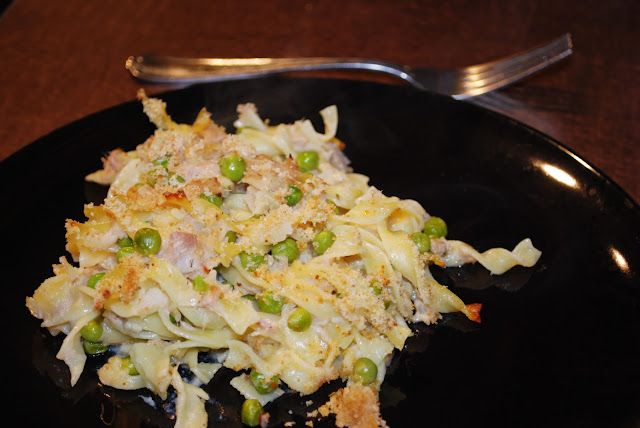
Tuna Casserole
Ingredients
Equipment
Method
- Preheat oven to 375°F (190°C). Lightly grease a 9×13 inch baking dish.
- Bring a large pot of salted water to a boil. Cook macaroni until al dente, according to package directions; drain and set aside.
- In a small bowl, combine panko, grated Parmesan, and 2 teaspoons extra-virgin olive oil; set aside.
- In a large skillet or Dutch oven, heat 2 tablespoons extra-virgin olive oil over medium heat. Sauté diced yellow onion until softened, about 5-7 minutes.
- Stir in all-purpose flour and cook, stirring constantly, for 1-2 minutes to create a roux.
- Gradually whisk in low-sodium chicken broth and whole milk until smooth. Bring to a gentle simmer, stirring, until the sauce thickens. Season with coarse salt and ground pepper.
- Remove the skillet from heat. Stir in the drained, flaked tuna and thawed frozen peas.
- Add the cooked macaroni to the sauce mixture, stirring gently to combine all ingredients evenly.
- Pour the casserole mixture into the prepared baking dish. Sprinkle the panko-Parmesan topping evenly over the surface.
- Bake for 25-30 minutes, or until the casserole is bubbly and the topping is golden brown. Let rest for a few minutes before serving.
Notes
Read more about: Craving Crispy? Fans Crown These 15 Grocery Stores with the Best Fried Chicken!
And there you have it: sixteen formerly beloved foods that fell out of fashion. All of them have stories not only about shifting tastes, but about technology, health trends, and what we consider convenience. What’s particularly interesting is the reminder that yesterday’s favorites may turn into tomorrow’s jokes. Perhaps in 20 years we will be looking back at avocado toast or oat milk lattes the way that now we laugh at Jell-O molds. Only time (and taste buds) will tell.


